Thursday, 14 February 2013

When it all goes wrong!

It's that time of year again, (no not Valentines day). Students have finally realised that they have assignments to do and are finally testing and writing code!

So far today I've had 12 email (and this week about 30) with problems and errors, so I've decided to collate as much wisdom and help as I can here which hopefully will help not only you but also me!

This post is intentionally sarcastic and not aimed at anyone in particular!

RTFEM

A lot of the time the errors are quite easy to spot but you get the blind panic of it not working, first thing you should do is "read the (fine) error message".

In the following example
src/GLWindow.cpp: In member function 'void GLWindow::persp(GLWindow::MODE)':
src/GLWindow.cpp:256: error: expected ',' or ';' before 'm_transformStack'
make: *** [obj/GLWindow.o] Error 1
In this case we can read that there is an error in the file src/GLWindow.cpp at line 256 so I would suggest looking there!

As I'm using (and most of you are) QtCreator we only have to double click on the error message to goto the error. Even better it also underlines it in red! (BTW green underlined usually indicates unused variables so we can remove them as well) and yes in this case I've missed a ;

Now some errors are not as obvious and I will add a list of the common ones as I get sent them at the bottom of this post. 

Different Error types

It is important to differentiate between error types.  We can roughly split the errors into three categories.
  1. Compilation errors
  2. Linker errors
  3. Runtime errors
Compilation errors are the most common and may be due to many different factors, some can be due to a missing header / include such as
src/main.cpp: In function 'int main(int, char**)':
src/main.cpp:11: error: 'MainWindow' was not declared in this scope
src/main.cpp:11: error: expected `;' before 'w'
src/main.cpp:13: error: 'w' was not declared in this scope
make: *** [obj/main.o] Error 1
In this case we are just missing the #include "MainWindow.h" but the error seems worse, the clue is the "not declared in this scope" which should give you a hint that the compiler doesn't know about something. Another error along the same lines is the following
int main()
{
  std::cout<<"hello world\n";
}
In this case we get the error
1.cpp: In function 'int main()':
1.cpp:3: error: 'cout' is not a member of 'std'
Just because we are missing the #include <iostream>. When you do get these errors this is a good resource for finding out what has gone wrong as is this

Linker errors are harder to find but usually are due to the fact that you don't have the correct libraries installed, the also seem much more scary as they seem to go on forever in some cases

For example the following
clang++ -Wall -g ClearScreen.cpp -o ClearScreen `sdl-config --cflags`
Undefined symbols for architecture x86_64:
  "_SDL_FillRect", referenced from:
      clearScreen(SDL_Surface*, char, char, char) in ClearScreen-vFrFBN.o
  "_SDL_Flip", referenced from:
      clearScreen(SDL_Surface*, char, char, char) in ClearScreen-vFrFBN.o
  "_SDL_Init", referenced from:
      _SDL_main in ClearScreen-vFrFBN.o
  "_SDL_MapRGB", referenced from:
      clearScreen(SDL_Surface*, char, char, char) in ClearScreen-vFrFBN.o
  "_SDL_PollEvent", referenced from:
      _SDL_main in ClearScreen-vFrFBN.o
  "_SDL_Quit", referenced from:
      _SDL_main in ClearScreen-vFrFBN.o
  "_SDL_SetVideoMode", referenced from:
      _SDL_main in ClearScreen-vFrFBN.o
  "_SDL_WM_SetCaption", referenced from:
      _SDL_main in ClearScreen-vFrFBN.o
  "_main", referenced from:
     -u command line option
     (maybe you meant: _SDL_main)
ld: symbol(s) not found for architecture x86_64
clang: error: linker command failed with exit code 1 (use -v to see invocation)
This is due to the fact that the compiler is not using the SDL libs flags "-L/usr/local/lib -lSDLmain -lSDL" Once these are added it usually fixes things. One of the most difficult problems you will encounter is finding which function lives in which lib, again you can google. Or I have a handy shell script
#!/bin/bash
for f in *.a *.so *.dylib
do
  echo "checking for $1 in - $f"
  strings $f | grep $1
done
Which using checkLib.sh glVertex in the directory /usr/lib/ gives
checkLib.sh glVertex | more
checking for glVertex in - libGLEW.a
glVertexAttrib1dNV
glVertexAttrib1dvNV
glVertexAttrib1fNV
glVertexAttrib1fvNV
....
Runtime errors are usually created when we cant find the dynamic libs we need to link to, for example
dyld: Library not loaded: libNGL.1.0.0.dylib
  Referenced from: /Volumes/home/jmacey/teaching/NGL5Demos/SimpleNGL/./SimpleNGL
  Reason: image not found
Trace/BPT trap: 5
Means that the LD_LIBRARY_PATH (actually DYLD on mac) has not been set for the NGL lib (see here)

If in doubt make clean

Sometimes things get out of sync and dependancies are not re-read. The simplest solution is to do a qmake; make clean ; make;l

In QtCreator this is the same as doing a re-build all. You will be surprised how often this solves things (usually to deps not being updated)

Still Stuck do this

If you need to send me some errors, please don't do this 
Yes that is an iPhone photo of the error message on my monitor, yes I have had this mailed to me before, and no I can't figure out what is wrong! My eyesight used to be that good but not anymore!

This is not much better
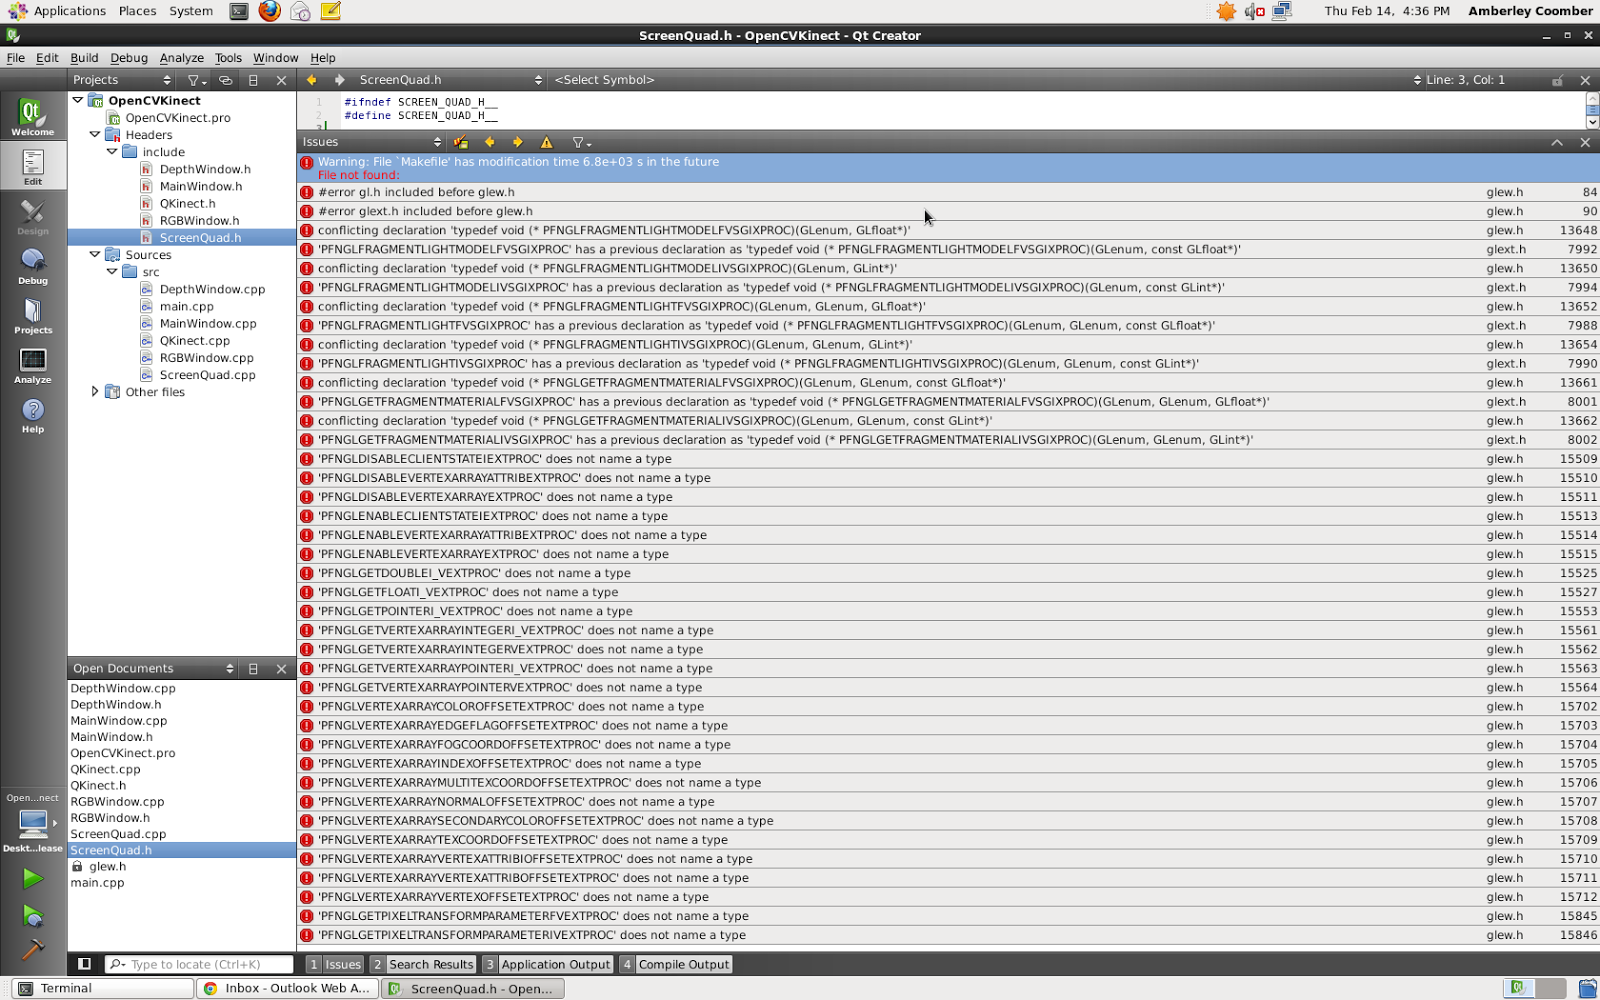
Yes I can see the errors in this one but it still doesn't help much, I really need to see the compiler output / flags as well as the error messages (these are on different tabs on Qt).

The easiest way of sending me errors etc is via plain ASCII text (I'm old fashioned like that ;-) To do this will require a little typing.

cd [your project root]
make &>err.txt

If you do this in the root of the project where the makefile is it will run make and output all of the errors to the file err.txt. Mail it to me as this will then help me to find the errors.

Send me the code

If I ask you to send me the code, I only need the source and other files not the .o and exe. The easiest way of sending this to me is as follows

cd [your project root]
make distclean
cd ..
tar vfcz code.tgz [your project root]

Then mail me the code, it also helps if I have the following information
  • Operating System (and version if Mac or Linux)
  • Compiler used (use g++ -v or clang -v) 
  • Graphics Card Make Model and version of OpenGL drivers installed. 
  • Versions of any extra libs etc you may be using. 
A lot of the time this could be the cause of the problem, I will test all my code against Mac OSX (Mountain Lion) using

clang++ ( Apple clang version 4.0 (tags/Apple/clang-421.0.60) (based on LLVM 3.1svn) Target: x86_64-apple-darwin12.2.0 Thread model: posix)

and the lab build

clang++ -v clang version 3.2 (trunk 163783) Target: x86_64-unknown-linux-gnu Thread model: posix g++ -v Using built-in specs. Target: x86_64-redhat-linux Configured with: ../configure --prefix=/usr --mandir=/usr/share/man --infodir=/usr/share/info --with-bugurl=http://bugzilla.redhat.com/bugzilla --enable-bootstrap --enable-shared --enable-threads=posix --enable-checking=release --with-system-zlib --enable-__cxa_atexit --disable-libunwind-exceptions --enable-gnu-unique-object --enable-languages=c,c++,objc,obj-c++,java,fortran,ada --enable-java-awt=gtk --disable-dssi --with-java-home=/usr/lib/jvm/java-1.5.0-gcj-1.5.0.0/jre --enable-libgcj-multifile --enable-java-maintainer-mode --with-ecj-jar=/usr/share/java/eclipse-ecj.jar --disable-libjava-multilib --with-ppl --with-cloog --with-tune=generic --with-arch_32=i686 --build=x86_64-redhat-linux Thread model: posix gcc version 4.4.6 20120305 (Red Hat 4.4.6-4) (GCC)

Also make sure you have pulled the latest versions of any of my code using a bzr pull as I do bug fixes as they are reported (there will soon be a more official way of reporting this using the redmine system)

Some Common Errors (and Fixes)

I get quite a lot of common errors so I will try and list them here

GLEW Errors

If you get something like this
/usr/include/GL/glew.h:84:2: error: gl.h included before glew.h
#error gl.h included before glew.h
 ^
/usr/include/GL/glew.h:90:2: error: glext.h included before glew.h
#error glext.h included before glew.h
It is due to the GLEW libs not being included properly (you may also get lots of PFNGL..... errors as well) Some of the old versions of my .pro files have a subtle bug in them where the defines are not done correctly check the .pro file and make sure this is correct
linux-g++*{
            DEFINES += LINUX
            LIBS+= -lGLEW
}
linux-clang* {
              DEFINES += LINUX
              LIBS+= -lGLEW
}

xxx does not name a type

Errors such as include/GLWindow.h:50: error: ‘Vector’ in namespace ‘ngl’ does not name a type means that you have either not included the correct header or something is missing. In this case it is due to the fact that ngl::Vector has now been replaced with ngl::Vec3 so you will need to #include <ngl/Vec3.h> and also replace all versions of ngl::Vector with ngl::Vec3

Thursday, 24 January 2013

CA 1 Initial Design General Feedback

This is the general feedback for the CA1 Initial Design in addition to some of the comments here

Class Diagrams

A lot of the class diagrams didn't use standard UML format. This is quite important as I can then see a number of things about the class at a glance. There are more details in my lecture notes but these slides show the main things


I mentioned in a lot of the feedback that you need to show the multiplicity / associations of the classes. This can be done as shown

Associations and Containment

In a lot of the designs there are classes that show some sort of relation, however no mention of a container is shown in the attributes.
In this case we use a filled diamond and it always gives a multiplicity of 1 or 0 .. 1, this implies ownership and when the car is destroyed so it the Engine, this is broadly know as composition.


Aggregation differs from composition as it doesn’t necessarily imply ownership. This is usually implemented by containing a reference to another object where the lifetime is determined elsewhere.

Physics

Those of you that mentioned doing some form of physics need to look at two things. Once getting a time into your program. This can be done easily in Qt using the QTimer classes. There are several NGL demos that use this and you can see how in the code.

The other thing you will need to write is an integrator.  If you code is well designed this should be able to be replaced with different types. I suggest starting with a basic Euler integrator then progress to a more stable RK 4 integrator

If you are not writing your own Physics but need to do some basic physics for a game there are a number of solutions, the labs have both ODE and Bullet installed and there is already an ODE demo for NGL with a bullet one coming soon.

If you are doing a 2D game or a basic 2.5D platform I would suggest Box2D as it is much simpler and more suited to these style of game. 

L-Systems

If you are writing an L-System I would suggest reading "The algorithmic beauty of plants". For a general design I would suggest reading in your grammar rules from a text file (you get marks for this anyway). There is a basic parser framework in the lecture code here and you can use boost::tokenize to most of the hard work.

It is also important to only build the grammar up once and create the geometry and store it. As this is a recursive system the generation may be slow and adding in drawing will make this a really slow system once a few iterations are used. The system should only update when a parameter is changed and this should generate geometry to be drawn every frame and not the other way around.

Also start in 2D and generate a simple turtle class, this can later be upgraded to a 3D system once the basic system is working.

Flocking System

One of the hardest problems with a flocking system is managing the communication between the boids. All of the boids need to know where they are in the world as well as have some knowledge of each other.  It is possible to use a naive list and check each boid against the others however this will lead to an O(n^2) complexity and slow things down. 

For the initials test this will be ok, however it should be factored into the design that at some stage this may become a problem at a later stage.

To get the flock working initially start with the flock centre rule. If you add the position of all the boids and divide by the number of boids this will give you the centroid. You can then calculate the direction vector for the flock centre on a per boid basis.

The other basic rules can then be added. It is also a good idea to add a weight to each of the rules and see the different effects. This can be loaded in a text file (or using a GUI) .

Next Steps

You should have a basic design, re-visit it based on the comments above and see what is missing. Once you have done this you should start to write the classes. I usually create the basic classes so they can be instantiated and connected together. Once this is done start adding the functionality as required.

For a more in detail step by step guide look as the examples from last year here note that some of the data types from these examples have changed but the principles are still the same.

Good luck and if you have any more questions ask me in the lab.

Jon

Thursday, 13 December 2012

Creating a local cmake library install

In one of my previous posts I talked about how to install your own versions of a library when you don't have root access.

In this post I will show you how to install a cmake style project in the same way.

For this example I'm going to use alembic as the target library to build and it will be installed in the directory $(HOME)/

First we will download the alembic source

hg clone https://code.google.com/p/alembic/
cd alembic
Now we need to configure cmake to use the correct path for our local install this is done with the -DCMAKE_INSTALL_PREFIX:PATH= command as follows where the = is followed by where you want to install alembic
cmake -DCMAKE_INSTALL_PREFIX:PATH=/home/jmacey/
make -j 4
make install
In the case of the current version of Alembic this will install to the directory alembic-1.1.2

Testing

A simple test program to read alembic files from the command line and write out the contents has been created as follows
#include <Alembic/AbcGeom/All.h>
#include <Alembic/AbcCoreAbstract/All.h>
#include <Alembic/AbcCoreHDF5/All.h>
#include <Alembic/Abc/ErrorHandler.h>
#include <iostream>
#include <cstdlib>


using namespace Alembic::AbcGeom; // Contains Abc, AbcCoreAbstract


int main(int argc, char **argv)
{
  if(argc <2 )
  {
    std::cerr <<"usage Alembic [filename]\n";
    exit(EXIT_FAILURE);
  }

  IArchive  archive( Alembic::AbcCoreHDF5::ReadArchive(),
                          argv[1] );


  std::cout<<"traversing archive for elements\n";
  IObject obj=archive.getTop();
  unsigned int numChildren=obj.getNumChildren();
  std::cout<< "found "<<numChildren<<" children in file\n";

  for(int i=0; i<numChildren; ++i)
  {
    std::cout<<obj.getChildHeader(i).getFullName()<<"\n";
    IObject child(obj,obj.getChildHeader(i).getName());

    std::cout<<"Children "<<child.getNumChildren()<<"\n";
    const MetaData &md = child.getMetaData();
    std::cout<<md.serialize() <<"\n";

    for(int x=0; x<child.getNumChildren(); x++)
    {
      IObject child2(child,child.getChildHeader(x).getName());
      const MetaData &md2 = child2.getMetaData();
      if( IPolyMeshSchema::matches( md2 ) || ISubDSchema::matches( md2 ))
      {
        std::cout<<"Found a mesh "<<child2.getName()<<"\n";

      }
    }
  }

  return EXIT_SUCCESS;
}
To compile this I have created a QMAKE project which sets the paths to point to the correct install of alembic
TARGET=Alembic
DESTDIR=./
CONFIG += console
CONFIG -= app_bundle

SOURCES+=read.cpp
INCLUDEPATH+=/home/jmacey/alembic-1.1.2/include/
INCLUDEPATH+=/usr/local/include/OpenEXR

ALEMBIC_DIR=/home/jmacey/alembic-1.1.2
ALEMBIC_LIB=/home/jmacey/alembic-1.1.2/lib/static

LIBS+= -L$$ALEMBIC_LIB
LIBS+= -lAbcWFObjConvert
LIBS+= -lAlembicAbcCollection
LIBS+= -lAlembicAbcCoreHDF5
LIBS+= -lAlembicAbc
LIBS+= -lAlembicAbcCoreAbstract
LIBS+= -lAlembicAbcGeom
LIBS+= -lAlembicUtil

LIBS+=-lImath
LIBS+=-lHalf
LIBS+=-lIex
LIBS+=-lhdf5
LIBS+=-lhdf5_hl
In the university labs most of these libs will be in the paths but you will need to change the ALEMBIC_DIR to the correct path for your install. Finally the LD_LIBRARY_PATH needed to be amended to point to the correct OpenEXR files by adding the following export LD_LIBRARY_PATH=$LD_LIBRARY_PATH:/usr/local/lib/ to my .bashrc, this may not be needed on your own versions.

Thursday, 29 November 2012

Using NGL with SDL

SDL is a very good library for games development and very useful for cross platform development. In this post I will explain how to install and configure SDL 2.0 (HG) for use with OpenGL and my NGL:: library. The source code can be downloaded using bzr branch http://nccastaff.bournemouth.ac.uk/jmacey/Code/SDLNGL from here

SDL installation

The latest version of SDL handles creating "core profile" OpenGL contexts on mac so this will be required. Earlier version of SDL will not work as they do not support the creation of the correct context for OpenGL under the mac. I decided to do a local install of SDL and if you wish to use this in the Labs at the University you will have to do the same thing as you don't have root permission to install the libs. The process of installation is similar to the one outlined here and I'm going to install the libraries in a directory called $(HOME)/SDL2.0 this is important as the makefile will also use this location to find the sdl2-config script at a later date.

The following commands will download and install the libraries and build it into the correct directory.
mkdir SDL2.0
tar vfxz SDL-2.0.tar.gz 
cd SDL-2.0.0-6673/
./configure --prefix=/home/jmacey/SDL2.0 (change to your home dir)
make -j 8
make install
This will install everything into the SDL2 directory and you will have a structure like this
bin include lib share
To test this is working do the following
cd ~/SDL2.0/bin
./sdl2-config --cflags --libs
-I/Volumes/home/jmacey/SDL2.0/include/SDL2 -D_THREAD_SAFE
-L/Volumes/home/jmacey/SDL2.0/lib -lSDL2

SDL NGL Demo

The demo is split into two main modules. The main.cpp file will create the SDL and OpenGL context, and handle the processing of events. The NGLDraw class will contain all OpenGL setup and drawing routines.

Setup and basic SDL

To use SDL we need to include the <SDL.h> header, this will be placed in the path by the following command in the Qt .pro file.
QMAKE_CXXFLAGS+=$$system($$(HOME)/SDL2.0/bin/sdl2-config  --cflags)
message(output from sdl2-config --cflags added to CXXFLAGS= $$QMAKE_CXXFLAGS)

LIBS+=$$system($$(HOME)/SDL2.0/bin/sdl2-config  --libs)
message(output from sdl2-config --libs added to LIB=$$LIBS)
For more info see this post

First we need to initialise the SDL video subsystem using the following command

// Initialize SDL's Video subsystem
if (SDL_Init(SDL_INIT_VIDEO) < 0 )
{
  // Or die on error
  SDLErrorExit("Unable to initialize SDL");
}
There is also a helper function to exit SDL gracefully
void SDLErrorExit(const std::string &_msg)
{
  std::cerr<<_msg<<"\n";
  std::cerr<<SDL_GetError()<<"\n";
  SDL_Quit();
  exit(EXIT_FAILURE);
}
Next we create the basic window, in this case I get the size of the screen and configure the screen to be centred and half max screen width and height
// now get the size of the display and create a window we need to init the video
SDL_Rect rect;
SDL_GetDisplayBounds(0,&rect);
// now create our window
SDL_Window *window=SDL_CreateWindow("SDLNGL",SDL_WINDOWPOS_CENTERED,SDL_WINDOWPOS_CENTERED,
                         rect.w/2,rect.h/2,
                         SDL_WINDOW_OPENGL | SDL_WINDOW_RESIZABLE);
// check to see if that worked or exit
if (!window)
{
 SDLErrorExit("Unable to create window"); 
}

Creating an OpenGL context

SDL 2.0 uses a SDL_GLContext to hold the information about the current GL context. There are many flags we need to setup our context and these are handled using the SDL_GL_SetAttribute function. I've also discovered on my linux build that some of these flags don't work and cause crashes (particularly creating a core profile context). To overcome this conditional compilation is used as shown in the following function.

SDL_GLContext createOpenGLContext(SDL_Window *window)
{
  // Request an opengl 3.2 context first we setup our attributes, if you need any
  // more just add them here before the call to create the context
  // SDL doesn't have the ability to choose which profile at this time of writing,
  // but it should default to the core profile
  // for some reason we need this for mac but linux crashes on the latest nvidia drivers
  // under centos
  #ifdef DARWIN
    SDL_GL_SetAttribute(SDL_GL_CONTEXT_MAJOR_VERSION, 3);
    SDL_GL_SetAttribute(SDL_GL_CONTEXT_MINOR_VERSION, 2);
    SDL_GL_SetAttribute(SDL_GL_CONTEXT_PROFILE_MASK, SDL_GL_CONTEXT_PROFILE_CORE);
    SDL_GL_SetAttribute(SDL_GL_ACCELERATED_VISUAL, 1);
  #endif
  // set multi sampling else we get really bad graphics that alias
  SDL_GL_SetAttribute(SDL_GL_MULTISAMPLEBUFFERS, 1);
  SDL_GL_SetAttribute(SDL_GL_MULTISAMPLESAMPLES,4);
  // Turn on double buffering with a 24bit Z buffer.
  // You may need to change this to 16 or 32 for your system
  // on mac up to 32 will work but under linux centos build only 16
  SDL_GL_SetAttribute(SDL_GL_DEPTH_SIZE, 16);
  // enable double buffering (should be on by default)
  SDL_GL_SetAttribute(SDL_GL_DOUBLEBUFFER, 1);
  //
  return SDL_GL_CreateContext(window);

}
Care must be taken with setting the depth size, under mac osx it works with 32 bit, under linux I set to 16 and on some machines 24 will work. The following code configures the GL context and clears the screen.
SDL_GLContext glContext=createOpenGLContext(window);
if(!glContext)
{
 SDLErrorExit("Problem creating OpenGL context");
}
// make this our current GL context (we can have more than one window but in this case not)
SDL_GL_MakeCurrent(window, glContext);
/* This makes our buffer swap syncronized with the monitor's vertical refresh */
SDL_GL_SetSwapInterval(1);
// now clear the screen and swap whilst NGL inits (which may take time)
glClear(GL_COLOR_BUFFER_BIT);
SDL_GL_SwapWindow(window);
Now this has been done we can use NGL and create our graphics. In this case the NGLDraw class is a re-working of the SimpleNGL demo, it initialises GLEW if required. The following code shows the creation of the NGLDraw class and the key and mouse processing.
NGLDraw ngl;
// resize the ngl to set the screen size and camera stuff
ngl.resize(rect.w,rect.h);
while(!quit)
{

 while ( SDL_PollEvent(&event) )
 {
  switch (event.type)
  {
   // this is the window x being clicked.
   case SDL_QUIT : quit = true; break;
   // process the mouse data by passing it to ngl class
   case SDL_MOUSEMOTION : ngl.mouseMoveEvent(event.motion); break;
   case SDL_MOUSEBUTTONDOWN : ngl.mousePressEvent(event.button); break;
   case SDL_MOUSEBUTTONUP : ngl.mouseReleaseEvent(event.button); break;
   case SDL_MOUSEWHEEL : ngl.wheelEvent(event.wheel);
   // if the window is re-sized pass it to the ngl class to change gl viewport
   // note this is slow as the context is re-create by SDL each time
   case SDL_WINDOWEVENT :
    int w,h;
    // get the new window size
    SDL_GetWindowSize(window,&w,&h);
    ngl.resize(w,h);
   break;

   // now we look for a keydown event
   case SDL_KEYDOWN:
   {
    switch( event.key.keysym.sym )
    {
     // if it's the escape key quit
     case SDLK_ESCAPE :  quit = true; break;
     case SDLK_w : glPolygonMode(GL_FRONT_AND_BACK,GL_LINE); break;
     case SDLK_s : glPolygonMode(GL_FRONT_AND_BACK,GL_FILL); break;
     case SDLK_f :
     SDL_SetWindowFullscreen(window,SDL_TRUE);
     glViewport(0,0,rect.w,rect.h);
     break;

     case SDLK_g : SDL_SetWindowFullscreen(window,SDL_FALSE); break;
     default : break;
    } // end of key process
   } // end of keydown

   default : break;
  } // end of event switch
 } // end of poll events

 // now we draw ngl
 ngl.draw();
 // swap the buffers
 SDL_GL_SwapWindow(window);

}
The most important call here is the SDL_GL_SwapWindow call which tells SDL to swap the buffers and re-draw.

NGLDraw class 

Most of the NGLDraw class is basic ngl code,  the constructor is used to initialise ngl and create the camera, light and materials.  The draw method grabs and instance of the primitives class and draws the teapot, both of which are similar to the Qt NGL demos. The main difference is the processing of the mouse input. I still use the same flags and attributes to store the rotations and position data, however the SDL mouse data is used to grab x,y and button values. This is shown in the following code.
void NGLDraw::mouseMoveEvent (const SDL_MouseMotionEvent &_event)
{
  if(m_rotate && _event.state &SDL_BUTTON_LMASK)
  {
    int diffx=_event.x-m_origX;
    int diffy=_event.y-m_origY;
    m_spinXFace += (float) 0.5f * diffy;
    m_spinYFace += (float) 0.5f * diffx;
    m_origX = _event.x;
    m_origY = _event.y;
    this->draw();

  }
  // right mouse translate code
  else if(m_translate && _event.state &SDL_BUTTON_RMASK)
  {
    int diffX = (int)(_event.x - m_origXPos);
    int diffY = (int)(_event.y - m_origYPos);
    m_origXPos=_event.x;
    m_origYPos=_event.y;
    m_modelPos.m_x += INCREMENT * diffX;
    m_modelPos.m_y -= INCREMENT * diffY;
    this->draw();
  }
}


void NGLDraw::mousePressEvent (const SDL_MouseButtonEvent &_event)
{
  // this method is called when the mouse button is pressed in this case we
  // store the value where the maouse was clicked (x,y) and set the Rotate flag to true
  if(_event.button == SDL_BUTTON_LEFT)
  {
    m_origX = _event.x;
    m_origY = _event.y;
    m_rotate =true;
  }
  // right mouse translate mode
  else if(_event.button == SDL_BUTTON_RIGHT)
  {
    m_origXPos = _event.x;
    m_origYPos = _event.y;
    m_translate=true;
  }
}

void NGLDraw::mouseReleaseEvent (const SDL_MouseButtonEvent &_event)
{
  // this event is called when the mouse button is released
  // we then set Rotate to false
  if (_event.button == SDL_BUTTON_LEFT)
  {
    m_rotate=false;
  }
  // right mouse translate mode
  if (_event.button == SDL_BUTTON_RIGHT)
  {
    m_translate=false;
  }
}

void NGLDraw::wheelEvent(const SDL_MouseWheelEvent &_event)
{

  // check the diff of the wheel position (0 means no change)
  if(_event.y > 0)
  {
    m_modelPos.m_z+=ZOOM;
    this->draw();
  }
  else if(_event.y <0 )
  {
    m_modelPos.m_z-=ZOOM;
    this->draw();
  }

  // check the diff of the wheel position (0 means no change)
  if(_event.x > 0)
  {
    m_modelPos.m_x-=ZOOM;
    this->draw();
  }
  else if(_event.x <0 )
  {
    m_modelPos.m_x+=ZOOM;
    this->draw();
  }
}
The rest of the code is fairly self explanatory if you've use NGL before.

Thursday, 22 November 2012

Libraries, Include paths and other Linux fun

I've been getting a few mails about installing libraries on the Lab machines and also where to find certain things. This post will explain a few things about how to setup your build environment to allow you to install different libs in your home directories and use them your self. It will also help people who wish to install / setup a build environment when you don't have root on the machine you are using.

Getting Started

First are you sure the library is not installed? On the lab centos machine we have installed most libraries you may need for doing computer graphics work. You can list the currently installed libs by using the ldconfig -p command. If you feed this into grep you can filter the results. For example to search for the location of the iMath library we can do the following

ldconfig -p | grep -i imath
libImath.so.6 (libc6,x86-64) => /usr/lib64/libImath.so.6

You can see the path of the library from this ( /usr/lib64 ) and this can be added to the link path using the -L command on the compiler (more on this later).

If this doesn't find what you are looking for, the package may not be a dynamic library. We can search for static libs using the locate command as follows

locate libode
/usr/local/lib/libode.a
/usr/local/lib/libode.la

If you can confirm that the library is installed the next thing is to find the headers,  again we can use the locate command. The following will find a specific header file (usually we will get a compile message saying can't find xxx.h).

locate ImathColor.h
/opt/autodesk/maya2012-x64/devkit/Alembic/include/AlembicPrivate/OpenEXR/ImathColor.h
/opt/hfs12.1.77/toolkit/include/OpenEXR/ImathColor.h
/usr/local/include/OpenEXR/ImathColor.h
/usr/local/include/OpenEXR/PyImathColor.h
You will see that in this case it is in several locations as some of the packages installed have included it. It is best to always use the /usr paths as these will correspond to the installed libraries. In this case we can add the include path -I/usr/local/include/

Setting things in Qt Creator

Qt creator uses qmake to configure the projects and the project locations. In particular there are two flags we need to set  to add  libraries and include paths as follows.

INCLUDEPATH+=/usr/local/include/collada-dom2.4/
LIBS+=-L/usr/lib   -lcolladadom150
Using the += option we can concatenate to the INCLUDEPATH keyword and absolute path to search for the libs, this will be translated to a -I flag in the compiler command line. The LIBS flag is passed verbatim to the linker so we need to use the correct commands in this case we use -L to indicate a library search path and -l for the library to be included. Note that the -l flag ignores the prefix lib and the postfix .so.x.x etc.

Once this is done your projects should be fine to run. You can also build and include libs in your own directories and link them using the project paths similar to above. If the lib created is a .a file it is a static lib it will be included in the build of the program. If you are linking to a dynamic lib (.so) you will need to tell the runtime linker where to find the library by setting the LD_LIBRARY_PATH environment variable (this is how the NGL lib is  configured).

An Example

This example will show how to install a source package in a custom location (your home dir) using a typical automake style project found in most linux source packages. 

First I'm going to download the ode source and extract it.
wget http://sourceforge.net/projects/opende/files/latest/download?source=files
tar vfxj ode-0.12.tar.bz2 
cd ode-0.12
Typically now you would run ./configure; make; sudo make install; however as most users do not have access to sudo this will not work as the install will attempt to write files in the /usr file system which you don't have permission to. Instead we can ask the configure script to use another custom location which we do have permission to. In this case I'm going to use /home/jmacey/myOde as follows
./configure --prefix /home/jmacey/myOde
make
make install
The install will now place all the files in the directory $(HOME)/myOde and we can adjust our build paths accordingly, the following list shows what has been installed.
find .
.
./include
./include/ode
./include/ode/error.h
./include/ode/odeconfig.h
./include/ode/timer.h
./include/ode/odemath.h
./include/ode/contact.h
./include/ode/odeinit.h
./include/ode/rotation.h
./include/ode/memory.h
./include/ode/collision.h
./include/ode/objects.h
./include/ode/collision_space.h
./include/ode/collision_trimesh.h
./include/ode/compatibility.h
./include/ode/common.h
./include/ode/mass.h
./include/ode/ode.h
./include/ode/export-dif.h
./include/ode/odemath_legacy.h
./include/ode/odecpp.h
./include/ode/matrix.h
./include/ode/misc.h
./include/ode/odecpp_collision.h
./lib
./lib/libode.la
./lib/pkgconfig
./lib/pkgconfig/ode.pc
./lib/libode.a
./bin
./bin/ode-config

Monday, 12 November 2012

Sponza Demo Pt 3 The GroupedObj class

In the previous post I described the Mtl class. This video blog will show the design and ideas behind the the GroupedObj class as shown in the following diagram


You can get the code from here

Sponza Demo Pt 2 Mtl class

In the previous post I discussed the basic overview of the system this post will explain how the Mtl class works and how is was developed.

The mtl file has the following basic structure, where each element may or may not be present.

newmtl leaf
  Ns 10.0000
  Ni 1.5000
  d 1.0000
  Tr 0.0000
  Tf 1.0000 1.0000 1.0000
  illum 2
  Ka 0.5880 0.5880 0.5880
  Kd 0.5880 0.5880 0.5880
  Ks 0.0000 0.0000 0.0000
  Ke 0.0000 0.0000 0.0000
  map_Ka textures\sponza_thorn_diff.tga
  map_Kd textures\sponza_thorn_diff.tga
  map_d textures\sponza_thorn_mask.tga
  map_bump textures\sponza_thorn_ddn.tga
  bump textures\sponza_thorn_ddn.tga

The newmtl keyword is used to indicate that a new material is being specified and the rest of the elements are part of that material. To store this information I decided to use a std::map using a std::string as the key which will be the name following the newmtl (in the above example this is "leaf"). The map will then store the following structure.
typedef struct
{
  float Ns;
  float Ni;
  float d;
  float Tr;
  int illum;
  ngl::Vec3 Tf;
  ngl::Vec3 Ka;
  ngl::Vec3 Kd;
  ngl::Vec3 Ks;
  ngl::Vec3 Ke;
  std::string map_Ka;
  std::string map_Kd;
  std::string map_d;
  std::string map_bump;
  std::string bump;
  GLuint map_KaId;
  GLuint map_KdId;
  GLuint map_dId;
  GLuint map_bumpId;
  GLuint bumpId;
}mtlItem;
You will notice that this replicates the mtl format shown above and also have several extra items which have the extra postfix ID, these will be used to store the OpenGL texture ID's of the textures once loaded. I also made the design decision not to follow my usual coding standard for the structure as this would make it easier to follow what is happening in the mtl file.

Class functional design


The main elements of the class are shown in the following class diagram.
The main functional design of the Mtl class is split into two areas, first the loading and parsing of the original mtl file. This can either be done in the constructor or using the load method. Next is the actual use of the class data. To allow easy access to this data iterators have been exposed for the std::map as well as other methods. Finally we have the ability to save and load the data in a binary format to save the parse time of reading the original files.

Parsing the mtl file


As the structure of the mtl file is quite simple I decided a full blown parser was not required. Instead I decided to use the boost::tokenizer template to process the data.  The file is opened and the data read a line at a time. The tokenizer splits the data and looks for the keywords, which are then processed one at a time. This is shown in the following code.
  // this is the line we wish to parse
  std::string lineBuffer;
  // say which separators should be used in this
  // case Spaces, Tabs and return \ new line
  boost::char_separator<char> sep(" \t\r\n");
  // loop through the file
  while(!fileIn.eof())
  {
    // grab a line from the input
    getline(fileIn,lineBuffer,'\n');
    // make sure it's not an empty line
    if(lineBuffer.size() >1)
    {
      // now tokenize the line
      tokenizer tokens(lineBuffer, sep);
      // and get the first token
      tokenizer::iterator  firstWord = tokens.begin();
      // now see if it's a valid one and call the correct function
      if( *firstWord =="newmtl")
      {

        // add to our map it is possible that a badly formed file would not have an mtl
        // def first however this is so unlikely I can't be arsed to handle that case.
        // If it does crash it could be due to this code.
        //std::cout<<"found "<<m_currentName<<"\n";
        parseString(firstWord,m_currentName);
        m_current= new mtlItem;
        // These are the OpenGL texture ID's so set to zero first (for no texture)
        m_current->map_KaId=0;
        m_current->map_KdId=0;
        m_current->map_dId=0;
        m_current->map_bumpId=0;
        m_current->bumpId=0;

        m_materials[m_currentName]=m_current;
      }
      else if(*firstWord =="Ns")
      {
        parseFloat(firstWord,m_current->Ns);
      }
      else if(*firstWord =="Ni")
      {
        parseFloat(firstWord,m_current->Ni);
      }
      else if(*firstWord =="d")
      {
        parseFloat(firstWord,m_current->d);
      }
      else if(*firstWord =="Tr")
      {
        parseFloat(firstWord,m_current->Tr);
      }
      else if(*firstWord =="Tf")
      {
        parseVec3(firstWord,m_current->Tf);
      }
      else if(*firstWord =="illum")
      {
        parseInt(firstWord,m_current->illum);
      }
      else if(*firstWord =="Ka")
      {
        parseVec3(firstWord,m_current->Ka);
      }
      else if(*firstWord =="Kd")
      {
        parseVec3(firstWord,m_current->Kd);
      }
      else if(*firstWord =="Ks")
      {
        parseVec3(firstWord,m_current->Ks);
      }
      else if(*firstWord =="Ke")
      {
        parseVec3(firstWord,m_current->Ke);
      }

      else if(*firstWord == "map_Ka")
      {
        parseString(firstWord,m_current->map_Ka);
      }
      else if(*firstWord == "map_Kd")
      {
        parseString(firstWord,m_current->map_Kd);
      }
      else if(*firstWord == "map_d")
      {
        parseString(firstWord,m_current->map_d);
      }
      else if(*firstWord == "map_bump")
      {
        parseString(firstWord,m_current->map_bump);
      }
      else if(*firstWord == "bump")
      {
        parseString(firstWord,m_current->bump);
      }


   } // end zero line
 } // end while

// as the trigger for putting the meshes back is the newmtl we will always have a hanging one
// this adds it to the list
 m_materials[m_currentName]=m_current;

The individual parse functions then use the boost::lexical_cast template to convert the values as shown in the following example
void Mtl::parseFloat(tokenizer::iterator &_firstWord, float &io_f)
{
  // skip first token
    ++_firstWord;
    // use lexical cast to convert to float then increment the itor
    io_f=boost::lexical_cast<float>(*_firstWord++);
}

A Subtle Bug

On problem I had when initially using this system was that the texture files were not found when loading. It turned out that as this was a windows mtl  file it was using \ in the file names and I was running under mac osx and linux which expected /. To overcome this problem the filename paths are parsed and / converted to \ and visa-versa depending upon operating system.

void Mtl::parseString(tokenizer::iterator &_firstWord, std::string &io_s)
{
  ++_firstWord;
  // there is a chance that we have either windows or linux slashes
  // need to process file name for either
  io_s=*_firstWord;

  #ifdef WIN32
  std::replace(io_s.begin(), io_s.end(), '/', '\\');
  #else
    std::replace(io_s.begin(), io_s.end(), '\\', '/');
  #endif
}

Designing for efficiency

One of the many things to think about when designing the class is the efficiency of the data storage / texture usage. It is quite possible that the maps used are loaded by several materials and only the multipliers are changed.  To ensure that the data is not replicated, the textures are processed when loaded. First I step through each of the materials and load them into a std::list. then the std::list::unique method is called to remove any duplicates. Once this is done the textures are loaded and the ID's stored in a std::vector. Finally these are re-associated with the mtlItem data to store all the values.
void Mtl::loadTextures()
{
  m_textureID.clear();
  std::cout<<"loading textures this may take some time\n";
  // first loop and store all the texture names in the container
  std::list <std::string> names;
  std::map<std::string, mtlItem *>::const_iterator end=m_materials.end();
  std::map<std::string, mtlItem *>::const_iterator i = m_materials.begin();
  for( ; i != end; ++i )
  {
    if(i->second->map_Ka.size() !=0)
      names.push_back(i->second->map_Ka);
    if(i->second->map_Kd.size() !=0)
      names.push_back(i->second->map_Kd);
    if(i->second->map_d.size() !=0)
      names.push_back(i->second->map_d);
    if(i->second->map_bump.size() !=0)
      names.push_back(i->second->map_bump);
    if(i->second->map_bump.size() !=0)
      names.push_back(i->second->bump);
  }

  std::cout<<"we have this many textures "<<names.size()<<"\n";
  // now remove duplicates
  names.unique();
  std::cout<<"we have "<<names.size()<<" unique textures to load\n";
  // now we load the textures and get the GL id
  // now we associate the ID with the mtlItem

  BOOST_FOREACH(std::string name , names)
  {
    std::cout<<"loading texture "<<name<<"\n";
    ngl::Texture t(name);
    GLuint textureID=t.setTextureGL();
    m_textureID.push_back(textureID);
    std::cout<<"processing "<<name<<"\n";
    i=m_materials.begin();
    for( ; i != end; ++i )
    {
      if(i->second->map_Ka == name)
        i->second->map_KaId=textureID;
      if(i->second->map_Kd == name)
        i->second->map_KdId=textureID;
      if(i->second->map_d == name)
        i->second->map_dId=textureID;
      if(i->second->map_bump == name)
        i->second->map_bumpId=textureID;
      if(i->second->bump == name)
        i->second->bumpId=textureID;
    }
  }
  std::cout <<"done \n";
}

Serialisation

Whilst the parsing of the mtl file is relatively quick it was decided to allow for both binary read and write of the data. As there is a lot of text data to save the process is not quite as simple as it could be. For most of the data we need to determine the length of the string to write out then I write out the size of the string followed by the string data. I also decided to write out a unique ID for the file header so we can check that the file being loaded is the correct one.

The code to write the data is as follows

bool Mtl::saveBinary(const std::string &_fname) const
{
  std::ofstream fileOut;
  fileOut.open(_fname.c_str(),std::ios::out | std::ios::binary);
  if (!fileOut.is_open())
  {
    std::cout <<"File : "<<_fname<<" could not be written for output"<<std::endl;
    return false;
  }
  // write our own id into the file so we can check we have the correct type
  // when loading
  const std::string header("ngl::mtlbin");
  fileOut.write(header.c_str(),header.length());

  unsigned int size=m_materials.size();
  fileOut.write(reinterpret_cast<char *>(&size),sizeof(size));
  std::map<std::string, mtlItem *>::const_iterator start=m_materials.begin();
  std::map<std::string, mtlItem *>::const_iterator end=m_materials.end();
  for(; start!=end; ++start)
  {
    //std::cout<<"writing out "<<start->first<<"\n";
    // first write the length of the string
    size=start->first.length();
    fileOut.write(reinterpret_cast<char *>(&size),sizeof(size));
    // now the string
    fileOut.write(reinterpret_cast<const char *>(start->first.c_str()),size);
    // now we do the different data elements of the mtlItem.
    fileOut.write(reinterpret_cast<char *>(&start->second->Ns),sizeof(float));
    fileOut.write(reinterpret_cast<char *>(&start->second->Ni),sizeof(float));
    fileOut.write(reinterpret_cast<char *>(&start->second->d),sizeof(float));
    fileOut.write(reinterpret_cast<char *>(&start->second->Tr),sizeof(float));
    fileOut.write(reinterpret_cast<char *>(&start->second->illum),sizeof(int));

    fileOut.write(reinterpret_cast<char *>(&start->second->Tf),sizeof(ngl::Vec3));
    fileOut.write(reinterpret_cast<char *>(&start->second->Ka),sizeof(ngl::Vec3));
    fileOut.write(reinterpret_cast<char *>(&start->second->Kd),sizeof(ngl::Vec3));
    fileOut.write(reinterpret_cast<char *>(&start->second->Ks),sizeof(ngl::Vec3));
    fileOut.write(reinterpret_cast<char *>(&start->second->Ke),sizeof(ngl::Vec3));

    // first write the length of the string
    size=start->second->map_Ka.length();
    fileOut.write(reinterpret_cast<char *>(&size),sizeof(size));
    // now the string
    fileOut.write(reinterpret_cast<const char *>(start->second->map_Ka.c_str()),size);

    // first write the length of the string
    size=start->second->map_Kd.length();
    fileOut.write(reinterpret_cast<char *>(&size),sizeof(size));
    // now the string
    fileOut.write(reinterpret_cast<const char *>(start->second->map_Kd.c_str()),size);

    // first write the length of the string
    size=start->second->map_d.length();
    fileOut.write(reinterpret_cast<char *>(&size),sizeof(size));
    // now the string
    fileOut.write(reinterpret_cast<const char *>(start->second->map_d.c_str()),size);

    // first write the length of the string
    size=start->second->map_bump.length();
    fileOut.write(reinterpret_cast<char *>(&size),sizeof(size));
    // now the string
    fileOut.write(reinterpret_cast<const char *>(start->second->map_bump.c_str()),size);

    // first write the length of the string
    size=start->second->bump.length();
    fileOut.write(reinterpret_cast<char *>(&size),sizeof(size));
    // now the string
    fileOut.write(reinterpret_cast<const char *>(start->second->bump.c_str()),size);
  }


  fileOut.close();
  return true;
}
Loading in the data is almost the reverse of writing it, we first read in the header bytes and check to see if it is the correct file type then read in the data re-sizing the strings to we have enough room to read the data into it.
bool Mtl::loadBinary(const std::string &_fname)
{
  std::ifstream fileIn;
  fileIn.open(_fname.c_str(),std::ios::in | std::ios::binary);
  if (!fileIn.is_open())
  {
    std::cout <<"File : "<<_fname<<" could not be opened for reading"<<std::endl;
    return false;
  }
  // clear out what we already have.
  clear();
  unsigned int mapsize;


  char header[12];
  fileIn.read(header,11*sizeof(char));
  header[11]=0; // for strcmp we need \n
  // basically I used the magick string ngl::bin (I presume unique in files!) and
  // we test against it.
  if(strcmp(header,"ngl::mtlbin"))
  {
    // best close the file and exit
    fileIn.close();
    std::cout<<"this is not an ngl::mtlbin file "<<std::endl;
    return false;
  }


  fileIn.read(reinterpret_cast<char *>(&mapsize),sizeof(mapsize));
  unsigned int size;
  std::string materialName;
  std::string s;
  for(unsigned int i=0; i<mapsize; ++i)
  {
    mtlItem *item = new mtlItem;

    fileIn.read(reinterpret_cast<char *>(&size),sizeof(size));
    // now the string we first need to allocate space then copy in
    materialName.resize(size);
   fileIn.read(reinterpret_cast<char *>(&materialName[0]),size);
    // now we do the different data elements of the mtlItem.
   fileIn.read(reinterpret_cast<char *>(&item->Ns),sizeof(float));
   fileIn.read(reinterpret_cast<char *>(&item->Ni),sizeof(float));
   fileIn.read(reinterpret_cast<char *>(&item->d),sizeof(float));
   fileIn.read(reinterpret_cast<char *>(&item->Tr),sizeof(float));
   fileIn.read(reinterpret_cast<char *>(&item->illum),sizeof(int));

   fileIn.read(reinterpret_cast<char *>(&item->Tf),sizeof(ngl::Vec3));
   fileIn.read(reinterpret_cast<char *>(&item->Ka),sizeof(ngl::Vec3));
   fileIn.read(reinterpret_cast<char *>(&item->Kd),sizeof(ngl::Vec3));
   fileIn.read(reinterpret_cast<char *>(&item->Ks),sizeof(ngl::Vec3));
   fileIn.read(reinterpret_cast<char *>(&item->Ke),sizeof(ngl::Vec3));
  // more strings
   fileIn.read(reinterpret_cast<char *>(&size),sizeof(size));
   // now the string we first need to allocate space then copy in
   s.resize(size);
   fileIn.read(reinterpret_cast<char *>(&s[0]),size);
   item->map_Ka=s;

   fileIn.read(reinterpret_cast<char *>(&size),sizeof(size));
   // now the string we first need to allocate space then copy in
   s.resize(size);
   fileIn.read(reinterpret_cast<char *>(&s[0]),size);
   item->map_Kd=s;

   fileIn.read(reinterpret_cast<char *>(&size),sizeof(size));
   // now the string we first need to allocate space then copy in
   s.resize(size);
   fileIn.read(reinterpret_cast<char *>(&s[0]),size);
   item->map_d=s;

   fileIn.read(reinterpret_cast<char *>(&size),sizeof(size));
   // now the string we first need to allocate space then copy in
   s.resize(size);
   fileIn.read(reinterpret_cast<char *>(&s[0]),size);
   item->map_bump=s;

   fileIn.read(reinterpret_cast<char *>(&size),sizeof(size));
   // now the string we first need to allocate space then copy in
   s.resize(size);
   fileIn.read(reinterpret_cast<char *>(&s[0]),size);
   item->bump=s;

   m_materials[materialName]=item;
  }
  m_loadTextures=true;
  loadTextures();
  return true;
}

Using the class

It is quite easy to use the class as the following code demonstrates

Mtl *m_mtl = new Mtl("models/sponza.mtl",true);
m_mtl->saveBinary("sponzaMtl.bin");

bool loaded=m_mtl->loadBinary("sponzaMtl.bin");
if(loaded == false)
{
 std::cerr<<"error loading mtl file ";
 exit(EXIT_FAILURE);
}

m_mtl->debugPrint();

That is about it for the Mtl class, the next post will describe the design of the GroupedObj class.