Showing posts with label Qt Creator. Show all posts

Thursday, 22 November 2012

Libraries, Include paths and other Linux fun

I've been getting a few mails about installing libraries on the Lab machines and also where to find certain things. This post will explain a few things about how to setup your build environment to allow you to install different libs in your home directories and use them your self. It will also help people who wish to install / setup a build environment when you don't have root on the machine you are using.

Getting Started

First are you sure the library is not installed? On the lab centos machine we have installed most libraries you may need for doing computer graphics work. You can list the currently installed libs by using the ldconfig -p command. If you feed this into grep you can filter the results. For example to search for the location of the iMath library we can do the following

ldconfig -p | grep -i imath
libImath.so.6 (libc6,x86-64) => /usr/lib64/libImath.so.6

You can see the path of the library from this ( /usr/lib64 ) and this can be added to the link path using the -L command on the compiler (more on this later).

If this doesn't find what you are looking for, the package may not be a dynamic library. We can search for static libs using the locate command as follows

locate libode
/usr/local/lib/libode.a
/usr/local/lib/libode.la

If you can confirm that the library is installed the next thing is to find the headers,  again we can use the locate command. The following will find a specific header file (usually we will get a compile message saying can't find xxx.h).

locate ImathColor.h
/opt/autodesk/maya2012-x64/devkit/Alembic/include/AlembicPrivate/OpenEXR/ImathColor.h
/opt/hfs12.1.77/toolkit/include/OpenEXR/ImathColor.h
/usr/local/include/OpenEXR/ImathColor.h
/usr/local/include/OpenEXR/PyImathColor.h
You will see that in this case it is in several locations as some of the packages installed have included it. It is best to always use the /usr paths as these will correspond to the installed libraries. In this case we can add the include path -I/usr/local/include/

Setting things in Qt Creator

Qt creator uses qmake to configure the projects and the project locations. In particular there are two flags we need to set  to add  libraries and include paths as follows.

INCLUDEPATH+=/usr/local/include/collada-dom2.4/
LIBS+=-L/usr/lib   -lcolladadom150
Using the += option we can concatenate to the INCLUDEPATH keyword and absolute path to search for the libs, this will be translated to a -I flag in the compiler command line. The LIBS flag is passed verbatim to the linker so we need to use the correct commands in this case we use -L to indicate a library search path and -l for the library to be included. Note that the -l flag ignores the prefix lib and the postfix .so.x.x etc.

Once this is done your projects should be fine to run. You can also build and include libs in your own directories and link them using the project paths similar to above. If the lib created is a .a file it is a static lib it will be included in the build of the program. If you are linking to a dynamic lib (.so) you will need to tell the runtime linker where to find the library by setting the LD_LIBRARY_PATH environment variable (this is how the NGL lib is  configured).

An Example

This example will show how to install a source package in a custom location (your home dir) using a typical automake style project found in most linux source packages. 

First I'm going to download the ode source and extract it.
wget http://sourceforge.net/projects/opende/files/latest/download?source=files
tar vfxj ode-0.12.tar.bz2 
cd ode-0.12
Typically now you would run ./configure; make; sudo make install; however as most users do not have access to sudo this will not work as the install will attempt to write files in the /usr file system which you don't have permission to. Instead we can ask the configure script to use another custom location which we do have permission to. In this case I'm going to use /home/jmacey/myOde as follows
./configure --prefix /home/jmacey/myOde
make
make install
The install will now place all the files in the directory $(HOME)/myOde and we can adjust our build paths accordingly, the following list shows what has been installed.
find .
.
./include
./include/ode
./include/ode/error.h
./include/ode/odeconfig.h
./include/ode/timer.h
./include/ode/odemath.h
./include/ode/contact.h
./include/ode/odeinit.h
./include/ode/rotation.h
./include/ode/memory.h
./include/ode/collision.h
./include/ode/objects.h
./include/ode/collision_space.h
./include/ode/collision_trimesh.h
./include/ode/compatibility.h
./include/ode/common.h
./include/ode/mass.h
./include/ode/ode.h
./include/ode/export-dif.h
./include/ode/odemath_legacy.h
./include/ode/odecpp.h
./include/ode/matrix.h
./include/ode/misc.h
./include/ode/odecpp_collision.h
./lib
./lib/libode.la
./lib/pkgconfig
./lib/pkgconfig/ode.pc
./lib/libode.a
./bin
./bin/ode-config

Wednesday, 21 March 2012

Using the Maya API with Qt Creator

I've just started writing next terms Maya API lectures and decided it would be a good idea to use Qt Creator as the ide for development as it's our main IDE. It also has the advantage of automatically creating the make file required for the projects and helping to make multi platform builds easier to manage.

Qt Creator Project file
qmake and Qt Creator both use the .pro file for the projects. In this case I'm going to create builds for both Linux 64bit and Mac OSX. qmake uses the pre-fix values linux-g+-64 for all flags relating to linux 64 bit and macx for Mac OSX. 

The following .pro file shows how this is done.
# This file is split into Three sections
# The first configures Qt and the source files for all platforms
# The second is the linux build
# The third the mac build
# (if your using windows you will need to add a fourth one!)
# first lets remove Qt core and gui not going to need it
QT       -= core gui
# set the variable for the Maya Location, this will be different depending
# upon the platform / version of maya used
TARGET = HelloMaya
# for for mac we need a bundle so change the name
macx:TARGET=HelloMaya.bundle
# here we add the source files (and headers if required)
SOURCES+=HelloMaya.cpp
# these are defines required by Maya to re-define some C++
# stuff, we will add some more later to tell what platform
# we are on as well
DEFINES+=REQUIRE_IOSTREAM \
         _BOOL
# These are the maya libs we need to link to, this will change depending
# upon which maya framework we use, just add them to the end of
# this list as required and they will be added to the build
MAYALIBS=-lOpenMaya \
        -lFoundation

# now tell linux we need to build a lib
linux-g++-64:TEMPLATE = lib

# this tells qmake where maya is
linux-g++-64:MAYALOCATION=/usr/autodesk/maya2011-x64/
# under linux we need to use the version of g++ used to build maya
# in this case g++412
linux-g++-64:QMAKE_CXX = g++412
# set the include path for linux
linux-g++-64:INCLUDEPATH += $$MAYALOCATION/include \
                        /usr/X11R6/include
# set which libs we need to include
linux-g++-64:LIBS += -L$$MAYALOCATION/lib \
                   $$MAYALIBS
# tell maya we're building for linux
linux:DEFINES+=linux

# tell maya we're building for Mac
macx:DEFINES+=OSMac_
macx:MAYALOCATION=/Applications/Autodesk/maya2011
macx:CONFIG -= app_bundle
macx:INCLUDEPATH+=$$MAYALOCATION/devkit/include
# under mac we need to build a bundle, to do this use
# the -bundle flag but we also need to not use -dynamic lib so
# remove this
macx:LIBS +=-bundle
mac:LIBS -=-dynamiclib

macx:LIBS += -L$$MAYALOCATION/Maya.app/Contents/MacOS \
             $$MAYALIBS
There are several sections to the .pro file above, mainly these are to make it easier to add to the project when needed. The two main distinctions between the linux and the Mac OSX version are how the plugin should be generated. Under linux the plugin is a normal shared object file (.so), however the mac version requires a bundle. To do this the -bundle flag is used and we also need to ensure that the extension .bundle is added to the Target.

Finally we need to add some defines to the build, depending upon the platform we need to either use -DOSMac_ or -Dlinux as well as the two flags REQUIRE_IOSTREAM which includes the correct iostream library for using std::cout and _BOOL to re-define bool.

Test Program
The following test program will send a message to both the shell maya was run from and the maya command window.

#include <maya/MSimple.h>
#include <maya/MIOStream.h>
#include <maya/MGlobal.h>

// This is a macro to create a simple command
// the compiler expands it to a bunch of code

DeclareSimpleCommand( HelloMaya , "NCCA", "Maya 2011"); 

MStatus HelloMaya::doIt( const MArgList& )
{
  std::cout<<"This should come from the shell\n";
  MGlobal::displayInfo("Hello Maya in the maya command shell");
  return MS::kSuccess;
}
Once this program is build depending upon the platform there should be a plugin ready to load in the maya plugin manager. The image below show this and the info set from the Command above
We now have two options to execute the loaded command. In the mel window we can invoke the command as follows, For the mel version
And for the python version we need to import the maya.cmds module first.


Thursday, 18 November 2010

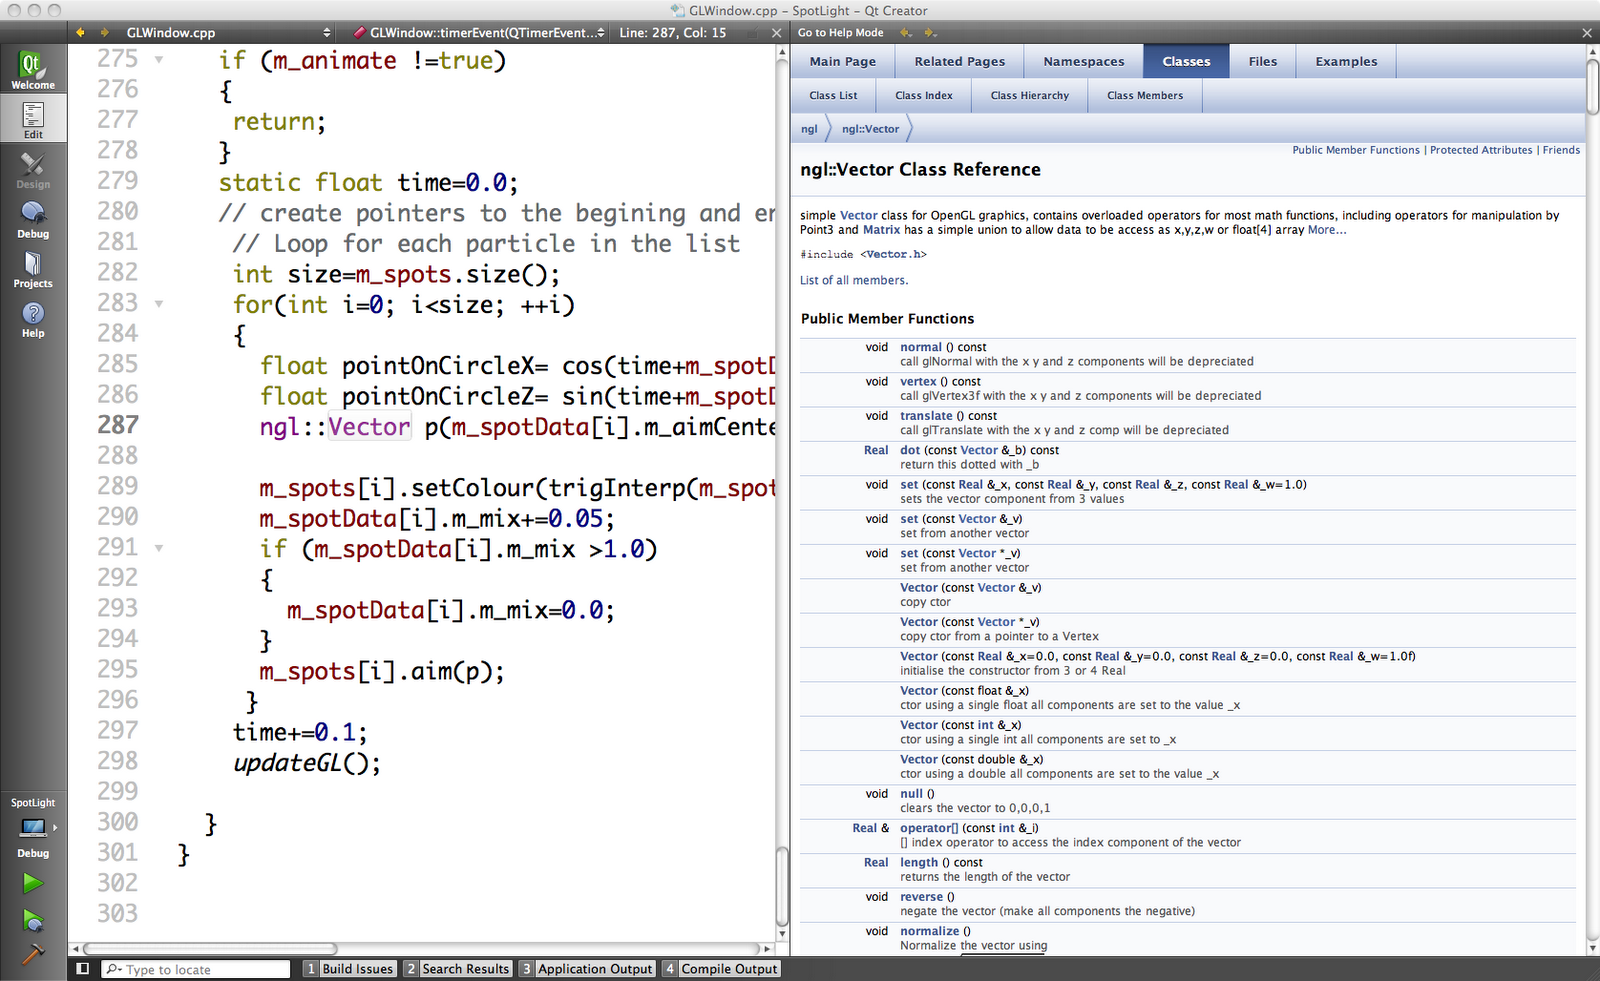
Installing NGL docs in Qt

The following post explains how to create the doxygen help for NGL then install it into QtCreator

First we need to create a directory for the help. Change into the NGL directory and type the following

mkdir docs
mkdir docs/html

Next in the root directory of NGL type doxygen (and ignore the warnings !)

This should generate all the html help files for doxygen. We now need to convert them into a format that Qt uses. This is done with the qhelpgenerator program which is located in  /opt/qtsdk/qt/bin/qhelpgenerator

To use it we change to the $(HOME)/NGL/docs/html directory and run

 /opt/qtsdk/qt/bin/qhelpgenerator index.qhp

This will create a file called index.qch which is loaded into Qt Creator, open up the preferences and locate the following tab

click on the add button and locate the NGL/docs/html/index.qch and add it.

re-start Qt Creator and you should be able to press F1 on any of the NGL:: classes and get the help as shown below


QtCreator 2.1 beta-2

Just downloaded QtCreator 2.1 beta-2 from here and it seems to work quite well. It's added a feature I've been looking for for ages which is syntax highlighting of non C++ files, to configure it you need to do the following.

First open up the preferences and go to the editor section and choose the generic highlighter section


Next select the download definitions and choose which ones you want (I chose Python and GLSL) as shown

This will download the file into the directory $(HOME).config/Nokia/qtcreator/generic-highlighter and for glsl it is a file called glsl.xml. I usually name my Vertex shaders with a .vs extension and my Fragment shaders with a .fs extension so we need to add this to the xml file

<language name="GLSL" section="Sources" extensions="*.glsl;*.vert;*.frag;*.vs;*.fs" mimetype="text/x-glslsrc" version="1.02" kateversion="2.4" author="Oliver Richers (o.richers@tu-bs.de)" license="LGPL">

Now all we need to do is re-start QtCreator and we have syntax highlighted glsl ;-)