ngl::Image Class
I've been meaning to update the ngl::Texture class for a while, a lot of time the texture class is used to load and image then load it into an OpenGL texture. Sometimes we just want an image and not access to OpenGL.
I've just split the two classes to have a separate image class and the Texture class is now much simpler (and in some cases can be ignored). To allow the loading of different images I've usually used the QImage class in Qt, this works really well and is simple to use, however sometimes I port my code to platforms that don't use Qt (raspberry pi for example) and I have to use another library. To this end I decided to support 3 different loading libraries QImage (the default), ImageMagick and Open Image I/O.
The code to load the images is quite simple, and uses a boost::scoped_array to store the data as a contiguous block of unsigned char data that OpenGL can use as texture data.
The source code can be seen in Image.cpp and Image.h and the video below shows how to change the Qt Project to set the image library to use.

lots of random code, usually involving the drawing of a teapot.
Showing posts with label NGL. Show all posts
Showing posts with label NGL. Show all posts
Friday, 2 October 2015

Friday, 21 November 2014
Using Qt Library templates
The following video shows how to configure a Qt project to create a static library to use in your own projects, the main code for this can be found on github here
The main things you will need to do are in the .pro file as follows
If you omit the staticlib it will create a dynamic library and the runtime linker will need to be told where to find your lib.
In the project you intend to use the library in you need to set the LIBS Qt variable passing in the -L[path to lib] and -l lib(s) to link
For more examples of this see this blog post
The main things you will need to do are in the .pro file as follows
TEMPLATE = lib
CONFIG+=staticlib
If you omit the staticlib it will create a dynamic library and the runtime linker will need to be told where to find your lib.
In the project you intend to use the library in you need to set the LIBS Qt variable passing in the -L[path to lib] and -l lib(s) to link
For more examples of this see this blog post
Friday, 21 March 2014
Using emscripten to port NGL to the Web
Introduction
I have been using the ngl:: library for many years as part of teaching various graphic programming courses. I decided recently it would be interesting to port the core library and many of the demos to work interactively on the web using WebGL so started investigating a number of ways to do this. The main library is written in C++ and uses either Qt or SDL to create the OpenGL context.
I had a number of choices as to which approach to take, I could learn Java Script and three.js however this would mean porting all my codebase to Java Script which seemed like too much work.
In the end I came across the emscripten system which is a LLVM-to-JavaScript Compiler which can convert my C++ code into LLVM and then into JavaScript and then into asm.js the process was quite a steep learning curve, however I manage to get quite a lot of demos ported very quickly which can be seen here the rest of the blog will outline the process and how the webngl system was developed.
Installing Emscripten
My main development environment is a mac, however I have also tested the files under linux and it also works well. To get started I followed the tutorial here and all worked first time. The next stage was to try a simple WebGL demo that is provided with the examples. There are several WebGL demos using different libraries for OpenGL context creation however as I'm most familiar with SDL I chose to use this as the basis of the framework.
A Simple SDL demo program
The following code is a simple SDL program (very similar to a normal SDL program) the only difference is the call to emscripten_set_main_loop.
#include "SDL.h"
#include <GLES2/gl2.h>
#define GL_GLEXT_PROTOTYPES 1
#include <GLES2/gl2ext.h>
#include <emscripten.h>
#include <iostream>
#include <cstdlib>


void process()
{
  // as we don't have a timer we need to do something here
  // using a static to update at an interval
  static int t=0;
  if(++t > 100)
  {
    float r=(double)rand() / ((double)RAND_MAX + 1);
    float g=(double)rand() / ((double)RAND_MAX + 1);
    float b=(double)rand() / ((double)RAND_MAX + 1);

    glClearColor(r,g,b,1);
    t=0;
  }
  glClear(GL_COLOR_BUFFER_BIT);
  // this is where we draw
  SDL_GL_SwapBuffers();
}

int main(int argc, char *argv[])
{

 SDL_Surface *screen;

 // Init SDL
 if ( SDL_Init(SDL_INIT_VIDEO) != 0 )
 {
  std::cerr<<"Unable to initialize SDL: "<<SDL_GetError();
  return EXIT_FAILURE;
 }

 SDL_GL_SetAttribute( SDL_GL_DOUBLEBUFFER, 1 );

 screen = SDL_SetVideoMode( 720, 576, 16, SDL_OPENGL  | SDL_RESIZABLE);
 if ( !screen )
 {
  std::cerr<<"Unable to set video mode: "<<SDL_GetError();
  return EXIT_FAILURE;
 }

 glEnable(GL_DEPTH_TEST);

 // let emscripten process something then
 // give control back to the browser
 emscripten_set_main_loop (process, 0, true);

 SDL_Quit();
 return EXIT_SUCCESS;
}
The emscripten_set_main_loop function is explained very well here basically we create a function that is called asynchronously to allow the browser to regain control after every iteration of the function. It is important that this function does exit else the browser will hang up and I have had several times when I get a complete lockup of the system.
Compiling the program
To compile the program we use the following command line (in this case I'm using c++ )
em++ -s FULL_ES2=1 SDL1.cpp -o SDL1.htmlThe flag -s FULL_ES2 tells emscripten to use full OpenGL ES 2 specification when compiling the code, the -o SDL1.html will generate an html file as well as the javascript file for the canvas to use. The html file can now be opened in the browser an in this case you will see a screen that changes colour every 100 cycles of the main loop. In the next post I will begin to discuss how I ported the rest of ngl to use emscripten.
Wednesday, 13 November 2013
Designing a Software System
This is the first guest post on my Blog, this one comes from a PhD student (and previously an MSc at Bournemouth) Mathieu Sanchez.
This post is specifically aimed at the design of complex software systems and is in general feedback on how to so the initial design required for some of our assignments. I was really impressed with this email and decided to share it with everyone.
This post is specifically aimed at the design of complex software systems and is in general feedback on how to so the initial design required for some of our assignments. I was really impressed with this email and decided to share it with everyone.
Design often takes experience, which is why it is so difficult to teach, but there are some "half rules".
- Write down your concepts, keywords and actions on a piece of paper, there is no need to draw anything. Verbs often translate to a relation and/or a class method (important). Nouns often refer to a class. ( see this and this)
- Classes are most likely a singular noun. If it is not then maybe you are doing something wrong. In this case, check your multiplicity, and try to find a better name. It can happen that you have "container" classes. Don't name them by what they contain. An example would be a container for several wolves. If you name it wolves, it is unclear, and will lead to confusion. Do you mean a "pack of wolves"? Naming is very important, and will help you get a clearer vision, and help the markers (which is always good).
- Classes ending in -ER are a warning flag. It can happen, but if it does, you need to be sure of yourself. Once again, naming might be the issue, not the actual design. (see here here and here)
- Don't build crazy associations everywhere. Data can travel along an association and should have a strong meaning such as "owns" "directs" etc...
- Triangle relations are nasty. If you have class A, B and C, there should not be a link between each of them with each other.
- If you find that there are many ways to achieve the same task, then there might be some inheritance in there. For instance, shadows in rendering can be done through shadow mapping or shadow feelers. This is crying for inheritance. Make sure you have a look at Liskov substitution if you have inheritance.
- Many of the common problems are solved with (famous) patterns. For instance, if there are two ways of doing one operations, but can also be combined together to achieve a better result, then there is a pattern for that.
- When I read a diagram, I first look for a point of entry. And so should you. A point of entry for me is where everything starts, the class that controls the entire system. If it is unclear to you where it starts, then you might have missed something.
- Think at a higher level at first, don't go straight for details, in fact implementation details such as acceleration structures only come last. The first diagram gives an overview of the system. If the interfaces are correctly made, adding spatial data structures is a piece of cake.
- Think about extensibility. What if someone else wants to extend your library/system? If I have to jump into your code to add some if/else and edit your interface, then it is just plain wrong. Hence inheritance and factories.
Finally, once you have a draft, you need to review your diagram. The only thing I do when I try to help you is ask you my famous "what is its responsibility, in one and only sentence?".
Do it yourself. Once the diagram is under your eyes, you can see if one of the classes overlaps with another, or worse, there is no class for a particular class. Then, double check your multiplicity. Read it out loud if needed. You should have two sentences to read. Let s say we have [ A ] 1 ------- * [ B ], then it would read "A has many B, and B belongs to one and only one A". Multiplicity can be: 0..1 (at most one), 1 (one and only one), 0..* (any number), 1..* (one or more). Your inheritance should be solid if it respects the Liskov substitution principle.
Don't leave your diagrams without explanation, and stand your ground. Design is all about making decisions and trade-offs. I want to know those, because this is what lets me know if you actually worked on this, and are an able analyst, or if you are just fighting to just get a working system.
Friday, 3 May 2013
Install NGL / Qt on a new Mac
This video blog shows how to install all of the NGL environment on a brand new mac running Mountain Lion. The links to download qt are here and the main configuration for ngl etc is here.
This is how I set the alias for qt creator
Next you need to follow the instructions here to install and setup NGL, you will need to install bzr which is a simple package from here.
Finally this example shows how to build the Qt 5 version of NGL and a basic demo
This is how I set the alias for qt creator
export PATH=$PATH:/Users/jmacey/Qt5.0.2/Qt\ Creator.app/Contents/MacOS
alias qtcreator='Qt\ Creator'
Next you need to follow the instructions here to install and setup NGL, you will need to install bzr which is a simple package from here.
Finally this example shows how to build the Qt 5 version of NGL and a basic demo
Monday, 11 March 2013
Adding Movement in ngl
Thursday, 14 February 2013
When it all goes wrong!
It's that time of year again, (no not Valentines day). Students have finally realised that they have assignments to do and are finally testing and writing code!
So far today I've had 12 email (and this week about 30) with problems and errors, so I've decided to collate as much wisdom and help as I can here which hopefully will help not only you but also me!
This post is intentionally sarcastic and not aimed at anyone in particular!

Linker errors are harder to find but usually are due to the fact that you don't have the correct libraries installed, the also seem much more scary as they seem to go on forever in some cases
For example the following


If you do this in the root of the project where the makefile is it will run make and output all of the errors to the file err.txt. Mail it to me as this will then help me to find the errors.
Then mail me the code, it also helps if I have the following information
clang++ ( Apple clang version 4.0 (tags/Apple/clang-421.0.60) (based on LLVM 3.1svn) Target: x86_64-apple-darwin12.2.0 Thread model: posix)
and the lab build
clang++ -v clang version 3.2 (trunk 163783) Target: x86_64-unknown-linux-gnu Thread model: posix g++ -v Using built-in specs. Target: x86_64-redhat-linux Configured with: ../configure --prefix=/usr --mandir=/usr/share/man --infodir=/usr/share/info --with-bugurl=http://bugzilla.redhat.com/bugzilla --enable-bootstrap --enable-shared --enable-threads=posix --enable-checking=release --with-system-zlib --enable-__cxa_atexit --disable-libunwind-exceptions --enable-gnu-unique-object --enable-languages=c,c++,objc,obj-c++,java,fortran,ada --enable-java-awt=gtk --disable-dssi --with-java-home=/usr/lib/jvm/java-1.5.0-gcj-1.5.0.0/jre --enable-libgcj-multifile --enable-java-maintainer-mode --with-ecj-jar=/usr/share/java/eclipse-ecj.jar --disable-libjava-multilib --with-ppl --with-cloog --with-tune=generic --with-arch_32=i686 --build=x86_64-redhat-linux Thread model: posix gcc version 4.4.6 20120305 (Red Hat 4.4.6-4) (GCC)
Also make sure you have pulled the latest versions of any of my code using a bzr pull as I do bug fixes as they are reported (there will soon be a more official way of reporting this using the redmine system)
So far today I've had 12 email (and this week about 30) with problems and errors, so I've decided to collate as much wisdom and help as I can here which hopefully will help not only you but also me!
This post is intentionally sarcastic and not aimed at anyone in particular!
RTFEM
A lot of the time the errors are quite easy to spot but you get the blind panic of it not working, first thing you should do is "read the (fine) error message".
In the following example
src/GLWindow.cpp: In member function 'void GLWindow::persp(GLWindow::MODE)':
src/GLWindow.cpp:256: error: expected ',' or ';' before 'm_transformStack'
make: *** [obj/GLWindow.o] Error 1
In this case we can read that there is an error in the file src/GLWindow.cpp at line 256 so I would suggest looking there!

As I'm using (and most of you are) QtCreator we only have to double click on the error message to goto the error. Even better it also underlines it in red! (BTW green underlined usually indicates unused variables so we can remove them as well) and yes in this case I've missed a ;
Now some errors are not as obvious and I will add a list of the common ones as I get sent them at the bottom of this post.
Different Error types
It is important to differentiate between error types. We can roughly split the errors into three categories.
- Compilation errors
- Linker errors
- Runtime errors
Compilation errors are the most common and may be due to many different factors, some can be due to a missing header / include such as
src/main.cpp: In function 'int main(int, char**)':
src/main.cpp:11: error: 'MainWindow' was not declared in this scope
src/main.cpp:11: error: expected `;' before 'w'
src/main.cpp:13: error: 'w' was not declared in this scope
make: *** [obj/main.o] Error 1
In this case we are just missing the #include "MainWindow.h" but the error seems worse, the clue is the "not declared in this scope" which should give you a hint that the compiler doesn't know about something. Another error along the same lines is the following
int main()
{
  std::cout<<"hello world\n";
}
In this case we get the error
1.cpp: In function 'int main()':
1.cpp:3: error: 'cout' is not a member of 'std'
Just because we are missing the #include <iostream>. When you do get these errors this is a good resource for finding out what has gone wrong as is this
Linker errors are harder to find but usually are due to the fact that you don't have the correct libraries installed, the also seem much more scary as they seem to go on forever in some cases
For example the following
clang++ -Wall -g ClearScreen.cpp -o ClearScreen `sdl-config --cflags`
Undefined symbols for architecture x86_64:
  "_SDL_FillRect", referenced from:
      clearScreen(SDL_Surface*, char, char, char) in ClearScreen-vFrFBN.o
  "_SDL_Flip", referenced from:
      clearScreen(SDL_Surface*, char, char, char) in ClearScreen-vFrFBN.o
  "_SDL_Init", referenced from:
      _SDL_main in ClearScreen-vFrFBN.o
  "_SDL_MapRGB", referenced from:
      clearScreen(SDL_Surface*, char, char, char) in ClearScreen-vFrFBN.o
  "_SDL_PollEvent", referenced from:
      _SDL_main in ClearScreen-vFrFBN.o
  "_SDL_Quit", referenced from:
      _SDL_main in ClearScreen-vFrFBN.o
  "_SDL_SetVideoMode", referenced from:
      _SDL_main in ClearScreen-vFrFBN.o
  "_SDL_WM_SetCaption", referenced from:
      _SDL_main in ClearScreen-vFrFBN.o
  "_main", referenced from:
     -u command line option
     (maybe you meant: _SDL_main)
ld: symbol(s) not found for architecture x86_64
clang: error: linker command failed with exit code 1 (use -v to see invocation)
This is due to the fact that the compiler is not using the SDL libs flags "-L/usr/local/lib -lSDLmain -lSDL" Once these are added it usually fixes things. One of the most difficult problems you will encounter is finding which function lives in which lib, again you can google. Or I have a handy shell script
#!/bin/bash
for f in *.a *.so *.dylib
do
  echo "checking for $1 in - $f"
  strings $f | grep $1
done
Which using checkLib.sh glVertex in the directory /usr/lib/ gives
checkLib.sh glVertex | more
checking for glVertex in - libGLEW.a
glVertexAttrib1dNV
glVertexAttrib1dvNV
glVertexAttrib1fNV
glVertexAttrib1fvNV
....
Runtime errors are usually created when we cant find the dynamic libs we need to link to, for example
dyld: Library not loaded: libNGL.1.0.0.dylib
  Referenced from: /Volumes/home/jmacey/teaching/NGL5Demos/SimpleNGL/./SimpleNGL
  Reason: image not found
Trace/BPT trap: 5
Means that the LD_LIBRARY_PATH (actually DYLD on mac) has not been set for the NGL lib (see here)
If in doubt make clean
Sometimes things get out of sync and dependancies are not re-read. The simplest solution is to do a qmake; make clean ; make;l
In QtCreator this is the same as doing a re-build all. You will be surprised how often this solves things (usually to deps not being updated)
Still Stuck do this
If you need to send me some errors, please don't do this

Yes that is an iPhone photo of the error message on my monitor, yes I have had this mailed to me before, and no I can't figure out what is wrong! My eyesight used to be that good but not anymore!
This is not much better
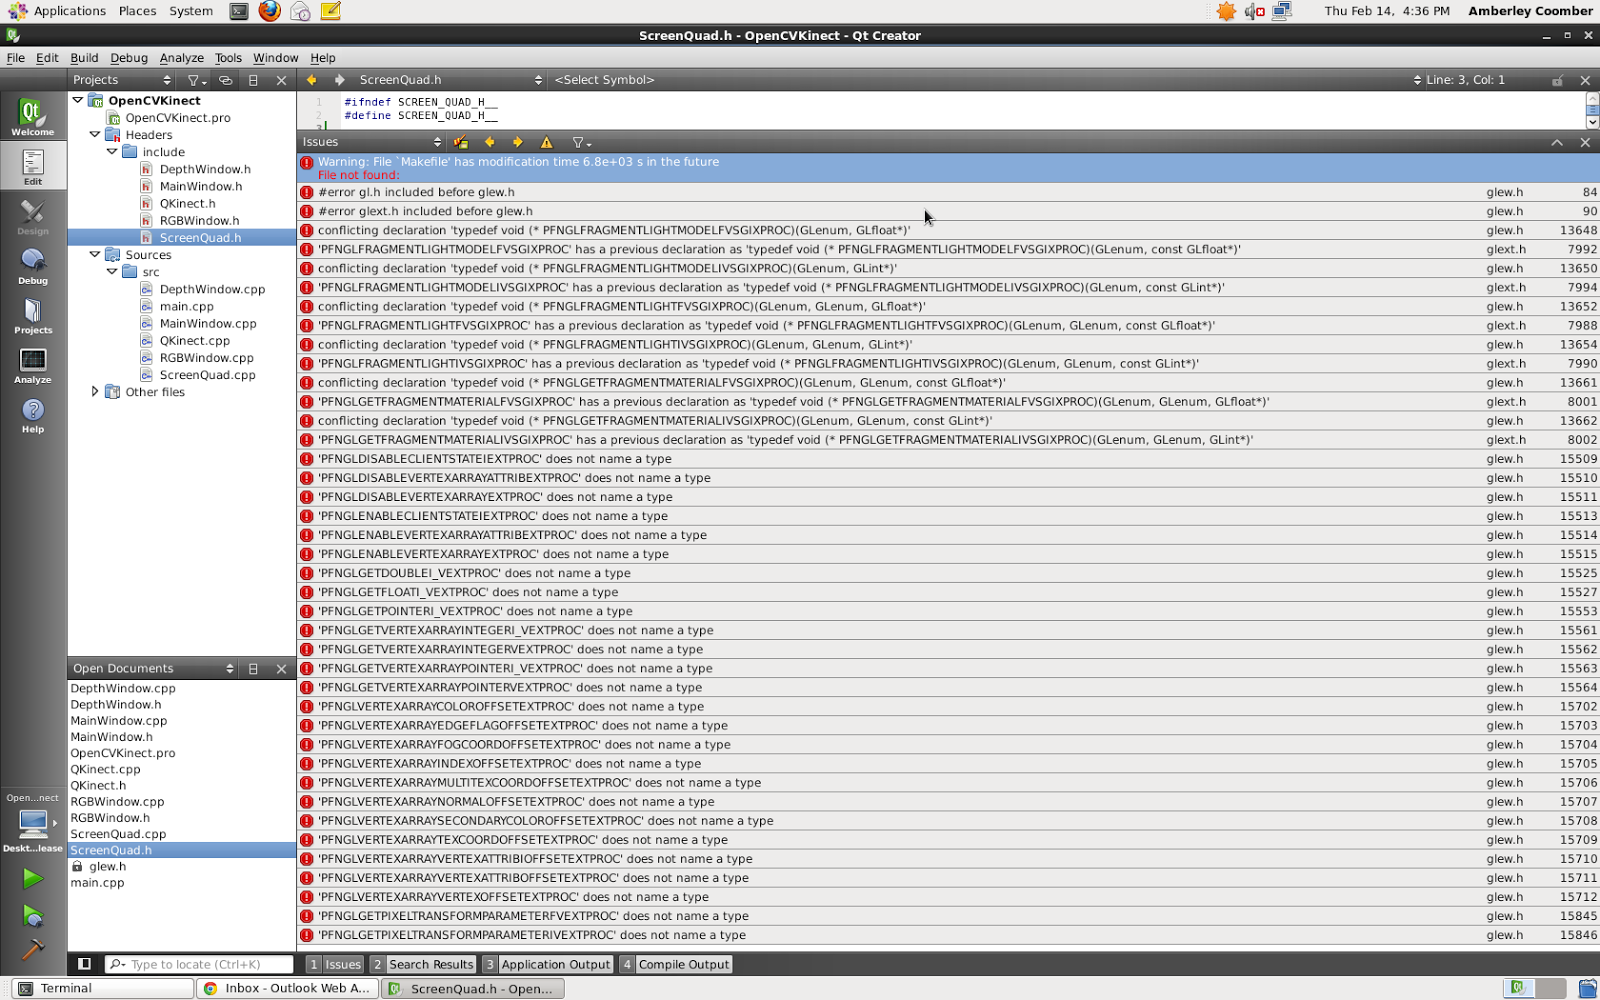
Yes I can see the errors in this one but it still doesn't help much, I really need to see the compiler output / flags as well as the error messages (these are on different tabs on Qt).
The easiest way of sending me errors etc is via plain ASCII text (I'm old fashioned like that ;-) To do this will require a little typing.
cd [your project root]
make &>err.txt
If you do this in the root of the project where the makefile is it will run make and output all of the errors to the file err.txt. Mail it to me as this will then help me to find the errors.
Send me the code
If I ask you to send me the code, I only need the source and other files not the .o and exe. The easiest way of sending this to me is as follows
cd [your project root]
make distclean
cd ..
tar vfcz code.tgz [your project root]
Then mail me the code, it also helps if I have the following information
- Operating System (and version if Mac or Linux)
- Compiler used (use g++ -v or clang -v)
- Graphics Card Make Model and version of OpenGL drivers installed.
- Versions of any extra libs etc you may be using.
clang++ ( Apple clang version 4.0 (tags/Apple/clang-421.0.60) (based on LLVM 3.1svn) Target: x86_64-apple-darwin12.2.0 Thread model: posix)
and the lab build
clang++ -v clang version 3.2 (trunk 163783) Target: x86_64-unknown-linux-gnu Thread model: posix g++ -v Using built-in specs. Target: x86_64-redhat-linux Configured with: ../configure --prefix=/usr --mandir=/usr/share/man --infodir=/usr/share/info --with-bugurl=http://bugzilla.redhat.com/bugzilla --enable-bootstrap --enable-shared --enable-threads=posix --enable-checking=release --with-system-zlib --enable-__cxa_atexit --disable-libunwind-exceptions --enable-gnu-unique-object --enable-languages=c,c++,objc,obj-c++,java,fortran,ada --enable-java-awt=gtk --disable-dssi --with-java-home=/usr/lib/jvm/java-1.5.0-gcj-1.5.0.0/jre --enable-libgcj-multifile --enable-java-maintainer-mode --with-ecj-jar=/usr/share/java/eclipse-ecj.jar --disable-libjava-multilib --with-ppl --with-cloog --with-tune=generic --with-arch_32=i686 --build=x86_64-redhat-linux Thread model: posix gcc version 4.4.6 20120305 (Red Hat 4.4.6-4) (GCC)
Also make sure you have pulled the latest versions of any of my code using a bzr pull as I do bug fixes as they are reported (there will soon be a more official way of reporting this using the redmine system)
Some Common Errors (and Fixes)
I get quite a lot of common errors so I will try and list them hereGLEW Errors
If you get something like this
/usr/include/GL/glew.h:84:2: error: gl.h included before glew.h
#error gl.h included before glew.h
 ^
/usr/include/GL/glew.h:90:2: error: glext.h included before glew.h
#error glext.h included before glew.h
It is due to the GLEW libs not being included properly (you may also get lots of PFNGL..... errors as well) Some of the old versions of my .pro files have a subtle bug in them where the defines are not done correctly check the .pro file and make sure this is correct
linux-g++*{
            DEFINES += LINUX
            LIBS+= -lGLEW
}
linux-clang* {
              DEFINES += LINUX
              LIBS+= -lGLEW
}
xxx does not name a type
Errors such as include/GLWindow.h:50: error: ‘Vector’ in namespace ‘ngl’ does not name a type means that you have either not included the correct header or something is missing. In this case it is due to the fact that ngl::Vector has now been replaced with ngl::Vec3 so you will need to #include <ngl/Vec3.h> and also replace all versions of ngl::Vector with ngl::Vec3
Thursday, 29 November 2012
Using NGL with SDL
SDL is a very good library for games development and very useful for cross platform development. In this post I will explain how to install and configure SDL 2.0 (HG) for use with OpenGL and my NGL:: library. The source code can be downloaded using bzr branch http://nccastaff.bournemouth.ac.uk/jmacey/Code/SDLNGL from here
First we need to initialise the SDL video subsystem using the following command
SDL installation
The latest version of SDL handles creating "core profile" OpenGL contexts on mac so this will be required. Earlier version of SDL will not work as they do not support the creation of the correct context for OpenGL under the mac. I decided to do a local install of SDL and if you wish to use this in the Labs at the University you will have to do the same thing as you don't have root permission to install the libs. The process of installation is similar to the one outlined here and I'm going to install the libraries in a directory called $(HOME)/SDL2.0 this is important as the makefile will also use this location to find the sdl2-config script at a later date.
The following commands will download and install the libraries and build it into the correct directory.
mkdir SDL2.0
tar vfxz SDL-2.0.tar.gz
cd SDL-2.0.0-6673/
./configure --prefix=/home/jmacey/SDL2.0 (change to your home dir)
make -j 8
make install
This will install everything into the SDL2 directory and you will have a structure like this
bin include lib shareTo test this is working do the following
cd ~/SDL2.0/bin
./sdl2-config --cflags --libs
-I/Volumes/home/jmacey/SDL2.0/include/SDL2 -D_THREAD_SAFE
-L/Volumes/home/jmacey/SDL2.0/lib -lSDL2
SDL NGL Demo
The demo is split into two main modules. The main.cpp file will create the SDL and OpenGL context, and handle the processing of events. The NGLDraw class will contain all OpenGL setup and drawing routines.
Setup and basic SDL
To use SDL we need to include the <SDL.h> header, this will be placed in the path by the following command in the Qt .pro file.
QMAKE_CXXFLAGS+=$$system($$(HOME)/SDL2.0/bin/sdl2-config  --cflags)
message(output from sdl2-config --cflags added to CXXFLAGS= $$QMAKE_CXXFLAGS)

LIBS+=$$system($$(HOME)/SDL2.0/bin/sdl2-config  --libs)
message(output from sdl2-config --libs added to LIB=$$LIBS)
For more info see this post
First we need to initialise the SDL video subsystem using the following command
// Initialize SDL's Video subsystem
if (SDL_Init(SDL_INIT_VIDEO) < 0 )
{
  // Or die on error
  SDLErrorExit("Unable to initialize SDL");
}
There is also a helper function to exit SDL gracefully
void SDLErrorExit(const std::string &_msg)
{
  std::cerr<<_msg<<"\n";
  std::cerr<<SDL_GetError()<<"\n";
  SDL_Quit();
  exit(EXIT_FAILURE);
}
Next we create the basic window, in this case I get the size of the screen and configure the screen to be centred and half max screen width and height
// now get the size of the display and create a window we need to init the video
SDL_Rect rect;
SDL_GetDisplayBounds(0,&rect);
// now create our window
SDL_Window *window=SDL_CreateWindow("SDLNGL",SDL_WINDOWPOS_CENTERED,SDL_WINDOWPOS_CENTERED,
                         rect.w/2,rect.h/2,
                         SDL_WINDOW_OPENGL | SDL_WINDOW_RESIZABLE);
// check to see if that worked or exit
if (!window)
{
 SDLErrorExit("Unable to create window");
}
Creating an OpenGL context
SDL 2.0 uses a SDL_GLContext to hold the information about the current GL context. There are many flags we need to setup our context and these are handled using the SDL_GL_SetAttribute function. I've also discovered on my linux build that some of these flags don't work and cause crashes (particularly creating a core profile context). To overcome this conditional compilation is used as shown in the following function.
SDL_GLContext createOpenGLContext(SDL_Window *window)
{
  // Request an opengl 3.2 context first we setup our attributes, if you need any
  // more just add them here before the call to create the context
  // SDL doesn't have the ability to choose which profile at this time of writing,
  // but it should default to the core profile
  // for some reason we need this for mac but linux crashes on the latest nvidia drivers
  // under centos
  #ifdef DARWIN
    SDL_GL_SetAttribute(SDL_GL_CONTEXT_MAJOR_VERSION, 3);
    SDL_GL_SetAttribute(SDL_GL_CONTEXT_MINOR_VERSION, 2);
    SDL_GL_SetAttribute(SDL_GL_CONTEXT_PROFILE_MASK, SDL_GL_CONTEXT_PROFILE_CORE);
    SDL_GL_SetAttribute(SDL_GL_ACCELERATED_VISUAL, 1);
  #endif
  // set multi sampling else we get really bad graphics that alias
  SDL_GL_SetAttribute(SDL_GL_MULTISAMPLEBUFFERS, 1);
  SDL_GL_SetAttribute(SDL_GL_MULTISAMPLESAMPLES,4);
  // Turn on double buffering with a 24bit Z buffer.
  // You may need to change this to 16 or 32 for your system
  // on mac up to 32 will work but under linux centos build only 16
  SDL_GL_SetAttribute(SDL_GL_DEPTH_SIZE, 16);
  // enable double buffering (should be on by default)
  SDL_GL_SetAttribute(SDL_GL_DOUBLEBUFFER, 1);
  //
  return SDL_GL_CreateContext(window);

}
Care must be taken with setting the depth size, under mac osx it works with 32 bit, under linux I set to 16 and on some machines 24 will work.
The following code configures the GL context and clears the screen.
SDL_GLContext glContext=createOpenGLContext(window);
if(!glContext)
{
 SDLErrorExit("Problem creating OpenGL context");
}
// make this our current GL context (we can have more than one window but in this case not)
SDL_GL_MakeCurrent(window, glContext);
/* This makes our buffer swap syncronized with the monitor's vertical refresh */
SDL_GL_SetSwapInterval(1);
// now clear the screen and swap whilst NGL inits (which may take time)
glClear(GL_COLOR_BUFFER_BIT);
SDL_GL_SwapWindow(window);
Now this has been done we can use NGL and create our graphics. In this case the NGLDraw class is a re-working of the SimpleNGL demo, it initialises GLEW if required. The following code shows the creation of the NGLDraw class and the key and mouse processing.
NGLDraw ngl;
// resize the ngl to set the screen size and camera stuff
ngl.resize(rect.w,rect.h);
while(!quit)
{

 while ( SDL_PollEvent(&event) )
 {
  switch (event.type)
  {
   // this is the window x being clicked.
   case SDL_QUIT : quit = true; break;
   // process the mouse data by passing it to ngl class
   case SDL_MOUSEMOTION : ngl.mouseMoveEvent(event.motion); break;
   case SDL_MOUSEBUTTONDOWN : ngl.mousePressEvent(event.button); break;
   case SDL_MOUSEBUTTONUP : ngl.mouseReleaseEvent(event.button); break;
   case SDL_MOUSEWHEEL : ngl.wheelEvent(event.wheel);
   // if the window is re-sized pass it to the ngl class to change gl viewport
   // note this is slow as the context is re-create by SDL each time
   case SDL_WINDOWEVENT :
    int w,h;
    // get the new window size
    SDL_GetWindowSize(window,&w,&h);
    ngl.resize(w,h);
   break;

   // now we look for a keydown event
   case SDL_KEYDOWN:
   {
    switch( event.key.keysym.sym )
    {
     // if it's the escape key quit
     case SDLK_ESCAPE :  quit = true; break;
     case SDLK_w : glPolygonMode(GL_FRONT_AND_BACK,GL_LINE); break;
     case SDLK_s : glPolygonMode(GL_FRONT_AND_BACK,GL_FILL); break;
     case SDLK_f :
     SDL_SetWindowFullscreen(window,SDL_TRUE);
     glViewport(0,0,rect.w,rect.h);
     break;

     case SDLK_g : SDL_SetWindowFullscreen(window,SDL_FALSE); break;
     default : break;
    } // end of key process
   } // end of keydown

   default : break;
  } // end of event switch
 } // end of poll events

 // now we draw ngl
 ngl.draw();
 // swap the buffers
 SDL_GL_SwapWindow(window);

}
The most important call here is the SDL_GL_SwapWindow call which tells SDL to swap the buffers and re-draw.
NGLDraw class
Most of the NGLDraw class is basic ngl code, the constructor is used to initialise ngl and create the camera, light and materials. The draw method grabs and instance of the primitives class and draws the teapot, both of which are similar to the Qt NGL demos. The main difference is the processing of the mouse input. I still use the same flags and attributes to store the rotations and position data, however the SDL mouse data is used to grab x,y and button values. This is shown in the following code.void NGLDraw::mouseMoveEvent (const SDL_MouseMotionEvent &_event)
{
if(m_rotate && _event.state &SDL_BUTTON_LMASK)
{
int diffx=_event.x-m_origX;
int diffy=_event.y-m_origY;
m_spinXFace += (float) 0.5f * diffy;
m_spinYFace += (float) 0.5f * diffx;
m_origX = _event.x;
m_origY = _event.y;
this->draw();
}
// right mouse translate code
else if(m_translate && _event.state &SDL_BUTTON_RMASK)
{
int diffX = (int)(_event.x - m_origXPos);
int diffY = (int)(_event.y - m_origYPos);
m_origXPos=_event.x;
m_origYPos=_event.y;
m_modelPos.m_x += INCREMENT * diffX;
m_modelPos.m_y -= INCREMENT * diffY;
this->draw();
}
}
void NGLDraw::mousePressEvent (const SDL_MouseButtonEvent &_event)
{
// this method is called when the mouse button is pressed in this case we
// store the value where the maouse was clicked (x,y) and set the Rotate flag to true
if(_event.button == SDL_BUTTON_LEFT)
{
m_origX = _event.x;
m_origY = _event.y;
m_rotate =true;
}
// right mouse translate mode
else if(_event.button == SDL_BUTTON_RIGHT)
{
m_origXPos = _event.x;
m_origYPos = _event.y;
m_translate=true;
}
}
void NGLDraw::mouseReleaseEvent (const SDL_MouseButtonEvent &_event)
{
// this event is called when the mouse button is released
// we then set Rotate to false
if (_event.button == SDL_BUTTON_LEFT)
{
m_rotate=false;
}
// right mouse translate mode
if (_event.button == SDL_BUTTON_RIGHT)
{
m_translate=false;
}
}
void NGLDraw::wheelEvent(const SDL_MouseWheelEvent &_event)
{
// check the diff of the wheel position (0 means no change)
if(_event.y > 0)
{
m_modelPos.m_z+=ZOOM;
this->draw();
}
else if(_event.y <0 )
{
m_modelPos.m_z-=ZOOM;
this->draw();
}
// check the diff of the wheel position (0 means no change)
if(_event.x > 0)
{
m_modelPos.m_x-=ZOOM;
this->draw();
}
else if(_event.x <0 )
{
m_modelPos.m_x+=ZOOM;
this->draw();
}
}
The rest of the code is fairly self explanatory if you've use NGL before.
Monday, 12 November 2012
Sponza Demo Pt 3 The GroupedObj class

Thursday, 21 June 2012
Embedding a Python interpreter in C++
In my feedback for the MSc project proposals I suggested it would be a good idea to embed some form of interpreter for the crowd / multi agent systems instead of hard coding them in C++. This allows for a quicker development cycle and a more flexible tool. In this video tutorial I explain the example code (here) and the basic design behind it. For more details I would read this


Wednesday, 20 June 2012
OpenGL ES on the raspberry pi Pt 2 EGLWindow Class
In the previous post I created an EGLconfig class to allow the creation of an eglConfig for raspberry pi. In this post I will talk about the design and implementation of an EGLWindow class which allows the user to create a window and then extend the basic window for their own drawing.

EGLWindow
This class will implement various functions to setup and create an OpenGL drawing context for the user. It is then the users responsibility to implement certain methods in the sub-class to do the basic initialisation of the OpenGL functions, then a drawing class which will be called each frame in the client program.

You will notice from the class diagram there are a number of methods and attributes which are either protected or private, along with several methods which are "pure virtual" this is to force the user of the class to implement them. Full source code for the .h file is here
The constructor takes an EGLConfig class as the main parameter, this by default is set to 0 so if one is not passed a default one will be created. This is shown in the following code
EGLWindow::EGLWindow(EGLconfig *_config)
{
 // toggle we don't yet have an active surface
 m_activeSurface=false;
 // set default to not upscale the screen resolution
 m_upscale=false;
 // set our display values to 0 (not once ported to cx11 will use nullptr but
 // current pi default compiler doesn't support it yet
 m_display=0;
 m_context=0;
 m_surface=0;

 // now find the max display size (we will use this later to assert if the user
 // defined sizes are in the correct bounds
 int32_t success = 0;
 success = graphics_get_display_size(0 , &m_width, &m_height);
 assert( success >= 0 );
 std::cout<<"max width and height "<<m_width<<" "<<m_height<<"\n";
 m_maxWidth=m_width;
 m_maxHeight=m_height;
 // if we have a user defined config we will use that else we need to create one
 if (_config == 0)
 {
  std::cout<<"making new config\n";
  m_config= new EGLconfig();
 }
 else
 {
  m_config=_config;
 }

}
The core method to this class is the makeSurface method. It will create our surface and configure internal class attributes to hold values needed for the drawing etc. It also calls the initializeGL method once the surface has been created to do one off configuration of OpenGL / class attributes.
void EGLWindow::makeSurface(uint32_t _x, uint32_t _y, uint32_t _w, uint32_t _h)
{
// this code does the main window creation
EGLBoolean result;

static EGL_DISPMANX_WINDOW_T nativeWindow;
// our source and destination rect for the screen
VC_RECT_T dstRect;
VC_RECT_T srcRect;

// config you use OpenGL ES2.0 by default
static const EGLint contextAttributes[] =
{
 EGL_CONTEXT_CLIENT_VERSION, 2,
 EGL_NONE
};


// get an EGL display connection
m_display = eglGetDisplay(EGL_DEFAULT_DISPLAY);
if(m_display == EGL_NO_DISPLAY)
{
 std::cerr<<"error getting display\n";
 exit(EXIT_FAILURE);
}
// initialize the EGL display connection
int major,minor;

result = eglInitialize(m_display, &major, &minor);
std::cout<<"EGL init version "<<major<<"."<<minor<<"\n";
if(result == EGL_FALSE)
{
 std::cerr<<"error initialising display\n";
 exit(EXIT_FAILURE);
}
// get our config from the config class
m_config->chooseConfig(m_display);
EGLConfig config=m_config->getConfig();
// bind the OpenGL API to the EGL
result = eglBindAPI(EGL_OPENGL_ES_API);
if(result ==EGL_FALSE)
{
 std::cerr<<"error binding API\n";
 exit(EXIT_FAILURE);
}
// create an EGL rendering context
m_context = eglCreateContext(m_display, config, EGL_NO_CONTEXT, contextAttributes);
if(m_context ==EGL_NO_CONTEXT)
{
 std::cerr<<"couldn't get a valid context\n";
 exit(EXIT_FAILURE);
}
// create an EGL window surface the way this works is we set the dimensions of the srec
// and destination rectangles.
// if these are the same size there is no scaling, else the window will auto scale

dstRect.x = _x;
dstRect.y = _y;
if(m_upscale == false)
{
 dstRect.width = _w;
 dstRect.height = _h;
}
else
{
 dstRect.width = m_maxWidth;
 dstRect.height = m_maxHeight;
}
srcRect.x = 0;
srcRect.y = 0;
srcRect.width = _w << 16;
srcRect.height = _h << 16;
// whilst this is mostly taken from demos I will try to explain what it does
// there are very few documents on this ;-0
// open our display with 0 being the first display, there are also some other versions
// of this function where we can pass in a mode however the mode is not documented as
// far as I can see
m_dispmanDisplay = vc_dispmanx_display_open(0);
// now we signal to the video core we are going to start updating the config
m_dispmanUpdate = vc_dispmanx_update_start(0);
// this is the main setup function where we add an element to the display, this is filled in
// to the src / dst rectangles
m_dispmanElement = vc_dispmanx_element_add ( m_dispmanUpdate, m_dispmanDisplay,
 0, &dstRect, 0,&srcRect, DISPMANX_PROTECTION_NONE, 0 ,0,DISPMANX_NO_ROTATE);
// now we have created this element we pass it to the native window structure ready
// no create our new EGL surface
nativeWindow.element = m_dispmanElement;
nativeWindow.width =_w;
nativeWindow.height =_h;
// we now tell the vc we have finished our update
vc_dispmanx_update_submit_sync( m_dispmanUpdate );

// finally we can create a new surface using this config and window
m_surface = eglCreateWindowSurface( m_display, config, &nativeWindow, NULL );
assert(m_surface != EGL_NO_SURFACE);
// connect the context to the surface
result = eglMakeCurrent(m_display, m_surface, m_surface, m_context);
assert(EGL_FALSE != result);
m_activeSurface=true;
initializeGL();
}
The rest of the class is fairy straight forward, however it is worth mentioning the destroySurface method as it is used to allow re-creation / re-size of the window created. This is a private method and is used by the destructor and the resizeScreen method
void EGLWindow::destroySurface()
{
 if(m_activeSurface == true)
 {
  eglSwapBuffers(m_display, m_surface);
  // here we free up the context and display we made earlier
  eglMakeCurrent( m_display, EGL_NO_SURFACE, EGL_NO_SURFACE, EGL_NO_CONTEXT );
  eglDestroySurface( m_display, m_surface );
  eglDestroyContext( m_display, m_context );
  eglTerminate( m_display );
  m_activeSurface=false;
 }
}
The next post will show how these classes can be used to create a simple OpenGL window.
Thursday, 31 May 2012
Getting Started with EGL on the Raspberry pi
So i finally go my raspberry pi and my plan is to port my NGL library to it, the main difference is that NGL is using Qt and OpenGL 3.2 core profile and the pi will use OpenGL ES and EGL. Having never used EGL I decides to do a bit of rtfm and read the spec as well as some of the demo programs that come with the pi. The following is a basic introduction to getting started with EGL and using the pi in general. All the code for this post can be found here


EGL getting started
EGL is used as an interface between OpenGL (and other Khronos API's) and the base system (in this case the pi). It is responsible for accessing the display hardware and other synchronisation of the display / graphics context. In the case of the pi we use it to access the display hardware and use OpenGL or OpenVG with it.
All of the functions for this are stored in the header file egl.h as shown below
#include <EGL/egl.h>On the debian "squeeze" image of the OS these headers can be found in /opt/vc/include, we also need to add the EGL library to our build using the flags -L/opt/vc/lib -lEGL (more on this later in the Makefile section).
Accessing the display
Almost all the EGL functions require a valid display pointer to do their work, this is stored using the EGLDisplay typedef (it's actually a void * ).
We can get one of these using the following code
EGLDisplay display;
// get an EGL display connection
display = eglGetDisplay(EGL_DEFAULT_DISPLAY);
assert(display !=EGL_NO_DISPLAY);
If this is successful it should return a valid display, else the EGL_NO_DISPLAY value will be returned.
EGL initialisation
Now we have a valid display connection we can initialise EGL and query what version we have, this is done with the following code.
// now lets initialise EGL and get the versions
int major;
int minor;
EGLBoolean result;

result = eglInitialize(display, &major, &minor);
assert(result != EGL_FALSE );
std::cout<<"Major version "<<major<<" minor "<<minor<<"\n";
On my version of the pi it gives the following output
Major version 1 minor 4
Configurations
Now we have initialised EGL we can query the different configurations available to use. This is done using the eglGetConfigs function which works in two different modes. The first mode will allow us to get how many configs there are, and the second will fill a buffer with all of the different configs. This is done in the the following codeEGLint numConfigs; // first we call getConfigs with a NULL to see how many configs we have result=eglGetConfigs(display,NULL,0,&numConfigs); assert(result != EGL_FALSE ); std::cout<< "number of configs found "<<numConfigs<<"\n"; // now we create a buffer to store all our configs EGLConfig *configs = new EGLConfig[numConfigs]; // and copy them into our buffer (don't forget to delete once done) result=eglGetConfigs(display,configs,numConfigs,&numConfigs); assert(result != EGL_FALSE ); ...... // don't forget to delete once done delete [] configs;We can now gather the information from each of the configs using the eglGetConfigAttrib function. This requires you to pass in the attribute you wish to query and will return the value if set. The following code queries the attributes available on the pi (some that are in the spec are not on the pi)
for(int i=0; i<numConfigs; ++i)
{
 std::cout<<"Config #"<<i<<"\n";
 eglGetConfigAttrib(display,configs[i],EGL_BUFFER_SIZE,&value);
 std::cout<<"Buffer Size "<<value<<"\n";
 eglGetConfigAttrib(display,configs[i],EGL_RED_SIZE,&value);
 std::cout<<"Red Size "<<value<<"\n";
 eglGetConfigAttrib(display,configs[i],EGL_GREEN_SIZE,&value);
 std::cout<<"Green Size "<<value<<"\n";
 eglGetConfigAttrib(display,configs[i],EGL_BLUE_SIZE,&value);
 std::cout<<"Blue Size "<<value<<"\n";
 eglGetConfigAttrib(display,configs[i],EGL_ALPHA_SIZE,&value);
 std::cout<<"Alpha Size "<<value<<"\n";
 eglGetConfigAttrib(display,configs[i],EGL_CONFIG_CAVEAT,&value);
 switch(value)
 {
  case  EGL_NONE : std::cout<<"EGL_CONFIG_CAVEAT EGL_NONE\n"; break;
  case  EGL_SLOW_CONFIG : std::cout<<"EGL_CONFIG_CAVEAT EGL_SLOW_CONFIG\n"; break;
 }
 eglGetConfigAttrib(display,configs[i],EGL_CONFIG_ID,&value);
 std::cout<<"Config ID "<<value<<"\n";

 eglGetConfigAttrib(display,configs[i],EGL_DEPTH_SIZE,&value);
 std::cout<<"Depth size "<<value<<"\n";

 eglGetConfigAttrib(display,configs[i],EGL_MAX_PBUFFER_WIDTH,&value);
 std::cout<<"Max pbuffer width "<<value<<"\n";
 eglGetConfigAttrib(display,configs[i],EGL_MAX_PBUFFER_HEIGHT,&value);
 std::cout<<"Max pbuffer height "<<value<<"\n";
 eglGetConfigAttrib(display,configs[i],EGL_MAX_PBUFFER_PIXELS,&value);
 std::cout<<"Max pbuffer pixels "<<value<<"\n";
 eglGetConfigAttrib(display,configs[i],EGL_NATIVE_RENDERABLE,&value);
 std::cout<<"Native renderable "<<std::string(value ? "true" : "false")<<"\n";
 eglGetConfigAttrib(display,configs[i],EGL_NATIVE_VISUAL_ID,&value);
 std::cout<<"Native visual ID "<<value<<"\n";
 eglGetConfigAttrib(display,configs[i],EGL_NATIVE_VISUAL_TYPE,&value);
 std::cout<<"Native visual type "<<value<<"\n";
 eglGetConfigAttrib(display,configs[i],EGL_SAMPLE_BUFFERS,&value);
 std::cout<<"Sample Buffers "<<value<<"\n";
 eglGetConfigAttrib(display,configs[i],EGL_SAMPLES,&value);
 std::cout<<"Samples "<<value<<"\n";
 eglGetConfigAttrib(display,configs[i],EGL_SURFACE_TYPE,&value);
 std::cout<<"Surface type "<<value<<"\n";
 eglGetConfigAttrib(display,configs[i],EGL_TRANSPARENT_TYPE,&value);

}
This give a sample output like this (a full listing can be seen here or in the file output.txt in the code bundle)
Config #0
Buffer Size 32
Red Size 8
Green Size 8
Blue Size 8
Alpha Size 8
EGL_CONFIG_CAVEAT EGL_NONE
Config ID 1
Depth size 24
Max pbuffer width 2048
Max pbuffer height 2048
Max pbuffer pixels 4194304
Native renderable true
Native visual ID 37928
Native visual type 12344
Sample Buffers 0
Samples 0
Surface type 1639
Makefile
To build the program the following makefile was used, it includes the correct paths and libs
CC=g++
CFLAGS=-c -Wall -O3 -I/usr/local/include -I/opt/vc/include -Iinclude/ngl -Isrc/ngl -Isrc/shaders -DNGL_DEBUG
LDFLAGS=-L/opt/vc/lib -lEGL
SOURCES=$(shell find ./ -name *.cpp)
OBJECTS=$(SOURCES:%.cpp=%.o)
EXECUTABLE=EGLgetConfig

all: $(SOURCES) $(EXECUTABLE)

$(EXECUTABLE): $(OBJECTS)
 $(CC) $(LDFLAGS) $(OBJECTS) -o $@

.cpp.o:
 $(CC) $(CFLAGS) $< -o $@

clean :
 rm -f *.o $(EXECUTABLE)
That it for now but here is a sneak preview of NGL almost working
Tuesday, 6 March 2012
Setting OpenGL Formats in Qt
Got asked how to enable multi-sampling in my demos the other day, and realised that I hadn't shared this information in any of my lectures so I thought I would write it up here.
OpenGL has a number of extensions which allow a number of different rendering features to be enabled. For example we can do stereo, accumulation multisampling and much more.
In Qt we do this by using the QGLFormat class and we can enable it for a specific QGLWidget, or for all widgets we create. For this example I will generate a default format and then create a widget to use the format. This code would be put in main.cpp in my demos (will update them soon) before the creation of the MainWindow class.
OpenGL has a number of extensions which allow a number of different rendering features to be enabled. For example we can do stereo, accumulation multisampling and much more.
In Qt we do this by using the QGLFormat class and we can enable it for a specific QGLWidget, or for all widgets we create. For this example I will generate a default format and then create a widget to use the format. This code would be put in main.cpp in my demos (will update them soon) before the creation of the MainWindow class.
QGLFormat glf = QGLFormat::defaultFormat();
glf.setSampleBuffers(true);
glf.setSamples(4);
QGLFormat::setDefaultFormat(glf);
Now when we create the GLWindow in the ngl:: demos this will be used for all windows created. Finally we need to enable GL_MULTISAMPLE when rendering which can be done using the following code
glEnable(GL_MULTISAMPLE);This method can also be used to enable things such as the new OpenGL core profile (under linux and windows for Qt 4.7 and with Qt 4.8 this will also work on the mac eventually, as long as you have Lion). You should be able to see from the documentation all the other features which can be enabled in this way.
Monday, 20 February 2012
ngl::ShaderLib update
Just a quick post to explain some updates to the ngl::ShaderLib sub-system. First of all this doesn't break any existing code, but has in some situations increased frame rate by 10-15%.
First a bit of background, all of the shader lib functions use the getUniformLocation function to query the location of the uniform in the current program and use this GLuint offset to load the values to the uniform in the shader.
This works ok, and generally this only called at the start of the program so doesn't cause too much of a bottleneck. However in most of the demos we load the Model/View/Projection matrix to the Shader each time we move something, and the MVP value will be loaded using the following code (from the ngl:: source)
First a bit of background, all of the shader lib functions use the getUniformLocation function to query the location of the uniform in the current program and use this GLuint offset to load the values to the uniform in the shader.
This works ok, and generally this only called at the start of the program so doesn't cause too much of a bottleneck. However in most of the demos we load the Model/View/Projection matrix to the Shader each time we move something, and the MVP value will be loaded using the following code (from the ngl:: source)
void ShaderProgram::setUniformMatrix4fv(
                                          const char* _varname,
                                          size_t _count,
                                          bool _transpose,
                                          const float* _value
                                        ) const
{
  glUniformMatrix4fv(getUniformLocation(_varname),_count,_transpose,_value);
}
Here the getUniformLocation is called and doesn't need to be if we pre-cache the value. To do this ngl::ShaderProgram has a new attribute added to it as follows
std::map <std::string, GLuint> m_registeredUniforms;To use this, once the shader is loaded, compiled and linked we must set it to be active and we can then register the uniform as follows (this will usually be done in the GLWindow::initalizeGL method)
(*shader)["MultipleLights"]->use();
shader->setShaderParam1f("Normalize",1);
shader->registerUniform("MultipleLights","MVP");
shader->registerUniform("MultipleLights","MV");
shader->registerUniform("MultipleLights","M");
shader->registerUniform("MultipleLights","normalMatrix");
shader->registerUniform("MultipleLights","viewerPos");
This will register the uniforms, now when we load the matrix values to the shaders, we can use the "registered" versions of the functions which will look up the values in the map and use the uniform's stored there. This will work unless the shader source is changed and re-compiled. In that case they will need to be re-registered.void GLWindow::loadMatricesToShader(
ngl::TransformStack &_tx
)
{
ngl::ShaderLib *shader=ngl::ShaderLib::instance();
(*shader)["MultipleLights"]->use();
ngl::Matrix MV;
ngl::Matrix MVP;
ngl::Mat3x3 normalMatrix;
ngl::Matrix M;
M=_tx.getCurrentTransform().getMatrix();
MV=_tx.getCurrAndGlobal().getMatrix()*m_cam->getViewMatrix() ;
MVP=MV*m_cam->getProjectionMatrix();
normalMatrix=MV;
normalMatrix.inverse();
normalMatrix.transpose();
shader->setRegisteredUniformFromMatrix("MV",MV);
shader->setRegisteredUniformFromMatrix("M",M);
shader->setRegisteredUniformFromMatrix("MVP",MVP);
shader->setRegisteredUniformFromMat3x3("normalMatrix",normalMatrix);
shader->setRegisteredUniformVec3("viewerPos",m_cam->getEye().toVec3());
}
Tuesday, 14 February 2012
Getting Started with the Programming Assignment Pt 5 A starmap
In the previous pos I got the ship moving, and on the way to work I decided it would be good to make a better background to the game, so I created a very simple StarMap class which loads two textures and creates two rotating sphere with alpha blended textures. This is shown in the following video and I will write a more detailed explanation when I get a chance. I've also got a new model form Turbo Squid until I get a better one.
The star map image is from here and I recommend this site in general especially the cool geometry stuff here. The planets were taken from here
The star map image is from here and I recommend this site in general especially the cool geometry stuff here. The planets were taken from here

Monday, 13 February 2012
Getting Started with the Programming Assignment Pt 4 Moving the Ship
In the previous post we designed different ways of linking our objects together, now to get the basic movement of the ship going I decided to modify the Advanced Game Key control demo from the ngl:: demos, I was originally going to use the format described in this post however the method I'm going to use here is a lot more flexible and is based on some code written by Rob the Bloke
This video shows the code in action
This code is spread amongst several classes but the main control codes are stored in the following structures in the file GameControls.h
Setting the Key Values
To set the key values we add a new attribute to the GLWindow.h class
This video shows the code in action
This code is spread amongst several classes but the main control codes are stored in the following structures in the file GameControls.h
enum GameControls
{
  kUp = 1 << 0,
  kDown = 1 << 1,
  kLeft = 1 << 2,
  kRight = 1 << 3,

  kUpLeft = kUp | kLeft,
  kUpRight = kUp | kRight,
  kDownLeft = kDown | kLeft,
  kDownRight = kDown | kRight,

  // nonsense controls
  kUpDown = kUp | kDown,
  kLeftRight = kRight | kLeft
};
This enum allows us to create a simple bit mask for each of the keys we require, in this case we define the main up/down & left right keys, then using a logical or we can create valid key combinations such as up and left etc.
Next we are going to define a structure to contain the movement values for each key combination, for now these will be the x,y movement and rotation values in x,y and z
// motion of a spaceship for a given key combo.
struct SpaceShipMotion
{
  float offsetX;
  float offsetY;
  float rotX;
  float rotY;
  float rotZ;
};
Finally we build up a table of key combination / motion values as shown here
static const SpaceShipMotion g_motionTable[] =
{
  { 0.0f, 0.0f, 0.0f ,0.0f,0.0f}, // 0
  { 0.0f, 1.0f, -1.0f,0.0f,0.0f}, // kUp
  { 0.0f,-1.0f, 1.0f,0.0f,0.0f }, // kDown
  { 0.0f, 0.0f, 0.0f,0.0f,0.0f }, // kUpDown (nonsense)

  {-1.0f, 0.0f, 0.0f,0.0f,-1.0f }, // kLeft
  {-0.707f, 0.707f, -0.707f,0.707f,-0.707f }, // kUpLeft
  {-0.707f,-0.707f, 0.707f,0.707f,0.707f }, // kDownLeft
  {-1.0f, 0.0f, 0.0f,0.0f,0.0f }, // kUpDown (nonsense) & kLeft

  { 1.0f, 0.0f, 0.0f,0.0f,1.0f }, // kRight
  { 0.707f, 0.707f, -0.707f,-0.707f,0.707f }, // kUpRight
  { 0.707f,-0.707f, 0.707f,-0.707f,0.707f }, // kDownRight
  { 1.0f, 0.0f, 0.0f,0.0f,0.0f }, // kUpDown (nonsense) & kRight

  { 0.0f, 0.0f, 0.0f,0.0f,0.0f }, // kLeftRight (nonsense)
  { 0.0f, 1.0f, 0.0f,0.0f,0.0f }, // kUp & kLeftRight (nonsense)
  { 0.0f,-1.0f, 0.0f,0.0f,0.0f }, // kDown & kLeftRight (nonsense)
  { 0.0f, 0.0f, 0.0f,0.0f,0.0f }, // kUpDown (nonsense) & kLeftRight (nonsense)

};
This structure is very useful as we can tweak the position and rotation values for each of the movements and it is easy to update the key combinations to add more.
The next stage of the code is to combine this with the SpaceShip class, the class used in the previous versions of the code have been modified to remove the move and rotate methods and been modified to use the following methodvoid SpaceShip::move(uint8_t _keysPressed)
{
// note we flip the offset to reverse the key direction here
m_pos.m_x += -g_motionTable[_keysPressed].offsetX;
m_pos.m_y += g_motionTable[_keysPressed].offsetY;
const static float s_rotationUpdate=20.0;
m_rotation.m_x=s_rotationUpdate*g_motionTable[_keysPressed].rotX;
m_rotation.m_y=s_rotationUpdate*g_motionTable[_keysPressed].rotY;
m_rotation.m_z=s_rotationUpdate*g_motionTable[_keysPressed].rotZ;
// clamp
m_pos.m_x = std::max(-s_xExtents, m_pos.m_x);
m_pos.m_y = std::max(-s_yExtents, m_pos.m_y);
m_pos.m_x = std::min(s_xExtents, m_pos.m_x);
m_pos.m_y = std::min(s_yExtents, m_pos.m_y);
}
The key combinations set in the GLWindow class are passed to this method as a uint8_t data type, we then uses this value to find the index into the motion table and set the SpaceShip position and rotation values. Finally the values are clamped to ensure the ship stays within the visibile area of the screen (this may change once I get some more of the game developed)
Setting the Key Values
To set the key values we add a new attribute to the GLWindow.h class
/// @brief the keys being pressed
uint8_t m_keysPressed;
Now when the keyPress and release method are called in the GLWindow class we set / free the m_keysPressed attribute to the key combinations in the GameControl.h file as shown
void GLWindow::processKeyDown(
                               QKeyEvent *_event
                              )
{
  switch(_event->key())
  {
    case Qt::Key_Up: m_keysPressed |= kUp; break;
    case Qt::Key_Down: m_keysPressed |= kDown; break;
    case Qt::Key_Left: m_keysPressed |= kLeft; break;
    case Qt::Key_Right: m_keysPressed |= kRight; break;
  }
}
When any of the keys are pressed the m_keysPressed attribute will set the correct key flag in the data structure by using a logical or. This means that if the flag is not set it will be set, however if already set it will remain active. When the key is released we need to turn this flag off, which can be done as follows
void GLWindow::processKeyUp(
                             QKeyEvent *_event
                           )
{
  switch(_event->key())
  {
    case Qt::Key_Up: m_keysPressed &= ~kUp; break;
    case Qt::Key_Down: m_keysPressed &= ~kDown; break;
    case Qt::Key_Left: m_keysPressed &= ~kLeft; break;
    case Qt::Key_Right: m_keysPressed &= ~kRight; break;
  }
}
In this case we use the logical not ~ and the logical and to turn the bit flag off.
Finally we call the move method of the SpaceShip before we draw as shown in the following method
void GLWindow::paintGL()
{
  // clear the screen and depth buffer
  glClear(GL_COLOR_BUFFER_BIT | GL_DEPTH_BUFFER_BIT);
  m_spaceShip.move(m_keysPressed);
  m_spaceShip.draw();

}
The code for this can be found here
Getting Started with the Programming Assignment Pt 3 Linking Things Together
In the previous post I created a simple SpaceShip class, to contain the state data for the Ship, I also outlined different methods. In this post I'm going to discuss different ways of associating the classes with each other. In this case we have the SpaceShip class which contains the state data, and the Models class which will contain the actual Mesh to be draw.
I'm going to then highlight three different ways of associating the classes so the SpaceShip class can access the model and draw.
In all these version we will have an instance of the SpaceShip class created in the GLWindow class called m_spaceShip, and we need to pass the global ngl::Camera to the SpaceShip class as well as the instance of the Model class.
Pass By Reference version
In this version we are going to pass into the draw method both the model and the camera, we declare the draw prototype as follows

Game State Object
The final method I'm going to describe is going to use a global game object. This object will be a singleton class, it will have public attributes for the camera and the models, which must be set when the class is first used.
The SpaceShip class will then access this when required.
Next how to move the ship
I'm going to then highlight three different ways of associating the classes so the SpaceShip class can access the model and draw.
In all these version we will have an instance of the SpaceShip class created in the GLWindow class called m_spaceShip, and we need to pass the global ngl::Camera to the SpaceShip class as well as the instance of the Model class.
Pass By Reference version
In this version we are going to pass into the draw method both the model and the camera, we declare the draw prototype as follows
/// @brief draw the ship
/// @param[in] _model a reference to the model loader
/// @param[in] _cam a reference to the global camera
void draw(
          const Models &_model,
          const ngl::Camera &_cam
         );
You will now note that this method is no longer marked as const, this is because in the loadMatricesToShader method we need to access the m_transform object and grab the current matrix. This will force the transform object to calculate the transforms and mutate itself, and hence is now a non const method./// @brief load our matrices to OpenGL shader
/// @param[in] _cam a reference to the camera use to grab the
/// VP part of the Matrix for drawing
void loadMatricesToShader(
const ngl::Camera &_cam
);
So the draw method will basically load the Model View Projection matrix to the shader by calling the method above we then need to access the model and call the draw method, this is shown in the following code
void SpaceShip::draw(const Models &_model, const ngl::Camera &_cam)
{
  loadMatricesToShader(_cam);
  _model.draw("spaceship");

}

void SpaceShip::loadMatricesToShader(const ngl::Camera &_cam)
{
  ngl::ShaderLib *shader=ngl::ShaderLib::instance();
  (*shader)["TextureShader"]->use();
  const ngl::Matrix MVP=m_transform.getMatrix()*_cam.getVPMatrix();
  shader->setShaderParamFromMatrix("MVP",MVP);
}
In the loadMatricesToShader method we have already loaded the shaders to the ShaderLib class and we then just call it when required. We can now use the following code in the GLWindow class to draw our SpaceShipm_spaceShip.draw(m_model,*m_cam);Which gives us the following

As you can see the orientation is wrong at present but I will fix that later.
Class Global Pointer Version
The next version is going to have two global pointers one for the Camera and one for the Models, these will be set in the spaceship class on construction and then used in the draw methods.
Firstly we need to add them to the SpaceShip class as follows
/// @brief the global camera
const ngl::Camera *m_camera;
/// @brief the global model store
const Models *m_models;
We now need to set these value, the best way to do this is by using the constructor, as we can guarantee that this will always be called.
/// @brief the ctor
/// @param[in] _cam the global camera
/// @param[in] _m the models
SpaceShip(
           const ngl::Camera *_cam,
           const Models *_m
         );
If we only implement the parameterized constructor above we will force the object to be constructed using these values. In the constructor we just need to copy these values
SpaceShip::SpaceShip(
                      const ngl::Camera *_cam,
                      const Models *_m
                     )
{
  m_camera=_cam;
  m_models=_m;
  m_pos.set(0,0,0);
  m_rotation.set(0,0,0);
  m_numLives=3;
  m_shieldStrength=100;
}
Now the draw and loadMatrices to shader method signatures can change to have no parameters as shown
void SpaceShip::draw()
{
  loadMatricesToShader();
  m_models->draw("spaceship");

}

void SpaceShip::loadMatricesToShader()
{
  ngl::ShaderLib *shader=ngl::ShaderLib::instance();
  (*shader)["TextureShader"]->use();
  const ngl::Matrix MVP=m_transform.getMatrix()*m_camera->getVPMatrix();
  shader->setShaderParamFromMatrix("MVP",MVP);
}
The code to generate the Ship is now different, firstly the SpaceShip class in GLWindow.h must now be a pointer and we need to build the object once we have created our camera and models as shown below
m_cam= new ngl::Camera(From,To,Up,ngl::PERSPECTIVE);
// set the shape using FOV 45 Aspect Ratio based on Width and Height
// The final two are near and far clipping planes of 0.5 and 10
m_cam->setShape(45,(float)720.0/576.0,0.05,350,ngl::PERSPECTIVE);


m_model.addModel("bigrock","models/RockBig.obj","textures/rock_texture.bmp");
m_model.addModel("spike","models/RockSpike.obj","textures/rock_texture.bmp");
m_model.addModel("spaceship","models/SpaceShip.obj","textures/spaceship.bmp");


m_spaceShip = new SpaceShip(m_cam,&m_model);
Both these methods work in more or less the same way, not passing the parameters to the draw method does reduce some of the stack overhead with accessing the data however simple timing tests give both methods the same speed of approximately 60FPS
Game State Object
The final method I'm going to describe is going to use a global game object. This object will be a singleton class, it will have public attributes for the camera and the models, which must be set when the class is first used.
The SpaceShip class will then access this when required.
#ifndef __GLOBALGAMEOBJECT_H__
#define __GLOBALGAMEOBJECT_H__

#include "Models.h"
#include <ngl/Camera.h>

/// @file GlobalGameObject.h
/// @brief we use this object to pass around global game data this is a singleton
/// @author Jonathan Macey
/// @version 1.0
/// @date 13/2/12
/// @class Models
/// @brief we only put const global references in this class to pass around data used
/// by the game


class GlobalGameObject
{
  public :
    /// @brief this is a singleton class this get the current instance
    static GlobalGameObject * instance();
    /// @brief our model made public for ease of access
    const Models *m_models;
    /// @brief the global camera made public for ease of access
    const ngl::Camera *m_camera;
  private :
    /// @brief hide away the ctor as this is a singleton
    GlobalGameObject(){;}
    /// @brief hide the copy ctor
    GlobalGameObject(const GlobalGameObject &_g){Q_UNUSED(_g);}
    /// @brief hide the dtor
    ~GlobalGameObject();
    /// @brief hide the assignment operator
    GlobalGameObject operator =(const GlobalGameObject &_r){Q_UNUSED(_r);}
    /// @brief our instance pointer
    static GlobalGameObject *m_instance;
};
#endif
The main C++ code looks like this and is a standard singleton, in this case we don't have to worry about managing the lifetime of the class as it will only contain const pointers and the other classes will manage their own lifetimes
#include "GlobalGameObject.h"

GlobalGameObject* GlobalGameObject::m_instance = 0;// initialize pointer

GlobalGameObject* GlobalGameObject::instance()
{
  if (m_instance == 0)  // is it the first call?
  {
    m_instance = new GlobalGameObject; // create sole instance
  }
  return m_instance; // address of sole instance
}
To use this class we must create it in GLWindow and attach the pointers as shown
GlobalGameObject *game=GlobalGameObject::instance();
game->m_camera=m_cam;
game->m_models=&m_model;
Now in the SpaceShip class we use the following to access the models and the camera
void SpaceShip::draw()
{
  loadMatricesToShader();
  GlobalGameObject *game=GlobalGameObject::instance();
  game->m_models->draw("spaceship");
}

void SpaceShip::loadMatricesToShader()
{
  GlobalGameObject *game=GlobalGameObject::instance();
  ngl::ShaderLib *shader=ngl::ShaderLib::instance();
  (*shader)["TextureShader"]->use();
  const ngl::Matrix MVP=m_transform.getMatrix()*game->m_camera->getVPMatrix();
  shader->setShaderParamFromMatrix("MVP",MVP);
}
As you can see this method breaks some of the OO rules about encapsulation but will require less re-working of the code if we wish to change game elements or add / remove elements to be shared with the rest of the game objects.
Another speed test puts this at about the same speed as the others. So there is no clear winner at present for any of the methods.
All of the code for the three examples can be found here, for now I think I'm going to use the GlobalGame object method as it will make the development cycle quicker as I only need to add things to the singleton class.Next how to move the ship
Getting Started with the Programming Assignment Pt 2 The SpaceShip
For part one see here
The main premise of the game is we are going to have a read view of a SpaceShip which the player can move around the screen in x and y. The user can also rotate the ship around the different axis.


The main premise of the game is we are going to have a read view of a SpaceShip which the player can move around the screen in x and y. The user can also rotate the ship around the different axis.

The sketch above shows the view of the ship and the axis of rotation, the class sketch below show the initial design of the SpaceShip class

The SpaceShip will have a shield with initial value of 100% which will be changed based on the game play mechanic (for example collisions will reduce the shield and I may update the value based on collecting assets)
By default the player will have 3 ships which will be decreased based on gameplay / collisions and there will be opportunities to add more ships based on score etc.
The following class diagram is a more formal version of the above

And in code looks like this
#ifndef __SPACESHIP_H__
#define __SPACESHIP_H__

#include <ngl/Vec3.h>
#include <ngl/Transformation.h>


/// @file SpaceShip.h
/// @brief the basic spaceship class used for the game
/// @author Jonathan Macey
/// @version 1.0
/// @date 13/2/12
/// @class SpaceShip
/// @brief this class encapsulates the spaceship state, and also controls, it does
/// not have a mesh assosiated with it this is stored in the Models class

class SpaceShip
{
  public :
    /// @brief the ctor
    SpaceShip();
    /// @brief the dtor
    ~SpaceShip();
    /// @brief move this will set the position of the ship
    /// @param[in] _dx the change in the x position
    /// @param[in] _dy the change in the y position
    void move(
               float _dx,
               float _dy
             );
    /// @brief rotate the ship in the three axis
    /// @param[in] _dx the change in the x rotation
    /// @param[in] _dy the change in the y rotation
    /// @param[in] _dz the change in the z rotation
    void rotate(
                 float _dx,
                 float _dy,
                 float _dz
                );
    /// @brief draw the ship
    void draw() const;
    /// @brief get the life value
    inline int getLife() const {return m_numLives;}
    /// @brief remove life
    inline void removeLife(){m_numLives-=1;}
    /// @brief get the sheild strength
    inline int getShieldStrength()const {return m_shieldStrength;}
    /// @brief reduce the sheild strength
    inline void reduceShieldStrength(int _s){ m_shieldStrength-=_s;}

  private :
    /// @brief the position of the ship
    ngl::Vec3 m_pos;
    /// @brief the x,y,z rotation values of the ship
    ngl::Vec3 m_rotation;
    /// @brief our transformation used to load to the matrix
    ngl::Transformation m_transform;
    /// @brief load our matrices to OpenGL shader
    void loadMatricesToShader();
    /// @brief the number of lives for the ship
    /// this is set to 3 initially and will then change as the game progresses
    int m_numLives;
    /// @brief the strength of the sheild starts at 100% and reduces during the game
    /// based on collisions
    int m_shieldStrength;
};


#endif
We can now write most of the methods if we ignore the drawing elements of the class. These are as follows
SpaceShip::SpaceShip()
{
  m_pos.set(0,0,0);
  m_rotation.set(0,0,0);
  m_numLives=3;
  m_shieldStrength=100;
}


SpaceShip::~SpaceShip()
{

}

void SpaceShip::move(float _dx, float _dy)
{
  m_pos.m_x+=_dx;
  m_pos.m_y+=_dy;
}

void SpaceShip::rotate(float _dx, float _dy, float _dz)
{
  m_rotation.m_x+=_dx;
  m_rotation.m_y+=_dy;
  m_rotation.m_z+=_dz;
}
It is now possible to construct a simple SpaceShip class in the main GLWindow and use it for storing the data values for the ship However drawing the mesh for the class is going to be a lot more complex and this will be put into the next post. For now here is the basic code and part three is here
Getting Started with the Programming Assignment Pt 1
It's programming assignment time again, and I've decided this year to write a simple game to demonstrate some of the features of NGL and to show you how to go from the initial design stuff into code.
For this game I've decided to do a simple 3D style asteroid game which uses a number of obj meshes to draw the different asteroids and the ship.
The main focus on these blog posts will be the sharing of data across different classes and the stepwise refinement from the class design to writing the code.
My initial design for the system is shown below


To test the class I've used one of the basic ngl:: demo programs, and added to the GLWindow.h class a simple Models m_model; object.
To load the meshes we need to first have a valid OpenGL context


For this game I've decided to do a simple 3D style asteroid game which uses a number of obj meshes to draw the different asteroids and the ship.
The main focus on these blog posts will be the sharing of data across different classes and the stepwise refinement from the class design to writing the code.
My initial design for the system is shown below

I'm going to concentrate of the basic design of each of these classes, then implement and test them separately. The first class will be the models class.
Models
The models class is a container for the meshes, and allows us to share meshes for each of the other classes. For example in this game we will have a number of Asteroid objects, however each one will only have a single mesh. We could load a mesh for each Asteroid object we create, however this is going to be slow and wasteful of resources as we only have a limited amount of GPU memory and texture memory. Using the Models class we load all our models and textures at program startup, then each of our classes that need access to the models will have a pointer to this class and access models via it.
To store the Obj meshes I decided to use std::string name lookup and the easiest way of implementing this is to use the std::map container and use the build in iterators to access things. Another concern when designing is to ensue we have const correctness built in from the outset. In this case as we only have one method that doesn't mutate the class (the draw method) it is quite easy to do this.
Finally I wish to ensure full documentation of the class, I will be using Doxygen to comment everything and as usual it is best to write this at the time of creating the class. The code below shows the fully .h file for the class
#ifndef __MODELS_H__
#define __MODELS_H__

#include <string>
#include <map>
#include <ngl/Obj.h>

/// @file Models.h
/// @brief a class to contain all models used in game
/// @author Jonathan Macey
/// @version 1.0
/// @date 10/2/12
/// @class Models
/// @brief this class contains all meshes required for the game level
/// we use this as we only need to load meshes once but may need to attach
/// to many objects in our game

class Models
{
public :
  /// @brief our ctor
  Models(){;}
  /// @brief our dtor this will clear the models and remove
  /// all of the meshes created
  ~Models();
  /// @brief add a mesh with no texture
  /// @param[in] the name of the model we wish to use for lookup
  /// @param[in] the path / name of the mesh
  void addModel(
                const std::string &_name,
                const std::string &_mesh
              );
  /// @brief add a mesh with a texture
  /// @param[in] the name of the model we wish to use for lookup
  /// @param[in] the path / name of the mesh
  /// @param[in] the path / name of the texture
  void addModel(
                  const std::string &_name,
                  const std::string &_mesh,
                  const std::string &_texture
               );
  /// @brief accesor to the model, incase the caller
  /// wishes to modify the mesh etc
  ngl::Obj *getModel(std::string _name);
  /// @brief method to draw the mesh, all tx must be executed before
  /// the call to draw
  /// @param[in] the name of the mesh to draw
  void draw(std::string _name) const;
private :
  /// @brief a map to hold our meshes by name
  std::map < std::string, ngl::Obj *>m_models;

};


#endif
As you can see the constructor doesn't do anything in the class, however we need to implement a destructor to call the ngl::Obj destructor and clear out all the mesh data etc.Models::~Models()
{
std::map <std::string,ngl::Obj *>::iterator pbegin=m_models.begin();
std::map <std::string,ngl::Obj *>::iterator pend=m_models.end();
while(pbegin != pend)
{
std::cout <<"deleting "<<pbegin->first<<"\n";
delete pbegin->second;
++pbegin;
}
}
The destructor uses the std::map::iterator to grab the front and the back of the map, we then loop through and use the ->second accessor to delete the ngl::Obj * class.
The rest of the class is fairly simple, to add a mesh we use the following code
void Models::addModel(
                       const std::string &_name,
                       const std::string &_mesh,
                       const std::string &_texture
                      )
{
  ngl::Obj *mesh = new ngl::Obj(_mesh,_texture);
  mesh->createVAO(GL_STATIC_DRAW);
  mesh->calcBoundingSphere();
  m_models[_name]=mesh;
}
Finally as the draw method is const we need to use a std::map::const_iterator to access the data for drawing
void Models::draw(std::string _name) const
{
  std::map <std::string,ngl::Obj *>::const_iterator pbegin=m_models.begin();
  std::map <std::string,ngl::Obj *>::const_iterator model=m_models.find(_name);

  if(pbegin!=m_models.end() && model !=m_models.end())
  {
    model->second->draw();
  }
}
TestingTo test the class I've used one of the basic ngl:: demo programs, and added to the GLWindow.h class a simple Models m_model; object.
To load the meshes we need to first have a valid OpenGL context
m_model.addModel("bigrock","models/RockBig.obj","textures/rock_texture.bmp");
m_model.addModel("spike","models/RockSpike.obj","textures/rock_texture.bmp");
m_model.addModel("ship","models/SpaceShip.obj","textures/spaceship.bmp");
Then to draw we can use the following
switch (m_whichModel)
{
  case 0 : m_model.draw("bigrock"); break;
  case 1 : m_model.draw("spike"); break;
  case 2 : m_model.draw("ship"); break;
}
Which gives us the following


You can download the test code and class here
Reflections on initial design
It has occurred to me, whilst writing this up that using a std::map may not be the fasted way of using this class as we need to iterate to search by name. It may actually be better to use a std::vector and have some form of index based enumerated type to search for the models. Once I start testing the rest of the classes I will do some comparisons for speed, which will test this.
Subscribe to:
Posts (Atom)