Showing posts with label Maya. Show all posts

Monday, 30 January 2012

Maya Alembic Export

Whilst this blog is mainly concerned with setting up alembic maya export within the University network, most of this is also applicable to other systems. You just need to change all the paths to the corresponding ones on your system.

First you need to download and build your alembic maya plugins. These come as part of the Alembic package and you should follow the build instructions. Once everything is built you will have a directory within the source tree called maya/plug-ins.

On the University system this is in the directory /public/bin/alembic/maya/plug-ins and you should see the two plugins AbcExport.so  AbcImport.so

University Setup
In the root of your home directory (type cd and press enter) execute the following commands

cd
mkdir MayaPlug
mkdir MayaScript
cp /public/bin/alembic/maya/plug-ins/* ~/MayaPlug
This will copy the Alembic plugins into a pre-defined directory which we will tell maya to search when starting up. This is controlled by the file Maya.env. Again the location of this file will differ depending upon the install, but in the University this is located here $HOME/maya/2011-x64/ If this file doesn't exist in the directory you can create your own using the following command
cd $HOME/maya/2011-x64/
touch Maya.env
gedit Maya.env
This will open the file and allow us to edit the maya environment variables used when maya starts. We need to add to this file the following
MAYA_PLUG_IN_PATH=/home/jmacey/MayaPlug
MAYA_SCRIPT_PATH=/home/jmacey/MayaScripts
PYTHONPATH=MAYA_SCRIPT_PATH
In the above example you will need to change the /home/jmacey to your own home directory path. This will then setup two areas that maya will search when looking for plugins ( $HOME/MayaPlug ) and scripts ( $HOME/MayaScript ) when you now start maya you should get the following list when opening the Menu Windows->Settings / Preferences -> Plugin-Manager
You should now see the AbcExport.so ( this screen shot from my mac is different as it uses a .bundle) and AbcImport.so. If you click on the Loaded button it will load the plugin and you should be able to type AbcExport -h in the Mel tab of the script editor as shown below
For more info on this read the blog post here. As the command line is a little bit complex, I decided to create a simple GUI to make life easier. The main design for this came from the output of AbcExport -h and all the options printed in the help that actually work have been translated into gui items.

AlembicExport.py

The AlembicExport.py script can be downloaded from here and it should be saved in the $HOME/MayaScripts directory.

When using the script you will need to select all the geometry you wish to export (if you select all Alembic will attempt to export all it can ) and type the following in the python script editor
from AlembicExport import *
AlembicExport()
This will give you the following GUI
The current frame range is selected and by default uv's and normals will be exported. Other options are available and you should read the AlembicExport help for more details. 

The actual alembic jobstring and command line is placed in the job string text field so you can copy this if you wish to use the command line at a later date.

Code outline
The code is fairly self explanatory, however I will outline a couple of areas.
First we check to see if the AlembicExport plugin is installed. This is done with the following code
# check to see if plugin is loaded
plugs=cmds.pluginInfo( query=True, listPlugins=True )
if "AbcExport" not in plugs :
  print "AbcExport not loaded please load it"
To build up the jobstring for the actual export we use the following code
jobstring="AbcExport "
if self.verbose == True :
  jobstring+=" -v "
jobstring+="-j \" -fr %d %d -s %d" %(self.start,self.end,self.steps)
.....
This will build up a complete export command which we will then execute using the eval command as follows
mel.eval(jobstring)

Friday, 27 January 2012

Maya standalone python

I've just had an email from an ex student asking about automating the export process from maya as at present they load each scene by hand and then use a particular plugin to export in a new format.

My suggestion was to use the standalone maya python interpretor and try to semi automate the process, to do this I wrote a simple proof of concept as follows.

The following script scans the current directory for any maya ASCII files, opens the file and selects all. Then exports this as an obj file.

First we need to enable the maya standalone system

import maya.standalone
import maya.cmds as cmds
import os

maya.standalone.initialize(name='python')

The line above imports the maya.standalone module, next we need to initialise this and tell it which interpretor we are using with the name='python' command. We now have an empty maya environment which should have read our Maya.env so all the paths etc are setup. However none of our default auto-loaded plugins are loaded. In this case I wish to use the obj export plugin so need to load it. As this is a simple proof of concept I don't do any checking to make sure it is loaded etc.

cmds.loadPlugin("objExport")

The next batch of code scans the current directory and checks for .ma files then does the export
files = os.listdir(".")
for mayafile in files :
  if mayafile.endswith(".ma") :
    cmds.file(mayafile,o=True)
    cmds.select(all=True)
    newFile="%s.obj" %(mayafile)
    cmds.file(newFile,type="OBJexport",pr=True,es=True)

The rest of the code uses the standard maya.cmds module to first open the file then select all elements.

Next I create a new filename by adding ".obj" to the end of the file loaded and export with the file command.

To run the script we need to use the mayapy command. This should be in the same directory as the rest of the maya executables. On my mac this is /Applications/Autodesk/maya2011/Maya.app/Contents/bin/mayapy but you will need to add it to your path

To run I've saved the file as export.py and run mayapy export.py

Monday, 16 January 2012

Pipeline Stuff

As we are starting the group project section of the Masters term I thought it would be a good idea to do some basic pipeline stuff.

This example is going to write some simulation data created in a C++ program and then we will write some simple Python scripts to load this data into Maya and Houdini.

The following video shows the program in action as well as the Maya and Houdini versions.

As this is an ad-hoc system the output file format is very simple, the C++ program writes out the following data :-


NumParticles 500
Frame 0
P0 64.301 -57.7284 49.8516
....
Frame 1
....

Where the particle data consists of The name of the Particle (in this case P0,P1....Pn) and the x,y,z positions of the particle per frame.

Maya Version
The maya version of the program will popup a dialog box to prompt the user to select an input file, it will then parse the file and create a locator for each of the particle names found.
Then for every frame a keyframe is created for the locator replicating the animation from the C++ simulation.
import maya.OpenMaya as OM
import maya.OpenMayaAnim as OMA
import maya.cmds as cmds
The code above loads in the maya elements we need, OpenMaya contains the core maya elements we need, the OpenMayaAnim namespace has the controls for all the animation transports such as setting the current frame and maya.cmds gives us access to all the maya cmds similar to the mel commands printed in the console when we generate things.

def createLocator(_name,_x,_y,_z) :
    cmds.spaceLocator( name=_name)
    cmds.move(_x,_y,_z)
    cmds.setKeyframe()

The createLocator function creates a simple space locator then moves it to the current x,y,z position we then set the keyframe to make the initial key at the currently set frame (more on this later)

def moveLocator(_name,x,y,z) :
    cmds.select(_name)
    cmds.move(x,y,z)
    cmds.setKeyframe()

The move locator function, first selects the locator (based on the name passed in), it then calles the move command which will move the currently selected object, finally we set the keyframe.
def importParticleFile() :
    basicFilter = "*.out"

    fileName=cmds.fileDialog2(caption="Please select file to import",fileFilter=basicFilter, fm=1)
    if fileName[0] !=None :

 file=open(str(fileName[0]))
 frame=0
 numParticles=0
 #set to frame 0
 animControl=OMA.MAnimControl()
 animControl.setCurrentTime(OM.MTime(frame))

 for line in file :
  line=line.split(" ")
  if line[0]=="NumParticles" :
   numParticles=int(line[1])
  elif line[0]=="Frame" :
   frame=int(line[1])
   animControl.setCurrentTime(OM.MTime(frame))
  else :
   name=line[0]
   x=float(line[1])
   y=float(line[2])
   z=float(line[3])
   if frame==0 :
    #we need to create our initial locators
    createLocator(name,x,y,z)
   else :
    moveLocator(name,x,y,z)
Houdini Version
The houdini version of the script will generate a null which is the houdini equivalent of a locator. By default a houdini null doesn't contain any geometry so we also need to parent this to some axis (houdini call these controls).


To start with we need to get the name of the file, this is done using the getAbsoluteFilename function described here http://jonmacey.blogspot.com/2011/01/houdini-python-ascode.html


def createNull(parent,_name,x,y,z) :
 #create a null this will set loads of default values
 null = parent.createNode("null", _name, run_init_scripts=False, load_contents=True)
 # set the x,y,z values
 null.parm("tx").set(x)
 null.parm("ty").set(y)
 null.parm("tz").set(z)
 # now add a control to the null so we have something to visualise
 null.createNode("control", "ctrl"+_name, run_init_scripts=False, load_contents=True)
 # now grab the keyframe
 setKey = hou.Keyframe()
 # set to frame 0
 setKey.setFrame(0)
 # now key the tx/y and z values
 setKey.setValue(x)
 null.parm("tx").setKeyframe(setKey)
 setKey.setValue(y)
 null.parm("ty").setKeyframe(setKey)
 setKey.setValue(z)
 null.parm("tz").setKeyframe(setKey)
 # now add to our network node
This function is passed the parent node, which in this case will be the houdini path "/obj/" from this we create a new node called a "null" and set it's parameters. In Houdini all parameters can be access using the parm(...) method of the object passing in the name of the parameter we wish to access, in this case "tx/ty/tz". Next we set the keyframes using the hou.keyframe class.
def moveNull(_name,frame,x,y,z) :
 null=hou.node("/obj/"+_name)
 setKey = hou.Keyframe()
 setKey.setFrame(frame)
 setKey.setValue(x)
 null.parm("tx").setKeyframe(setKey)
 setKey.setValue(y)
 null.parm("ty").setKeyframe(setKey)
 setKey.setValue(z)
 null.parm("tz").setKeyframe(setKey)
In this function we grab the object by name then set the keyframes using the same method as above. Finally we are going to create our nodes and import the file, the file reading code is exactly the same, however we create a subNetwork first to make the houdini scene neater.
def importParticleFile() :

 fileName=GetAbsoluteFileName("Select particle File","*.out",hou.fileType.Any)
 # get the the object leve as our parent
 if locals().get("hou_parent") is None:
  parent = hou.node("/obj")

 # make sure we got a filename
 if fileName !=None :
  subNetName=hou.ui.readInput("Please Enter name for the subnet")
  ## @brief we now copy this to a new string
  subNetName=subNetName[1]

  subNet=parent.createNode("subnet", subNetName, run_init_scripts=False, load_contents=True)
  #open the file (could do a proper check here)
  file=open(fileName)
  frame=0
  numParticles=0
  # now process the file and create the nulls
  for line in file :
   line=line.split(" ")
   if line[0]=="NumParticles" :
    numParticles=int(line[1])
   elif line[0]=="Frame" :
    frame=int(line[1])
   else :
    name=line[0]
    x=float(line[1])
    y=float(line[2])
    z=float(line[3])
    if frame==0 :
     #we need to create our initial locators
     createNull(subNet,name,x,y,z)
    else :
     moveNull(subNetName+"/"+name,frame,x,y,z)


To grab the full code use the following

DemoProgram (requires NGL)
particles.out (the output of the program which the python files read)
Houdini Script
Maya Script

Thursday, 9 June 2011

Point Bake Export of Animation Data

The following videos demonstrate the NCCA PointBake system developed as a simple "lowest common denominator" exporter for basic animation data.

For the export code look here there are a number of Python scripts in the tgz file. For the Source code use the PointBake and PointBakeCloth from here.


Wednesday, 6 April 2011

Using the Maya MScriptUtil class in Python

Been using some maya and python and discovered there was no way to access some of the MImage methods as they use pass by reference to return values. This after some investigation lead me to the MScriptUtil class.

Now a couple of things struck me when reading the documents, the first being
"This class is cumbersome to use but it provides a way of building parameters and accessing return values for methods which would normally not be scriptable".
To my mind this reads as
"This is a hack but we couldn't be arsed to re-factor loads of our code to add proper accesors and mutators"

On further reading you get even more of a sense of that. What I wanted to do was to access the width and height of an MImage and access the RGB(A) data of the MImage and the only way of really doing this within python is to use the MScriptUtil Class.

MImage Class Design
I decided to wrap up all the functionality I needed into a simple python class which could be re-used within maya, the basic class design is as follows

The class will be constructed with a filename and will automatically read the image file and grab the image dimensions as well as a pointer to the data.

import maya.OpenMaya as om
import sys

class MayaImage :
 """ The main class, needs to be constructed with a filename """
 def __init__(self,filename) :
  """ constructor pass in the name of the file to load (absolute file name with path) """
  # create an MImage object
  self.image=om.MImage()
  # read from file MImage should handle errors for us so no need to check
  self.image.readFromFile(filename)
  # as the MImage class is a wrapper to the C++ module we need to access data
  # as pointers, to do this use the MScritUtil helpers
  self.scriptUtilWidth = om.MScriptUtil()
  self.scriptUtilHeight = om.MScriptUtil()

  # first we create a pointer to an unsigned in for width and height
  widthPtr = self.scriptUtilWidth.asUintPtr()
  heightPtr = self.scriptUtilHeight.asUintPtr()
  # now we set the values to 0 for each
  self.scriptUtilWidth.setUint( widthPtr, 0 )
  self.scriptUtilHeight.setUint( heightPtr, 0 )
  # now we call the MImage getSize method which needs the params passed as pointers
  # as it uses a pass by reference
  self.image.getSize( widthPtr, heightPtr )
  # once we get these values we need to convert them to int so use the helpers
  self.m_width = self.scriptUtilWidth.getUint(widthPtr)
  self.m_height = self.scriptUtilHeight.getUint(heightPtr)
  # now we grab the pixel data and store
  self.charPixelPtr = self.image.pixels()
  # query to see if it's an RGB or RGBA image, this will be True or False
  self.m_hasAlpha=self.image.isRGBA()
  # if we are doing RGB we step into the image array in 3's
  # data is always packed as RGBA even if no alpha present
  self.imgStep=4
  # finally create an empty script util and a pointer to the function
  # getUcharArrayItem function for speed
  scriptUtil = om.MScriptUtil()
  self.getUcharArrayItem=scriptUtil.getUcharArrayItem


Initially the class was designed to check to see if alpha was present and determine if the data was packed as RGB or RGBA and step through the packed data accordingly, however on further reading of the documents I discovered

"The image is stored as an uncompressed array of pixels, that can be read and manipulated directly. For simplicity, the pixels are stored in a RGBA format (4 bytes per pixel)".
So this was not required and was removed.

Using MScriptUtil
There are several ways to use MScriptUtil, the various constructors allow us to generate an object by passing in an object as a reference value, or we can create an instance of the class and then associate an object as a reference.

Initially I generated one MScriptUtil class, and associated the pointers from an already instantiated object. However this didn't work correctly. After reading the help I found the following note


So if you need to use two pointers at the same time you need to create two MScriptUtil objects.
self.scriptUtilWidth = om.MScriptUtil()
self.scriptUtilHeight = om.MScriptUtil()

# first we create a pointer to an unsigned in for width and height
widthPtr = self.scriptUtilWidth.asUintPtr()
heightPtr = self.scriptUtilHeight.asUintPtr()
Next we set the values to 0 for both the pointers, whilst this is not required, it make sure when we load the actual values if nothing is returned we have a null value.

Next a call to the MImage getSize method is called


As you can see in this method both the width and the height values are passed by reference. The code below passes the new pointers we have created using the script util class into the getSize method and these will be associated.

self.scriptUtilWidth.setUint( widthPtr, 0 )
self.scriptUtilHeight.setUint( heightPtr, 0 )
self.image.getSize( widthPtr, heightPtr )
Finally we need to extract the values that the pointers are pointing to, and load them into our python class which is done in the following code

self.m_width = self.scriptUtilWidth.getUint(widthPtr)
self.m_height = self.scriptUtilHeight.getUint(heightPtr)

See all this code could be avoided if MImage had getWidth and getHeigh accessor methods!
Now for some speedups

To access the pixel data we need to grab the array of data from the MImage class, this is done with the following method call

self.charPixelPtr = self.image.pixels()

The help says that
"Returns a pointer to the first pixel of the uncompressed pixels array. This array is tightly packed, of size (width * height * depth * sizeof( float)) bytes".

So we also have a pointer that we need to convert into a python data type. This can be done with the getUcharArrayItem however this would need to be created each time we try to access the data.

In python however it is possible to create a reference to a function / method in the actual code. This is done by assigning a variable name to a function and then using this instead of the actual function call. This can significantly speed up methods as the python interpretor doesn't have to lookup the method each time.

The following code shows this and the pointer to the method is stored as part of the class
scriptUtil = om.MScriptUtil()
self.getUcharArrayItem=scriptUtil.getUcharArrayItem
getPixels
To get the pixel data we need to calculate the index into the pointer array (1D) as a 2D x,y co-ordinate. This is a simple calculation as follows


index=(y*self.m_width*4)+x*4
In this case we hard code the 4 as the MImage help states that the data is always stored as RGBA if this were not the case we would have to query if the data contained an alpha channel and make the step 3 or 4 depending upon this.

The complete method is as follows
def getPixel(self,x,y) :
 """ get the pixel data at x,y and return a 3/4 tuple depending upon type """
 # check the bounds to make sure we are in the correct area
 if x<0 or x>self.m_width :
  print "error x out of bounds\n"
  return
 if y<0 or y>self.m_height :
  print "error y our of bounds\n"
  return
 # now calculate the index into the 1D array of data
 index=(y*self.m_width*4)+x*4
 # grab the pixels
 red = self.getUcharArrayItem(self.charPixelPtr,index)
 green = self.getUcharArrayItem(self.charPixelPtr,index+1)
 blue = self.getUcharArrayItem(self.charPixelPtr,index+2)
 alpha=self.getUcharArrayItem(self.charPixelPtr,index+3)
 return (red,green,blue,alpha)

As you can see the index is calculated then the method saved earlier is called to grab the actual value at the index location (Red) then index+1 (green) index+2 (blue) and index+3 (alpha). For convenience I also wrote a getRGB method as shown

def getRGB(self,x,y) :
    r,g,b,a=getPixel(x,y)
    return (r,g,b)

Other methods shown below are also added to the class to allow access to the attributes, whilst python allows access to these class attributes directly, when porting C++ code usually we will have getWidth / getHight style methods so I just added them.

def width(self) :
    """ return the width of the image """
    return self.m_width

def height(self) :
    """ return the height of the image """
    return self.m_height

def hasAlpha(self) :
    """ return True is the image has an Alpha channel """
    return self.m_hasAlpha


Using the Class
The following example prompts the used for a file name then loads the image, anything in the red channel of the image with a pixel value greater than 10 is used to generate a cube of height r/10

import maya.OpenMaya as om
import maya.cmds as cmds


basicFilter = "*.*"

imageFile=cmds.fileDialog2(caption="Please select imagefile",
             fileFilter=basicFilter, fm=1)


img=MayaImage(str(imageFile[0]))
print img.width()
print img.height()a
xoffset=-img.width()/2
yoffset=-img.height()/2

for y in range (0,img.height()) :
 for x in range(0,img.width()) :
  r,g,b,a=img.getPixel(x,y)
  if r > 10 :
   cmds.polyCube(h=float(r/10))
   cmds.move(xoffset+x,float(r/10)/2,yoffset+y)

Using the following image

We produce the following


Wednesday, 1 December 2010

Maya Batch Renderer GUI Using PyQT

The code for this demo is now on github.

The maya batch renderer is a command line tool to allow the rendering of frames from within a maya file. It has many command line options which can be determined by running the command Render -h. From this output the following elements have been identified as most use for the basic batch renderer dialog.


In addition to this we can query the different renderer options and get the following list
We are going to design a user interface using Qt and Python to generate the command line arguments shown above and give the user the ability to choose the files, project directory and output directory for the program.
The program will also report the output of the batch renderer in a window and give the user the ability to stop batch render at any stage. The main UI is shown next.


Batch Render Dialog
We are going to use Qt designer to develop the application user interface, first open up designer (/opt/qtsdk/qt/bin/designer in the Linux studios) and choose a Dialog without buttons as shown
Select the dialog that’s created and set the object properties objectName to mainDialog and windowTitle to Batch Render as shown
We are now going to add a button to the window and then set the layout manager before we create the rest of the UI.
First drag a button anywhere on the screen, then change the name of the button to m_chooseFile and the button text to Choose File as shown below.
At present you are free to move any of the UI components within the form, however once the form is re-sized no of the buttons will re-size correctly. To enable this we need to add a layout manager to the form. This is done by right clicking on the dialog and in this case we are going to select the “Layout on Grid” which should now result in the following
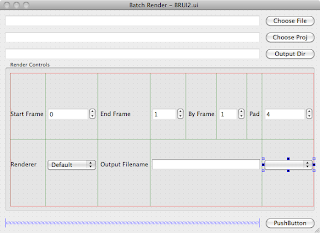
Now as we add components to the UI blue areas will appear as slots to add to the grid, for the next stage we are going to add a “QLineEdit” component next to the button, and name it m_fileName we will also tick the read-only tickbox.
We are now going to replicate this process and add 2 more QLineEdit and Button Combinations as shown below
Note the Names of each of the components and set them to the correct names, and set the read only flag for each of the text components.

Next we are going to add a group box and set it to the following size and values
Next we add another button which will need to be spaced to fit into the correct size
First add the button and name it m_batchRender as shown 
Then add a horizontal spacer to make the button fit in the correct area (you may have to add the spacer above then move the button into place)
We are now going to add the rest of the controls into the group box, we need to first add a layout to the group box, this is done by choosing the Grid Layout  as shown here and scaling it to fit the group box
Now add the following labels and spin boxes
The spin boxes from left to right are called m_startFrame, m_endFrame, m_byFrame and m_pad.

We need to set some default values and ranges for each as shown
We are now going to add a second row to the group box first a label and a combo box which we will call m_renderer as shown
By double clicking on the combo box we can get the edit dialog and using the + button add the following text values for the different renderers.

Next we will add a text edit called m_outputFileName and a combo box called  m_extension and complete the row as shown.


For the final element we are going to add a textedit so we can capture the output of the batch render, this will be called m_outputWindow and we need to set the read only flag in the property editor.
The final window should look like the following 
Using PyQt
The UI file generated by QtDesigner is a simple XML file containing the layouts of the different elements. We can convert this into source code using one of the UI compilers, in this case we are developing a python application so we will use the pyuic4 compiler using the following command line.

pyuic4 BatchRenderUI.ui -o BatchRender.py

This will produce a python file for the UI elements which we will use within our own class to then create the program.
Basic Program Operation
The way the program will operate is to check that MAYA_LOCATION is in the current path, if it is not we need to tell the user and set this. This is so we can determine the correct location of the Render command in MAYA_LOCATION/bin. The basic python code to do this is as follows

#!/usr/bin/python
from PyQt4 import QtCore, QtGui
from BatchRenderUI import Ui_mainDialog

import os,shutil
import fileinput


if __name__ == "__main__":
 import sys
 app = QtGui.QApplication(sys.argv)

 ResourcePath=os.environ.get("MAYA_LOCATION")

 MainDialog = QtGui.QDialog()
 ui = BatchRender(ResourcePath)

#see if the ResourcePath is set and quite if not
 if ResourcePath == None :
  msgBox=QtGui.QMessageBox()
  msgBox.setText("The environment variable MAYA_LOCATION not set ")
  msgBox.show()
  sys.exit(app.exec_())

 else :
    print "ready"
  sys.exit(app.exec_())


If the environment variable is not set we will get the following dialog box
To set the location we need to add export MAYA_LOCATION=:/usr/autodesk/maya2011-x64/ to our .bashrc file.

UI Class
We are now going to develop a UI class to contain the UI developed using designer and then extend it to have our own functionality and methods for the program.
The basic outline of the class init method is as follows
class BatchRender(Ui_mainDialog):
 def __init__(self, _mayaPath=None):

  # @brief the name of the maya file to render
  self.m_mayaFile=""
  # @brief the name of the maya project directory
  self.m_mayaProject=""
  # @brief the optional name of the output directory
  self.m_outputDir=""
  # @brief the main ui object which contains our controls
  self.m_ui=Ui_mainDialog()
  # @brief we will use this to thread our render output
  self.m_process=QtCore.QProcess()
  # @brief a flag to indicate if we are rendering or not
  self.m_rendering=False
  # @brief the batch render command constructed from the maya path
  self.m_batchRender="%sbin/Render " %(_mayaPath)
  # now we call the setup UI to populate our gui
  self.m_ui.setupUi(MainDialog)

  print self.m_batchRender

This will construct the ui by calling the Ui_mainDialog constructor created from the pyuic4 command and then later call the setupUI command which is automatically generated from the pyuic compiler.

We can now update our main function to construct this object and build our dialog
if __name__ == "__main__":
 import sys
 app = QtGui.QApplication(sys.argv)

 ResourcePath=os.environ.get("MAYA_LOCATION")

 MainDialog = QtGui.QDialog()
 ui = BatchRender(ResourcePath)

#see if the ResourcePath is set and quite if not
 if ResourcePath == None :
  msgBox=QtGui.QMessageBox()
  msgBox.setText("The environment variable MAYA_LOCATION not set ")
  msgBox.show()
  sys.exit(app.exec_())

 else :

  MainDialog.show()
  sys.exit(app.exec_())

Connecting Buttons to Methods

Qt uses the signals and slots mechanism to connect UI component actions to methods within our classes. We must explicitly connect these elements for them to work. The following code section is from the __init__ method of the BatchRender class and show this in action.
# here we connect the controls on the UI to the methods in the class

QtCore.QObject.connect(self.m_ui.m_chooseFile, QtCore.SIGNAL("clicked()"), self.chooseFile)
QtCore.QObject.connect(self.m_ui.m_chooseProject, QtCore.SIGNAL("clicked()"), self.chooseProject)
QtCore.QObject.connect(self.m_ui.m_chooseOutputDir, QtCore.SIGNAL("clicked()"), self.chooseOutput)
QtCore.QObject.connect(self.m_ui.m_batchRender, QtCore.SIGNAL("clicked()"), self.doRender)
QtCore.QObject.connect(self.m_process, QtCore.SIGNAL("readyReadStandardOutput()"), self.updateDebugOutput)
QtCore.QObject.connect(self.m_process, QtCore.SIGNAL("readyReadStandardError()"), self.updateDebugOutput)
QtCore.QObject.connect(self.m_process, QtCore.SIGNAL("started()"), self.updateDebugOutput)
QtCore.QObject.connect(self.m_process, QtCore.SIGNAL("error()"), self.error)
QtCore.QObject.connect(self.m_process, QtCore.SIGNAL("finished()"), self.finished)

The m_process attribute has a number of signals to indicate the state of the process being run, this will be outlined later.

The Render process

For the batch render to run we must have a minimum of a filename and project directory set. We can check these value by seeing if the textEdit fields for each of these values are empty or not.

As part of this process we will also check to see if the startFrame value is >= endFrame value by querying the two spin boxes. The basic code for this is shown below
def doRender(self) :
  if self.m_rendering == True :
    self.m_ui.m_batchRender.setText("Batch Render");
    # stop the batch render process
    self.m_process.kill()
    # clear the output window
    self.m_ui.m_outputWindow.clear()
    self.m_rendering = False
  else :
    """ first we are going to check that we have the correct settings """
    if self.m_mayaFile =="" :
      self.errorDialog("no maya file set")
      return
    if self.m_mayaProject=="" :
      self.errorDialog("no Project directory set")
      return
    if self.m_ui.m_startFrame.value() >= self.m_ui.m_endFrame.value() :
      self.errorDialog("start Frame <= end Frame")
      return
  

If these fail we pop up a generic dialog error box using the following code
Using the following function
def errorDialog(self,_text) :
  QtGui.QMessageBox.about(None,"Warning", _text)

If the criteria above are correct we can construct the Batch Render command string, this is done by building up different elements for each of the argument flags as separate strings as follows.
print "Doing render"
self.m_ui.m_batchRender.setText("stop Batch Render");
# first we need to build up the render string
renderString=self.m_batchRender
frameRange="-fnc name.#.ext -s %d -e %d -b %d -pad %d " %(self.m_ui.m_startFrame.value(),
                                           self.m_ui.m_endFrame.value(),
                                           self.m_ui.m_byFrame.value(),
                                           self.m_ui.m_pad.value())
outputDir=""
if self.m_ui.m_outputDir.text() != "" :
  outputDir="-rd %s/ " %(self.m_ui.m_outputDir.text())
outputName=""
if self.m_ui.m_outputFileName.text() !="" :
  outputName="-im %s "%(self.m_ui.m_outputFileName.text())

extension=""
if self.m_ui.m_extension.currentIndex()!=0 :
  extension=" -of %s " %(self.m_ui.m_extension.currentText())

sceneData="-proj %s %s" %(self.m_mayaProject,self.m_mayaFile)

Renderers={0:"default",1:"mr",2:"file",3:"hw",4:"rman",5:"sw"}
rendererString="-renderer %s " %(Renderers.get(self.m_ui.m_renderer.currentIndex()))

arguments=frameRange+outputName+extension+rendererString+outputDir+sceneData;
commandString=renderString+arguments
self.m_ui.m_outputWindow.setText(commandString)

The combo box for the file extensions contain the correct values for the command argument, this means that the values may be used directly using the .currentText() method of the combo box.

However the renderer string is not correct so we make a dictionary of the correct values using a integer index as the key and the string for the correct values, we then use the currentIndex value to return the integer key value and use the dictionary get() method to retrieve the correct string.

QProcess

We wish to start the batch rendering as a separate process from the rest of the system. This is so that the UI will still respond to commands whilst the batch rendering process is running, and we can also update the debug window with the text from the batch render process.

When the class is constructed we create a QProcess object called m_process, this can then be started with the command line we created above using the following code.
self.m_process.start(commandString)
self.m_rendering = True
Once the process is started it will emit different signals which we can capture and respond too, we connected these signal together in the earlier code, the main one for the output of the batch render data is as follows
def updateDebugOutput(self) :

  data=self.m_process.readAllStandardOutput()
  s=QtCore.QString(data);
  self.m_ui.m_outputWindow.append(s)

  data=self.m_process.readAllStandardError()
  s=QtCore.QString(data);
  self.m_ui.m_outputWindow.append(s)

The maya batch renderer outputs most of the debug information on the stderr stream but some is also sent to the stdout stream so both streams are read to the data returned is converted to a string and added to the outputWindow.

The full code of this program can be downloaded from the following https://github.com/NCCA/MayaBatchRender  or a zip from here url.