Friday, 30 August 2013

Getting Started with GamePlay3D under Mac OSX

I've been researching different game engines to use with our teaching next year. Of the many engines gameplay3D stood out for a number of reasons.
  1. Open Source
  2. Written in C++ and Lua scriptable
  3. Works under Mac, Linux, Windows and mobile devices
This blog post is going to talk about the basic setup under mac osx and how to start a basic project, In this case I'm going to use xcode, however I do also have a basic qt creator project as well which I may do in another blog post.

Downloading the source

I'm going to download the source using git into my main root directory as this will make paths easier. To do this I do the following
cd
git clone https://github.com/blackberry/GamePlay.git
This may take a while but once it is done you should have a new directory called $(HOME)/GamePlay. Now we have to download the external dependancies. This is done via a script called install.sh Change into the GamePlay directory and run this script. This will take a while as it is quite a large file but it will download pre-built libs for all the platforms. Under mac osx these are built as 32bit static libs and may cause problems if you wish to link against other 64bit libs and I will do another blog post at a later date on how to build and link your own 64 bit version of the library but it is quite an involved process. In most cases the 32bit pre-built lib will be fine.

Compiling with xcode

Now we can open the xcode workspace (gameplay.xcworkspace) and configure and build the main gameplay static library.

To make development easier I'm going to setup the targets to build the library in the same root GamePlay directory. To do this we do the following first goto File->Workspace Settings in the xcode menu

Choose WorkSpace relative as shown below

Now we can build the library and the final lib should be placed in the directory GamePlay/DerivedData/gameplay/Build/Products/Debug. This actually builds a mac framework that we can copy into some other directory to use in our own projects. However for now we will leave it as it is.

Creating a new project

Gameplay comes with a newproject script that will copy a template project to a new location. Again I have modified this to make it easier to create new projects in directories other than the main GamePlay one. 

In an editor open up the GamePlay/newproject.sh script look for each instance of the cp command like this
cp "template/template.vcxproj" "$projPath/$projName.vcxproj"
Where it says "template/ we are going to pre-pend the path of the GamePlay install so in my example it's going to be $HOME/GamePlay/
cp "$HOME/GamePlay/template/template.vcxproj" "$projPath/$projName.vcxproj"
Do this for every cp command in the script.

Now this is done we can create a new directory to put our demos in. In my case I've created one called GamePlayDemos


mkdir GamePlayDemos
cd GamePlayDemos
~/GamePlay/newproject.sh

1. Enter a name for the new project.

   This name will be given to the project
   executable and a folder with this name
   will be created to store all project files.

Project Name: Test


2. Enter a game title.

   On some platforms, this title is used to
   identify the game during installation and
   on shortcuts/icons.

Title: Test


3. Enter a short game description.

Description:


4. Enter a unique identifier for your project.

   This should be a human readable package name,
   containing at least two words separated by a
   period (eg. com.surname.gamename).

Unique ID: ncca


5. Enter author name.

   On BlackBerry targets, this is used for
   signing and must match the developer name
   of your development certificate.

Author: jm


6. Enter your game's main class name.

   Your initial game header and source file
   will be given this name and a class with
   this name will be created in these files.

Class name: Test


7. Enter the project path.

   This can be a relative path, absolute path,
   or empty for the current folder. Note that
   a project folder named Test will also
   be created inside this folder.

Path:./
Once the script has run you should see a folder like this
Now we can open the Test.xcodeproj file and get ready to build the demo. First we need to change the search paths for headers. By default they look like this
We need to add $(HOME)/GamePlay to each of these paths (or the directory you installed it into)
This will now allow the project to compile, however we still need to set the linker paths and do the same path addition

Add $(HOME)/GamePlay to the ../ paths as shown


Finally we need to add an additional path for the libgameplay.a location this can be done by selecting the build options and removing the original reference and locating the one we built earlier in the DerivedData directory as shown

The program should now run and give you the following screen.


I will do some more blog posts soon on using the game engine with maya.


Saturday, 11 May 2013

GLSL tessellation Shaders under Mac OSX

So this interesting post appeared the other day saying that tessellation shaders were working  on Mac OSX. According to the documents and other things like GLView this is not the case.

I decided to spend the day investigating the claims to a) see if they were true, and b) see how I could replicate this in my own library.

The following video shows how I used the Mac OpenGL profiler to dig into the source code and find out how to do this.


 The main code elements you need are the following defines

#ifdef DARWIN
    #ifndef GL_TESS_CONTROL_SHADER
        #define GL_TESS_CONTROL_SHADER 0x00008e88
    #endif
    #ifndef GL_TESS_EVALUATION_SHADER
        #define GL_TESS_EVALUATION_SHADER 0x00008e87
    #endif
    #ifndef GL_PATCHES
        #define GL_PATCHES 0x0000000e
    #endif
#endif
Once this has been defined somewhere you can use the default OpenGL commands to create a shader, I chose to use the demo code / shader here the main thing to remember is that you must use GL_PATCHES to draw to the tessellation units.

The other problem is that code like
glPatchParameteri(GL_PATCH_VERTICES, 16); 
is not available as the glPatchParam functions are not exposed, the good news is that you can set all of this in the shader so it is not too much of an issue. The updates have now been rolled into the core ngl library, and I will add some demos soon.

Friday, 3 May 2013

Install NGL / Qt on a new Mac

This video blog shows how to install all of the NGL environment on a brand new mac running Mountain Lion. The links to download qt are here and the main configuration for ngl etc is here.


This is how I set the alias for qt creator
export PATH=$PATH:/Users/jmacey/Qt5.0.2/Qt\ Creator.app/Contents/MacOS
alias qtcreator='Qt\ Creator'


Next you need to follow the instructions here to install and setup NGL, you will need to install bzr which is a simple package from here.
Finally this example shows how to build the Qt 5 version of NGL and a basic demo

Monday, 11 March 2013

Adding Movement in ngl

This video blog shows how to add movement using the Model, View, Project matrix in ngl you can get the demo program here and should also read the lecture notes here


Thursday, 14 February 2013

When it all goes wrong!

It's that time of year again, (no not Valentines day). Students have finally realised that they have assignments to do and are finally testing and writing code!

So far today I've had 12 email (and this week about 30) with problems and errors, so I've decided to collate as much wisdom and help as I can here which hopefully will help not only you but also me!

This post is intentionally sarcastic and not aimed at anyone in particular!

RTFEM

A lot of the time the errors are quite easy to spot but you get the blind panic of it not working, first thing you should do is "read the (fine) error message".

In the following example
src/GLWindow.cpp: In member function 'void GLWindow::persp(GLWindow::MODE)':
src/GLWindow.cpp:256: error: expected ',' or ';' before 'm_transformStack'
make: *** [obj/GLWindow.o] Error 1
In this case we can read that there is an error in the file src/GLWindow.cpp at line 256 so I would suggest looking there!

As I'm using (and most of you are) QtCreator we only have to double click on the error message to goto the error. Even better it also underlines it in red! (BTW green underlined usually indicates unused variables so we can remove them as well) and yes in this case I've missed a ;

Now some errors are not as obvious and I will add a list of the common ones as I get sent them at the bottom of this post. 

Different Error types

It is important to differentiate between error types.  We can roughly split the errors into three categories.
  1. Compilation errors
  2. Linker errors
  3. Runtime errors
Compilation errors are the most common and may be due to many different factors, some can be due to a missing header / include such as
src/main.cpp: In function 'int main(int, char**)':
src/main.cpp:11: error: 'MainWindow' was not declared in this scope
src/main.cpp:11: error: expected `;' before 'w'
src/main.cpp:13: error: 'w' was not declared in this scope
make: *** [obj/main.o] Error 1
In this case we are just missing the #include "MainWindow.h" but the error seems worse, the clue is the "not declared in this scope" which should give you a hint that the compiler doesn't know about something. Another error along the same lines is the following
int main()
{
  std::cout<<"hello world\n";
}
In this case we get the error
1.cpp: In function 'int main()':
1.cpp:3: error: 'cout' is not a member of 'std'
Just because we are missing the #include <iostream>. When you do get these errors this is a good resource for finding out what has gone wrong as is this

Linker errors are harder to find but usually are due to the fact that you don't have the correct libraries installed, the also seem much more scary as they seem to go on forever in some cases

For example the following
clang++ -Wall -g ClearScreen.cpp -o ClearScreen `sdl-config --cflags`
Undefined symbols for architecture x86_64:
  "_SDL_FillRect", referenced from:
      clearScreen(SDL_Surface*, char, char, char) in ClearScreen-vFrFBN.o
  "_SDL_Flip", referenced from:
      clearScreen(SDL_Surface*, char, char, char) in ClearScreen-vFrFBN.o
  "_SDL_Init", referenced from:
      _SDL_main in ClearScreen-vFrFBN.o
  "_SDL_MapRGB", referenced from:
      clearScreen(SDL_Surface*, char, char, char) in ClearScreen-vFrFBN.o
  "_SDL_PollEvent", referenced from:
      _SDL_main in ClearScreen-vFrFBN.o
  "_SDL_Quit", referenced from:
      _SDL_main in ClearScreen-vFrFBN.o
  "_SDL_SetVideoMode", referenced from:
      _SDL_main in ClearScreen-vFrFBN.o
  "_SDL_WM_SetCaption", referenced from:
      _SDL_main in ClearScreen-vFrFBN.o
  "_main", referenced from:
     -u command line option
     (maybe you meant: _SDL_main)
ld: symbol(s) not found for architecture x86_64
clang: error: linker command failed with exit code 1 (use -v to see invocation)
This is due to the fact that the compiler is not using the SDL libs flags "-L/usr/local/lib -lSDLmain -lSDL" Once these are added it usually fixes things. One of the most difficult problems you will encounter is finding which function lives in which lib, again you can google. Or I have a handy shell script
#!/bin/bash
for f in *.a *.so *.dylib
do
  echo "checking for $1 in - $f"
  strings $f | grep $1
done
Which using checkLib.sh glVertex in the directory /usr/lib/ gives
checkLib.sh glVertex | more
checking for glVertex in - libGLEW.a
glVertexAttrib1dNV
glVertexAttrib1dvNV
glVertexAttrib1fNV
glVertexAttrib1fvNV
....
Runtime errors are usually created when we cant find the dynamic libs we need to link to, for example
dyld: Library not loaded: libNGL.1.0.0.dylib
  Referenced from: /Volumes/home/jmacey/teaching/NGL5Demos/SimpleNGL/./SimpleNGL
  Reason: image not found
Trace/BPT trap: 5
Means that the LD_LIBRARY_PATH (actually DYLD on mac) has not been set for the NGL lib (see here)

If in doubt make clean

Sometimes things get out of sync and dependancies are not re-read. The simplest solution is to do a qmake; make clean ; make;l

In QtCreator this is the same as doing a re-build all. You will be surprised how often this solves things (usually to deps not being updated)

Still Stuck do this

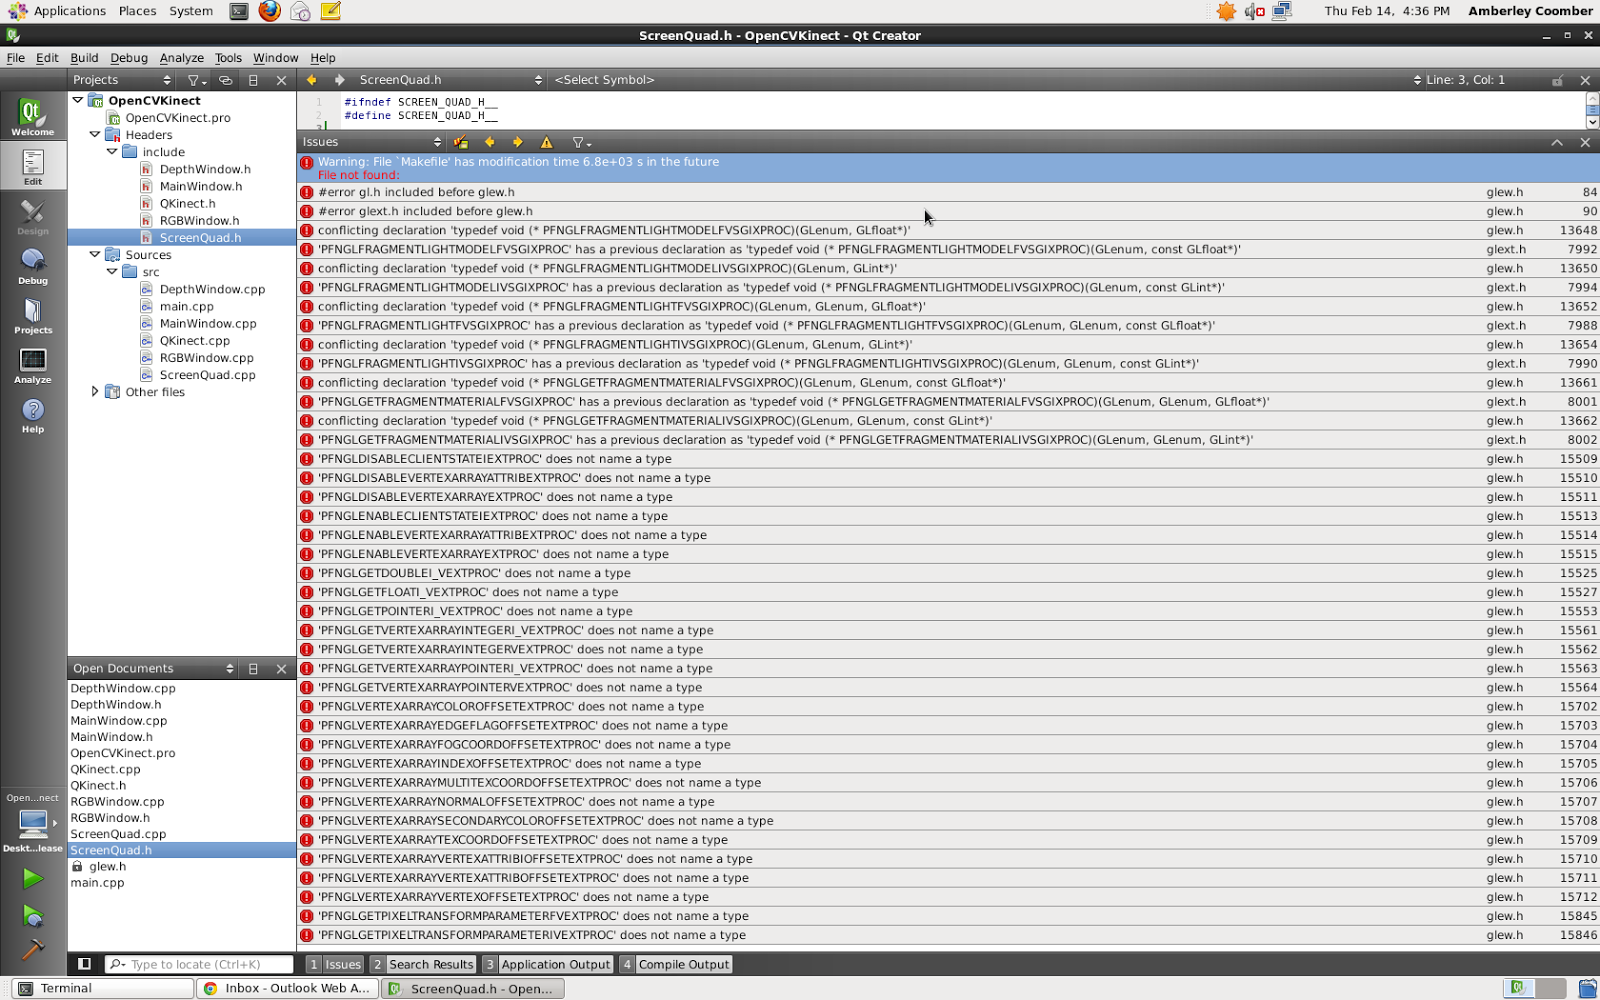
If you need to send me some errors, please don't do this 
Yes that is an iPhone photo of the error message on my monitor, yes I have had this mailed to me before, and no I can't figure out what is wrong! My eyesight used to be that good but not anymore!

This is not much better
Yes I can see the errors in this one but it still doesn't help much, I really need to see the compiler output / flags as well as the error messages (these are on different tabs on Qt).

The easiest way of sending me errors etc is via plain ASCII text (I'm old fashioned like that ;-) To do this will require a little typing.

cd [your project root]
make &>err.txt

If you do this in the root of the project where the makefile is it will run make and output all of the errors to the file err.txt. Mail it to me as this will then help me to find the errors.

Send me the code

If I ask you to send me the code, I only need the source and other files not the .o and exe. The easiest way of sending this to me is as follows

cd [your project root]
make distclean
cd ..
tar vfcz code.tgz [your project root]

Then mail me the code, it also helps if I have the following information
  • Operating System (and version if Mac or Linux)
  • Compiler used (use g++ -v or clang -v) 
  • Graphics Card Make Model and version of OpenGL drivers installed. 
  • Versions of any extra libs etc you may be using. 
A lot of the time this could be the cause of the problem, I will test all my code against Mac OSX (Mountain Lion) using

clang++ ( Apple clang version 4.0 (tags/Apple/clang-421.0.60) (based on LLVM 3.1svn) Target: x86_64-apple-darwin12.2.0 Thread model: posix)

and the lab build

clang++ -v clang version 3.2 (trunk 163783) Target: x86_64-unknown-linux-gnu Thread model: posix g++ -v Using built-in specs. Target: x86_64-redhat-linux Configured with: ../configure --prefix=/usr --mandir=/usr/share/man --infodir=/usr/share/info --with-bugurl=http://bugzilla.redhat.com/bugzilla --enable-bootstrap --enable-shared --enable-threads=posix --enable-checking=release --with-system-zlib --enable-__cxa_atexit --disable-libunwind-exceptions --enable-gnu-unique-object --enable-languages=c,c++,objc,obj-c++,java,fortran,ada --enable-java-awt=gtk --disable-dssi --with-java-home=/usr/lib/jvm/java-1.5.0-gcj-1.5.0.0/jre --enable-libgcj-multifile --enable-java-maintainer-mode --with-ecj-jar=/usr/share/java/eclipse-ecj.jar --disable-libjava-multilib --with-ppl --with-cloog --with-tune=generic --with-arch_32=i686 --build=x86_64-redhat-linux Thread model: posix gcc version 4.4.6 20120305 (Red Hat 4.4.6-4) (GCC)

Also make sure you have pulled the latest versions of any of my code using a bzr pull as I do bug fixes as they are reported (there will soon be a more official way of reporting this using the redmine system)

Some Common Errors (and Fixes)

I get quite a lot of common errors so I will try and list them here

GLEW Errors

If you get something like this
/usr/include/GL/glew.h:84:2: error: gl.h included before glew.h
#error gl.h included before glew.h
 ^
/usr/include/GL/glew.h:90:2: error: glext.h included before glew.h
#error glext.h included before glew.h
It is due to the GLEW libs not being included properly (you may also get lots of PFNGL..... errors as well) Some of the old versions of my .pro files have a subtle bug in them where the defines are not done correctly check the .pro file and make sure this is correct
linux-g++*{
            DEFINES += LINUX
            LIBS+= -lGLEW
}
linux-clang* {
              DEFINES += LINUX
              LIBS+= -lGLEW
}

xxx does not name a type

Errors such as include/GLWindow.h:50: error: ‘Vector’ in namespace ‘ngl’ does not name a type means that you have either not included the correct header or something is missing. In this case it is due to the fact that ngl::Vector has now been replaced with ngl::Vec3 so you will need to #include <ngl/Vec3.h> and also replace all versions of ngl::Vector with ngl::Vec3

Thursday, 24 January 2013

CA 1 Initial Design General Feedback

This is the general feedback for the CA1 Initial Design in addition to some of the comments here

Class Diagrams

A lot of the class diagrams didn't use standard UML format. This is quite important as I can then see a number of things about the class at a glance. There are more details in my lecture notes but these slides show the main things


I mentioned in a lot of the feedback that you need to show the multiplicity / associations of the classes. This can be done as shown

Associations and Containment

In a lot of the designs there are classes that show some sort of relation, however no mention of a container is shown in the attributes.
In this case we use a filled diamond and it always gives a multiplicity of 1 or 0 .. 1, this implies ownership and when the car is destroyed so it the Engine, this is broadly know as composition.


Aggregation differs from composition as it doesn’t necessarily imply ownership. This is usually implemented by containing a reference to another object where the lifetime is determined elsewhere.

Physics

Those of you that mentioned doing some form of physics need to look at two things. Once getting a time into your program. This can be done easily in Qt using the QTimer classes. There are several NGL demos that use this and you can see how in the code.

The other thing you will need to write is an integrator.  If you code is well designed this should be able to be replaced with different types. I suggest starting with a basic Euler integrator then progress to a more stable RK 4 integrator

If you are not writing your own Physics but need to do some basic physics for a game there are a number of solutions, the labs have both ODE and Bullet installed and there is already an ODE demo for NGL with a bullet one coming soon.

If you are doing a 2D game or a basic 2.5D platform I would suggest Box2D as it is much simpler and more suited to these style of game. 

L-Systems

If you are writing an L-System I would suggest reading "The algorithmic beauty of plants". For a general design I would suggest reading in your grammar rules from a text file (you get marks for this anyway). There is a basic parser framework in the lecture code here and you can use boost::tokenize to most of the hard work.

It is also important to only build the grammar up once and create the geometry and store it. As this is a recursive system the generation may be slow and adding in drawing will make this a really slow system once a few iterations are used. The system should only update when a parameter is changed and this should generate geometry to be drawn every frame and not the other way around.

Also start in 2D and generate a simple turtle class, this can later be upgraded to a 3D system once the basic system is working.

Flocking System

One of the hardest problems with a flocking system is managing the communication between the boids. All of the boids need to know where they are in the world as well as have some knowledge of each other.  It is possible to use a naive list and check each boid against the others however this will lead to an O(n^2) complexity and slow things down. 

For the initials test this will be ok, however it should be factored into the design that at some stage this may become a problem at a later stage.

To get the flock working initially start with the flock centre rule. If you add the position of all the boids and divide by the number of boids this will give you the centroid. You can then calculate the direction vector for the flock centre on a per boid basis.

The other basic rules can then be added. It is also a good idea to add a weight to each of the rules and see the different effects. This can be loaded in a text file (or using a GUI) .

Next Steps

You should have a basic design, re-visit it based on the comments above and see what is missing. Once you have done this you should start to write the classes. I usually create the basic classes so they can be instantiated and connected together. Once this is done start adding the functionality as required.

For a more in detail step by step guide look as the examples from last year here note that some of the data types from these examples have changed but the principles are still the same.

Good luck and if you have any more questions ask me in the lab.

Jon

Thursday, 13 December 2012

Creating a local cmake library install

In one of my previous posts I talked about how to install your own versions of a library when you don't have root access.

In this post I will show you how to install a cmake style project in the same way.

For this example I'm going to use alembic as the target library to build and it will be installed in the directory $(HOME)/

First we will download the alembic source

hg clone https://code.google.com/p/alembic/
cd alembic
Now we need to configure cmake to use the correct path for our local install this is done with the -DCMAKE_INSTALL_PREFIX:PATH= command as follows where the = is followed by where you want to install alembic
cmake -DCMAKE_INSTALL_PREFIX:PATH=/home/jmacey/
make -j 4
make install
In the case of the current version of Alembic this will install to the directory alembic-1.1.2

Testing

A simple test program to read alembic files from the command line and write out the contents has been created as follows
#include <Alembic/AbcGeom/All.h>
#include <Alembic/AbcCoreAbstract/All.h>
#include <Alembic/AbcCoreHDF5/All.h>
#include <Alembic/Abc/ErrorHandler.h>
#include <iostream>
#include <cstdlib>


using namespace Alembic::AbcGeom; // Contains Abc, AbcCoreAbstract


int main(int argc, char **argv)
{
  if(argc <2 )
  {
    std::cerr <<"usage Alembic [filename]\n";
    exit(EXIT_FAILURE);
  }

  IArchive  archive( Alembic::AbcCoreHDF5::ReadArchive(),
                          argv[1] );


  std::cout<<"traversing archive for elements\n";
  IObject obj=archive.getTop();
  unsigned int numChildren=obj.getNumChildren();
  std::cout<< "found "<<numChildren<<" children in file\n";

  for(int i=0; i<numChildren; ++i)
  {
    std::cout<<obj.getChildHeader(i).getFullName()<<"\n";
    IObject child(obj,obj.getChildHeader(i).getName());

    std::cout<<"Children "<<child.getNumChildren()<<"\n";
    const MetaData &md = child.getMetaData();
    std::cout<<md.serialize() <<"\n";

    for(int x=0; x<child.getNumChildren(); x++)
    {
      IObject child2(child,child.getChildHeader(x).getName());
      const MetaData &md2 = child2.getMetaData();
      if( IPolyMeshSchema::matches( md2 ) || ISubDSchema::matches( md2 ))
      {
        std::cout<<"Found a mesh "<<child2.getName()<<"\n";

      }
    }
  }

  return EXIT_SUCCESS;
}
To compile this I have created a QMAKE project which sets the paths to point to the correct install of alembic
TARGET=Alembic
DESTDIR=./
CONFIG += console
CONFIG -= app_bundle

SOURCES+=read.cpp
INCLUDEPATH+=/home/jmacey/alembic-1.1.2/include/
INCLUDEPATH+=/usr/local/include/OpenEXR

ALEMBIC_DIR=/home/jmacey/alembic-1.1.2
ALEMBIC_LIB=/home/jmacey/alembic-1.1.2/lib/static

LIBS+= -L$$ALEMBIC_LIB
LIBS+= -lAbcWFObjConvert
LIBS+= -lAlembicAbcCollection
LIBS+= -lAlembicAbcCoreHDF5
LIBS+= -lAlembicAbc
LIBS+= -lAlembicAbcCoreAbstract
LIBS+= -lAlembicAbcGeom
LIBS+= -lAlembicUtil

LIBS+=-lImath
LIBS+=-lHalf
LIBS+=-lIex
LIBS+=-lhdf5
LIBS+=-lhdf5_hl
In the university labs most of these libs will be in the paths but you will need to change the ALEMBIC_DIR to the correct path for your install. Finally the LD_LIBRARY_PATH needed to be amended to point to the correct OpenEXR files by adding the following export LD_LIBRARY_PATH=$LD_LIBRARY_PATH:/usr/local/lib/ to my .bashrc, this may not be needed on your own versions.