ngl::Image Class
I've been meaning to update the ngl::Texture class for a while, a lot of time the texture class is used to load and image then load it into an OpenGL texture. Sometimes we just want an image and not access to OpenGL.
I've just split the two classes to have a separate image class and the Texture class is now much simpler (and in some cases can be ignored). To allow the loading of different images I've usually used the QImage class in Qt, this works really well and is simple to use, however sometimes I port my code to platforms that don't use Qt (raspberry pi for example) and I have to use another library. To this end I decided to support 3 different loading libraries QImage (the default), ImageMagick and Open Image I/O.
The code to load the images is quite simple, and uses a boost::scoped_array to store the data as a contiguous block of unsigned char data that OpenGL can use as texture data.
The source code can be seen in Image.cpp and Image.h and the video below shows how to change the Qt Project to set the image library to use.

lots of random code, usually involving the drawing of a teapot.
Friday, 2 October 2015

Friday, 21 November 2014
Using Qt Library templates
The following video shows how to configure a Qt project to create a static library to use in your own projects, the main code for this can be found on github here
The main things you will need to do are in the .pro file as follows
If you omit the staticlib it will create a dynamic library and the runtime linker will need to be told where to find your lib.
In the project you intend to use the library in you need to set the LIBS Qt variable passing in the -L[path to lib] and -l lib(s) to link
For more examples of this see this blog post
The main things you will need to do are in the .pro file as follows
TEMPLATE = lib
CONFIG+=staticlib
If you omit the staticlib it will create a dynamic library and the runtime linker will need to be told where to find your lib.
In the project you intend to use the library in you need to set the LIBS Qt variable passing in the -L[path to lib] and -l lib(s) to link
For more examples of this see this blog post
Tuesday, 4 November 2014
Drawing with Modern OpenGL
The following video demonstrate how modern OpenGL uses Vertex Array Objects to store buffers and generic vertex attributes together for faster drawing.
The first Video shows how the deprecated immediate mode OpenGL version would work as context for why we use Modern OpenGL.
The next videos show the basic framework code using ngl and a simple colour shader. The first demo will then use OpenGL calls to create and display a series of points. The second uses the ngl::VertexArrayObject class to do the same thing. The source code can be found here and suggested man pages are glGenVertexArrays glBindVertexArray glGenBuffers glBufferData glVertexAttribPointer glDrawArrays
The first Video shows how the deprecated immediate mode OpenGL version would work as context for why we use Modern OpenGL.
The next videos show the basic framework code using ngl and a simple colour shader. The first demo will then use OpenGL calls to create and display a series of points. The second uses the ngl::VertexArrayObject class to do the same thing. The source code can be found here and suggested man pages are glGenVertexArrays glBindVertexArray glGenBuffers glBufferData glVertexAttribPointer glDrawArrays
Friday, 21 March 2014
Using emscripten to port NGL to the Web
Introduction
I have been using the ngl:: library for many years as part of teaching various graphic programming courses. I decided recently it would be interesting to port the core library and many of the demos to work interactively on the web using WebGL so started investigating a number of ways to do this. The main library is written in C++ and uses either Qt or SDL to create the OpenGL context.
I had a number of choices as to which approach to take, I could learn Java Script and three.js however this would mean porting all my codebase to Java Script which seemed like too much work.
In the end I came across the emscripten system which is a LLVM-to-JavaScript Compiler which can convert my C++ code into LLVM and then into JavaScript and then into asm.js the process was quite a steep learning curve, however I manage to get quite a lot of demos ported very quickly which can be seen here the rest of the blog will outline the process and how the webngl system was developed.
Installing Emscripten
My main development environment is a mac, however I have also tested the files under linux and it also works well. To get started I followed the tutorial here and all worked first time. The next stage was to try a simple WebGL demo that is provided with the examples. There are several WebGL demos using different libraries for OpenGL context creation however as I'm most familiar with SDL I chose to use this as the basis of the framework.
A Simple SDL demo program
The following code is a simple SDL program (very similar to a normal SDL program) the only difference is the call to emscripten_set_main_loop.
#include "SDL.h"
#include <GLES2/gl2.h>
#define GL_GLEXT_PROTOTYPES 1
#include <GLES2/gl2ext.h>
#include <emscripten.h>
#include <iostream>
#include <cstdlib>


void process()
{
  // as we don't have a timer we need to do something here
  // using a static to update at an interval
  static int t=0;
  if(++t > 100)
  {
    float r=(double)rand() / ((double)RAND_MAX + 1);
    float g=(double)rand() / ((double)RAND_MAX + 1);
    float b=(double)rand() / ((double)RAND_MAX + 1);

    glClearColor(r,g,b,1);
    t=0;
  }
  glClear(GL_COLOR_BUFFER_BIT);
  // this is where we draw
  SDL_GL_SwapBuffers();
}

int main(int argc, char *argv[])
{

 SDL_Surface *screen;

 // Init SDL
 if ( SDL_Init(SDL_INIT_VIDEO) != 0 )
 {
  std::cerr<<"Unable to initialize SDL: "<<SDL_GetError();
  return EXIT_FAILURE;
 }

 SDL_GL_SetAttribute( SDL_GL_DOUBLEBUFFER, 1 );

 screen = SDL_SetVideoMode( 720, 576, 16, SDL_OPENGL  | SDL_RESIZABLE);
 if ( !screen )
 {
  std::cerr<<"Unable to set video mode: "<<SDL_GetError();
  return EXIT_FAILURE;
 }

 glEnable(GL_DEPTH_TEST);

 // let emscripten process something then
 // give control back to the browser
 emscripten_set_main_loop (process, 0, true);

 SDL_Quit();
 return EXIT_SUCCESS;
}
The emscripten_set_main_loop function is explained very well here basically we create a function that is called asynchronously to allow the browser to regain control after every iteration of the function. It is important that this function does exit else the browser will hang up and I have had several times when I get a complete lockup of the system.
Compiling the program
To compile the program we use the following command line (in this case I'm using c++ )
em++ -s FULL_ES2=1 SDL1.cpp -o SDL1.htmlThe flag -s FULL_ES2 tells emscripten to use full OpenGL ES 2 specification when compiling the code, the -o SDL1.html will generate an html file as well as the javascript file for the canvas to use. The html file can now be opened in the browser an in this case you will see a screen that changes colour every 100 cycles of the main loop. In the next post I will begin to discuss how I ported the rest of ngl to use emscripten.
Thursday, 20 February 2014
GamePlay 3D 101
Another Guest post on my Blog, this time from Callum James and Ramesh Balachandran from the BSc. Software Development for Animation, Games and Effects course at the NCCA
What is Gameplay 3D?
Gameplay 3D is an open-source, code based engine that is aimed at being cross-platform compatible. We decided to use this engine over others as we would have the most control over the features and optimisations of the program / game we create. Whilst giving you the tools to produce a simple piece of high quality in relatively little time, other game engines such as the Unreal Development Kit , are restrictive to their scripting functionality and UI interaction. Therefore, by using an open-source engine that has an established rendering engine, we are able to extend upon and create a new version of the engine in our own desired way.
Lack of Documentation
One of the greatest obstacles we are still striving to overcome whilst using the Gameplay 3D engine is its lack of clear and precise documentation for its use. Whilst there exists basic documentation on the engine and classes, a lot of features found within the engine do not have any form of detailed information regarding their uses or function. The sections are ways we have found to set-up the game engine and use its features to hopefully serve as a 101 guide to getting started with Gameplay 3D.
Our Preferred Gameplay 3D Setup
There are multiple ways you can use the Gameplay 3D engine on different platforms. By default, the engine comes with source and project files for Visual Studio on Windows and an XCode project for MacOSX. It is then up to you to get an environment set up for a Linux build. However this makes it a little cumbersome to be easily platform independant for efficient development. We however have come up with a simple solution to make it as easy as possible to pass your project between all three major platforms and quickly get up and running for development.
Whilst it would be ideal to have a single development project for all three platforms, due to our desire to support not only Windows 7 but also Windows 8, we have had to separate the Windows build to its own Visual Studio project. For Mac and Linux, we then have a single Qt Creator project (.pro file) that very easily compiles and runs on both of the Unix flavours.
As the VS project file and the Qt project files all read from the same sources, cross platform development is still quick, easy and affects all platforms. To ensure this works however it is important to keep a strict directory hierarchy to your project so that no file gets lost and you keep independant local file paths to a minimum.
Following is a quick overview into how to set up Gameplay 3D on each of the three major platforms in the way we have discussed here.
Setting up Gameplay 3D on Unix - Linux and MacOSX
Setting up Gameplay 3D to work on a Unix platform (either Linux or MacOSX) using Qt Creator, there are a few things you need to make sure are set and linked correctly. Here we will discuss what you need to ensure is set correctly and included in the .pro file so that your project will build and run successfully.
The first thing you need to look at is your include and library paths. You need to ensure that your include paths are at least set to ./include to pick up on your header files.
Other directories to include are:
INCLUDEPATH += $$GAMEPLAY_DIR/gameplay/src
INCLUDEPATH += $$GAMEPLAY_DIR/gameplay/src/lua
INCLUDEPATH += $$GAMEPLAY_DIR/external-deps/bullet/include
INCLUDEPATH += $$GAMEPLAY_DIR/external-deps/lua/include
INCLUDEPATH += $$GAMEPLAY_DIR/external-deps/oggvorbis/include
INCLUDEPATH += $$GAMEPLAY_DIR/external-deps/png/include
Libraries to link up to for your projects are as follows for Linux:
unix:!macx{
   LIBS += -L$$GAMEPLAY_DIR/external-deps/lua/lib/linux/x64/ -llua
   LIBS += -L/usr/local/lib -lBulletCollision -lBulletDynamics -lLinearMath
   LIBS += -L$$GAMEPLAY_DIR/external-deps/glew/lib/linux/x64/ -lGLEW
   QMAKE_CXXFLAGS += $$system(pkg-config --cflags gtk+-2.0)
   LIBS += -lgtk-x11-2.0 -lglib-2.0 -lgobject-2.0
   LIBS += -L$$GAMEPLAY_DIR/external-deps/oggvorbis/lib/linux/x64/ -lvorbis -logg
   LIBS+=  -lrt -ldl -lpng -lopenal -lz -pthread -lGL -lX11
}
And for MacOSX:
macx:{
   INCLUDEPATH+=/usr/local/include/
   LIBS+= -L/usr/local/lib -lBulletDynamics  -lBulletCollision -lLinearMath
   LIBS+= -L/usr/local/lib -lpng
   LIBS += -L/ext-deps/fmod/lib/macosx -lfmodex
   LIBS += -framework Cocoa -framework GameKit -framework IOKit -framework QuartzCore -framework OpenGL -framework OpenAL
   LIBS+= -llua -lvorbis -lvorbisfile -logg -lz  -ldl -lpthread
}
These are all the include paths and libraries you will need to get started. It is however important to note on Mac, you need to make sure you are linking against the right architecture for your build. The external dependency libraries supplied with the Gameplay 3D library are all 32 bit so if you want to build 64 bit projects you will need to recompile the external libraries as 64 bit and then link to these. You will the need to include in your .pro file the following:
macx:QMAKE_CXXFLAGS+= -arch x86_64
macx:CONFIG+=x86_64
Secondly, local path set-up is vital to ensuring your project will run on all platforms without having to go through and change all of the paths to files and assets. The paths differ due to the way that the game is built on different platforms. On Linux (and Windows) it is built as a simple executable. Gameplay 3D built on OSX however utilises the MacOSX app bundle feature. When compiling on Mac, the application will be built into the directory ./application_name.app/Contents/MacOS. This is also where it will be run from. However because the executable is run from here and not the root directory, any assets it requires are no longer visible to it. As such, all the required assets need to be copied into the correct directory for the application to find them. On Linux and Windows, this is simple as the executable will look from assets in a res/ folder from the root directory. So within your root directory as long as your assets are stored within a res folder, you will be fine. However on Mac, the files you require for the game need to be copied into the Resources folder into a folder called res. The gameplay engine will then pick up on these resources. The config files also go into the Resources folder (but not the res) folder. These can then be picked up and read by the application when run. In the .pro file, you just need to ensure all the files you require are passed to QMAKE_BUNDLE_DATA. So for example, to copy some splash screen images to the correct directory and use them with a local path, you need the following in your .pro file:
SPLASHIMAGES += res/splash/logo_powered_white.png

macx:{
 APP_SPLASH_IMAGES.path = Contents/Resources/res/splash
     APP_SPLASH_IMAGES.files += $$SPLASHIMAGES

 QMAKE_BUNDLE_DATA +=  … \
        APP_SPLASH_IMAGES \
 … \
}
Any other files you need also need to be added to QMAKE_BUNDLE_DATA in this manner, so for example to also add audio files, use:
QMAKE_BUNDLE_DATA +=  APP_AUDIO_FILES \
                        APP_SPLASH_IMAGES \
   … \
The Gameplay engine will automatically pick up on them when located in this directry, but anything you write yourself using paths needs to be prefixed. Adding ../Resources/ to the front of any local paths used in your code will ensure your game looks into the right folder on Mac. To automatically do this, we have developed a very simple function as below:
#ifdef DARWIN
    #define PATH_PREFIX "../Resources/"
#else
    #define PATH_PREFIX ""
#endif

std::string GeneralUtils::PLATFORM_FILE_PATH(std::string _path)
{
    return (PATH_PREFIX+_path);
}
The DARWIN define is set within the .pro file if the macx platform is detected, as follows:
unix:!macx: DEFINES += LINUX
macx: DEFINES += DARWIN
If this is all set up correctly, then local paths will work on all platforms without any need to change them.
Setting up Gameplay 3D on Windows
The setup for programming with Gameplay 3D on Windows differs slightly from the Unix build. Due to the current operating system used for development on Windows (Windows 8.1 64-bit), there were issues in setting up Qt Creator to enable complete cross-platform programming. The IDE of choice was shifted to Visual Studio 2010. In order to set up the project to work with Unix build, the Visual Studio project settings need to be set up to correctly link to the Gameplay3D libraries as well as the correct Windows external dependencies. To make sure this is done correctly, the engine needs to be built using the Visual Studio project file accompanying the engine. The Gameplay3D files are compiled for a 64-bit architecture of Windows to work alongside the 64-bit architecture setup of the OSX and Linux builds. Once this is compiled, the Visual Studio project needs to correctly link to the engine header files as well as the necessary external dependency files. This is done under Project -> Properties -> Configuration Properties -> C/C++ in the ‘Additional Include Directories’ section. In this section, the paths to all of the header files would be added:../../external-deps/lua/lib/windows/x64 ../../external-deps/bullet/lib/windows/x64 ../../external-deps/openal/lib/windows/x64 ../../external-deps/oggvorbis/lib/windows/x64 ../../external-deps/glew/lib/windows/x64 ../../external-deps/png/lib/windows/x64 ../../external-deps/zlib/lib/windows/x64 ../../gameplay/windows/x64/$(Configuration) ext-deps/fmod/lib/windowsIn addition to this the .lib files need to be explicitly linked under Linker -> Input in the ‘Additional Dependencies’ section:
lua.lib;OpenAL32.lib;OpenGL32.lib;GLU32.lib;glew32.lib;libpng14.lib;zlib.lib;gameplay.lib;libogg.lib;libvorbis.lib;libvorbisfile.lib;BulletDynamics.lib;BulletCollision.lib;LinearMath.lib;fmodex64_vc.lib;%(AdditionalDependencies)Once this is set, all that is necessary is to include the source files we were currently using to the project and make sure that it compiles. At this point, the project folder is transferrable between platforms as it contains both the Qt .pro file as well as the Visual Studio .vcxproj file, keeping the order of source and include files as they were.
Using Config Files
When you run your Gameplay 3D project or game, the window it creates will be generated from a game.config file located within the root directory of your project. If no config file is found, then it will default to standard values to best fit the situation. The basic options you can specify in the game.config file within the window scope (window {}) are:
- title The text you wish to appear at the top of the window if full screen is false
- width The resolution width you wish to use
- height The resolution height you wish to use
- fullscreen This can either be true or false and will set the game either full screen or windowed
The .config file can also be used to set up aliases. These aliases can be used across your project, in both material, scene and physics files and also within the code when specifying paths and passing them to the engine. To set up an alias, simply first specify the scope aliases
aliases
{

}
Within this scope, declare a name and set what it is equal to. For example:
aliases
{
  komodo = res/textures/komodo.png
}
This will create an alias to the texture file called komodo.png. If you then wanted to use this alias within another file, all you need to do is reference it as follows:
{what_to_set_to} = @komodo
The engine will then replace @komodo with the right path. You can have as many aliases as you like within one project. Another use for the .config file is in the gamepad scope, declared as:
gamepads
{

}
This will declare aliases for gamepad forms, which can then be used on touch devices as a way to control the game, for example:
gamepads
{
   form = res/common/gamepad.form

}
It is important to remember that whilst on Windows and Linux the game.config file can remain in the root directory, on Mac, it must be copied into the .app/Contents/Resources folder when building the game. If it is not, then the executable will not find the file and so will resort to default values.
Encoding Files
Encoding files is an important aspect of using the engine, as Gameplay3D works with .gpb files, which are a Gameplay3D binary file format. This is then read in by the engine for assets used in the game. To encode files, we need to use the encoder that is compiled upon compiling the Gameplay source files. The encoder takes in a .fbx file exported from Autodesk Maya and encodes it into the .gpb file format. Using the encoder at its basic level is just running the command in terminal:
gameplay-encoder ‘name of .fbx file’This will create a .gpb file of the same name as the input .fbx file which can then be read into the engine either by passing the reference to the file in the .scene file used by the engine or explicitly loading the file in the source code. The encoder will also pick up on any animation present in the .fbx file, prompting the user when encoding if they wish to group the animations. If you intend to use the animations for a character, for example if the character has multiple animation cycles, you would run a different version of the encoder command in the terminal:
gameplay-encoder -g ‘name of root joint in Maya’ ‘name of animation group’ ‘name of .fbx file’This would group the animations for the specified joint hierarchy under the name of the input animation group from the .fbx file. The animation group name is the name of the animation set specified in the .animation file following the structure:
animation name of animation group
{
  frameCount = 1100
 clip idle
 {
  begin = 27
  end = 167
  repeatCount = INDEFINITE
  loopBlendTime = 250
 }
}
Using the Scene Files
Using scene files is a matter of specifying the contents of the encoded .gpb file to easily load them into the game without having to specify each asset and its respective material and/or physics profile in the code. A simplistic .scene file would follow the format:scene
{
path = res/models/boy.gpb
node boycharacter
{
collisionObject = res/common/demo.physics#boy
}
node boymesh
{
material = res/common/demo.material#boy
}
node boyshadow
{
material = res/common/demo.material#demo
tags
{
transparent
dynamic
}
}
node camera
{
collisionObject = res/common/demo.physics#camera
}
}
This file is then loaded into the scene using ‘Scene::load("res/common/demo.scene");’. Given the specified .scene file and all the nodes in the file, we are able to use the findNode(“asset name”); to get the necessary asset and manipulate it as necessary. Static objects in the scene, as mentioned, don’t need to be found from the scene file and are loaded into the game scene based on the material and physics tags given in the .scene file. Note in the example above that the nodes are in reference to the .gpb file given under ‘path’.Setting up Physics
In order to get physics working within the game, there are two methods that can be taken. The first is the more straightforward approach, using a .physics file which contains an outline of the physics objects that can be assigned to assets in the .scene file. An example of a physics object from the .physics file is as follows:collisionObject staticMesh
{
type = RIGID_BODY
shape = MESH
static = true
mass = 0
restitution = 0.01
linearDamping = 1.0
angularDamping = 1.0
}
This can then be referenced in the .scene file for a node using the # symbol after the reference to location of the .physics file in collisionObject. For example as seen in the example .scene file for instance, if you were to set the boyCharacter node as a static object using the above collision object the path would read as:
node boycharacter
{
collisionObject = res/common/demo.physics#staticMesh
}
The second approach to physics in the game engine, would be to attach a physics character node to the asset in code. This would mean instantiating a PhysicsCharacter that has the properties of the node’s collision object, but this would allow you to manipulate the node such as updating it’s velocity, step height, etc.
Using Materials
One easy way of controlling and using materials within your project is through the use of material files (.material). You can have multiple material files per project, and they simply need to be referenced with the correct local path when using them. So if you had a foo.material and a foo2.material file, you can extract materials from either by simply quoting the correct path when setting a material in the engine. A material file has a fairly similar structure to both the scene and physics files described previously. It makes use of a scope to define a single material. Within that scope, a number of attributes are then defined. For example, to create a material called demo:material demo
{
}
Within this material you can then specify certain techniques, such as:
material demo
{
 technique Default
 {

 }

 technique Edges
 {

 }
}
This will allow you to specify a single material but with multiple techniques. To access these in the code, use the following:
{__model__}->setMaterial("res/common/demo.material#demo");
{__model__}->setTechnique("Default");
This will look into the demo.material file and find the demo material (denoted by the #). The next line will then set the active technique to Default. If there are no techniques specified within the material, it will simply use the information supplied within the material scope.
To specify which shaders and any uniforms to set in the shader, simply declare these within this scope. So for example:
material demo
{

technique Default
{
  pass
  {
  // shaders
    vertexShader = res/shaders/colouredVertex.glsl
    fragmentShader = res/shaders/colouredFragment.glsl

    // uniforms
    u_worldViewProjectionMatrix = WORLD_VIEW_PROJECTION_MATRIX
    u_inverseTransposeWorldViewMatrix = INVERSE_TRANSPOSE_WORLD_VIEW_MATRIX
    u_diffuseColor = 1.0, 1.0, 1.0, 1.0

    renderState
    {
      cullFace = true
      depthTest = true
    }
  }
 }
}
Within the technique, the pass scope declares a single render pass and everything declared within the pass scope will be used in a single pass. More passes can be defined by defining more pass scopes. The vertexShader and fragmentShader paths simply declare the shader file to use for each. Below this are some uniforms being set. WORLD_VIEW_PROJECTION_MATRIX and INVERSE_TRANSPOSE_WORLD_VIEW_MATRIX are Gameplay 3D built in values. However if you wish to upload your own values to these uniforms, you can do through setting the material within the main code.
The render state scope is optional and simply sets some OpenGL options for rendering of this pass. If you are using a shader that requires a texture or image path, this can be set by using the keyword path = and then setting either a declared path or an alias such as @komodo.
This is the basic use of a material file for your project.
Animations
Animation in the game engine works based on animations that are done in Maya and encoded in the .gpb file as stated above. In order to get animations working in your scene you would need the .animation file that defines the different animation clips as mentioned in the explanation of encoding files. The animation is loaded using code such as:m_animation = node->getAnimation("animations");
m_animation->createClips("res/common/boy.animation");
From here, you can use the loaded animation to store and/or play specific clips to be used in the scene when needed. For instance, in the initialize function, if you needed the character in your game to start playing the idle animation when it loads you would use:
play("idle", true);
Using this, the animation clips specified in the .animation file can be called explicitly to make the character animate with the chosen animation clip. The loop blending time can be specified in code or in the .animation file to determine the smoothness of the blending between different animation clips when switching animations, for example from idle, to walking to running.The different clips can also be linked to character velocities in order to simulate changes in animation based on the speed at which the character is moving.
First Person Control System
In order to set up a first-person camera system in a Gameplay3D scene, a few things need to be determined. Firstly, you would need to include a camera in the encoded .gpb file. This camera node is then found using the aforementioned findNode function in order to work with the camera is the scene. Secondly, you would need to ensure that the mouse event is set to capture the mouse within the game window using:Game::setMouseCaptured(true);The reason for this is to make sure that you are able to have full control of camera movement in the scene without having the mouse leave the game window. Once this is all set up, it is a matter of determining how to link the values from the mouse event function to the movement and rotation of the camera. If there isn’t a character set up in the scene for your game, the linking is much simpler. The y change of the mouse in the mouse event function, gives you a value with which you can determine how much to rotate the camera in the x-axis (look up and down). The x value in this function would then be used to determine the y-axis rotation for the camera (look left and right). If a character was used in the scene, you would then need to make sure that the PhysicsCharacter assigned to the character looks where the camera looks and vice-versa. The easiest method to doing this is to parent the camera to the character in the scene in Maya, but could potentially result in orientation issues. As such, what needs to be done, is that using the x mouse value, you would rotate character and ensure the the camera is similarly oriented using the character’s forward vector. This would handle the ‘looking’ aspect of the first-person camera system. In order to move the camera, you would register key-inputs and respectively use the key inputs to determine the direction of movement. This can then be used to affect and update the camera’s position in the update function. Once again, if a character was used, you would update the camera’s position not based on key inputs but by getting the character’s position using the getTranslation function and moving the camera to that location. Note that the camera would thus be correctly oriented using the forward vector of the character as mentioned above. The basis of the first-person camera system is now set, but can be further developed should the need arise for different camera actions, such as leaning around corners or peeking over obstacles.
Use of external GL calls
Even though Gameplay 3D has its own GL context and its own rendering engine (used through the render() function) you are able to use your own calls to GL functions and GL draw calls if you wish. These will apply to the same GL context as every other Gameplay 3D draw call. This can give you a good deal of extra control over certain rendering aspects and GL attributes used within your project.Wednesday, 13 November 2013
Designing a Software System
This is the first guest post on my Blog, this one comes from a PhD student (and previously an MSc at Bournemouth) Mathieu Sanchez.
This post is specifically aimed at the design of complex software systems and is in general feedback on how to so the initial design required for some of our assignments. I was really impressed with this email and decided to share it with everyone.
This post is specifically aimed at the design of complex software systems and is in general feedback on how to so the initial design required for some of our assignments. I was really impressed with this email and decided to share it with everyone.
Design often takes experience, which is why it is so difficult to teach, but there are some "half rules".
- Write down your concepts, keywords and actions on a piece of paper, there is no need to draw anything. Verbs often translate to a relation and/or a class method (important). Nouns often refer to a class. ( see this and this)
- Classes are most likely a singular noun. If it is not then maybe you are doing something wrong. In this case, check your multiplicity, and try to find a better name. It can happen that you have "container" classes. Don't name them by what they contain. An example would be a container for several wolves. If you name it wolves, it is unclear, and will lead to confusion. Do you mean a "pack of wolves"? Naming is very important, and will help you get a clearer vision, and help the markers (which is always good).
- Classes ending in -ER are a warning flag. It can happen, but if it does, you need to be sure of yourself. Once again, naming might be the issue, not the actual design. (see here here and here)
- Don't build crazy associations everywhere. Data can travel along an association and should have a strong meaning such as "owns" "directs" etc...
- Triangle relations are nasty. If you have class A, B and C, there should not be a link between each of them with each other.
- If you find that there are many ways to achieve the same task, then there might be some inheritance in there. For instance, shadows in rendering can be done through shadow mapping or shadow feelers. This is crying for inheritance. Make sure you have a look at Liskov substitution if you have inheritance.
- Many of the common problems are solved with (famous) patterns. For instance, if there are two ways of doing one operations, but can also be combined together to achieve a better result, then there is a pattern for that.
- When I read a diagram, I first look for a point of entry. And so should you. A point of entry for me is where everything starts, the class that controls the entire system. If it is unclear to you where it starts, then you might have missed something.
- Think at a higher level at first, don't go straight for details, in fact implementation details such as acceleration structures only come last. The first diagram gives an overview of the system. If the interfaces are correctly made, adding spatial data structures is a piece of cake.
- Think about extensibility. What if someone else wants to extend your library/system? If I have to jump into your code to add some if/else and edit your interface, then it is just plain wrong. Hence inheritance and factories.
Finally, once you have a draft, you need to review your diagram. The only thing I do when I try to help you is ask you my famous "what is its responsibility, in one and only sentence?".
Do it yourself. Once the diagram is under your eyes, you can see if one of the classes overlaps with another, or worse, there is no class for a particular class. Then, double check your multiplicity. Read it out loud if needed. You should have two sentences to read. Let s say we have [ A ] 1 ------- * [ B ], then it would read "A has many B, and B belongs to one and only one A". Multiplicity can be: 0..1 (at most one), 1 (one and only one), 0..* (any number), 1..* (one or more). Your inheritance should be solid if it respects the Liskov substitution principle.
Don't leave your diagrams without explanation, and stand your ground. Design is all about making decisions and trade-offs. I want to know those, because this is what lets me know if you actually worked on this, and are an able analyst, or if you are just fighting to just get a working system.
Wednesday, 2 October 2013
Introduction to using the bash shell (NCCA Version)
So it's the first week of term, and many new students have arrived to start their lab sessions only to find that we don't use windows!
There are many reasons for this, however the main one is the our main output industry is VFX and the majority of (large) VFX houses use linux / unix. This is due to a number of reasons, however mainly stability, scalability and ease of customisation.
Learning to use the linux command line and linux in general is quite a daunting task for a new user, and many people often wonder why they should bother when there is a perfectly good GUI. However as I shall explain in the following videos it will make you a more efficient / better operator if you can master some of the basic shell commands.
Also it has the added benefit that once you have learnt them, most of them will also be available in both shell scripts, python programs and C / C++ programs so you are learning valuable transferable skills all in one go.
Whilst these videos will concentrate on the university lab setup they will also be relevant to other linux distributions and linux in general and are mainly a repetition of what we do in the introduction lab sessions.
There is a link to a workbook and other resources here
(for more info on ssh see here)
some useful information on the prompt

There are many reasons for this, however the main one is the our main output industry is VFX and the majority of (large) VFX houses use linux / unix. This is due to a number of reasons, however mainly stability, scalability and ease of customisation.
Learning to use the linux command line and linux in general is quite a daunting task for a new user, and many people often wonder why they should bother when there is a perfectly good GUI. However as I shall explain in the following videos it will make you a more efficient / better operator if you can master some of the basic shell commands.
Also it has the added benefit that once you have learnt them, most of them will also be available in both shell scripts, python programs and C / C++ programs so you are learning valuable transferable skills all in one go.
Whilst these videos will concentrate on the university lab setup they will also be relevant to other linux distributions and linux in general and are mainly a repetition of what we do in the introduction lab sessions.
There is a link to a workbook and other resources here
(for more info on ssh see here)
alias ls='ls --color'
alias ll='ls -al'
alias rm='rm -i'
some useful information on the prompt

Friday, 30 August 2013
Getting Started with GamePlay3D under Mac OSX
I've been researching different game engines to use with our teaching next year. Of the many engines gameplay3D stood out for a number of reasons.

Now this is done we can create a new directory to put our demos in. In my case I've created one called GamePlayDemos


- Open Source
- Written in C++ and Lua scriptable
- Works under Mac, Linux, Windows and mobile devices
This blog post is going to talk about the basic setup under mac osx and how to start a basic project, In this case I'm going to use xcode, however I do also have a basic qt creator project as well which I may do in another blog post.
Downloading the source
I'm going to download the source using git into my main root directory as this will make paths easier. To do this I do the following
cd
git clone https://github.com/blackberry/GamePlay.git
This may take a while but once it is done you should have a new directory called $(HOME)/GamePlay. Now we have to download the external dependancies. This is done via a script called install.sh Change into the GamePlay directory and run this script. This will take a while as it is quite a large file but it will download pre-built libs for all the platforms. Under mac osx these are built as 32bit static libs and may cause problems if you wish to link against other 64bit libs and I will do another blog post at a later date on how to build and link your own 64 bit version of the library but it is quite an involved process. In most cases the 32bit pre-built lib will be fine.
Compiling with xcode
Now we can open the xcode workspace (gameplay.xcworkspace) and configure and build the main gameplay static library.
To make development easier I'm going to setup the targets to build the library in the same root GamePlay directory. To do this we do the following first goto File->Workspace Settings in the xcode menu
Choose WorkSpace relative as shown below

Now we can build the library and the final lib should be placed in the directory GamePlay/DerivedData/gameplay/Build/Products/Debug. This actually builds a mac framework that we can copy into some other directory to use in our own projects. However for now we will leave it as it is.
Creating a new project
Gameplay comes with a newproject script that will copy a template project to a new location. Again I have modified this to make it easier to create new projects in directories other than the main GamePlay one.
In an editor open up the GamePlay/newproject.sh script look for each instance of the cp command like this
cp "template/template.vcxproj" "$projPath/$projName.vcxproj"Where it says "template/ we are going to pre-pend the path of the GamePlay install so in my example it's going to be $HOME/GamePlay/
cp "$HOME/GamePlay/template/template.vcxproj" "$projPath/$projName.vcxproj"Do this for every cp command in the script.
Now this is done we can create a new directory to put our demos in. In my case I've created one called GamePlayDemos
mkdir GamePlayDemos
cd GamePlayDemos
~/GamePlay/newproject.sh

1. Enter a name for the new project.

   This name will be given to the project
   executable and a folder with this name
   will be created to store all project files.

Project Name: Test


2. Enter a game title.

   On some platforms, this title is used to
   identify the game during installation and
   on shortcuts/icons.

Title: Test


3. Enter a short game description.

Description:


4. Enter a unique identifier for your project.

   This should be a human readable package name,
   containing at least two words separated by a
   period (eg. com.surname.gamename).

Unique ID: ncca


5. Enter author name.

   On BlackBerry targets, this is used for
   signing and must match the developer name
   of your development certificate.

Author: jm


6. Enter your game's main class name.

   Your initial game header and source file
   will be given this name and a class with
   this name will be created in these files.

Class name: Test


7. Enter the project path.

   This can be a relative path, absolute path,
   or empty for the current folder. Note that
   a project folder named Test will also
   be created inside this folder.

Path:./
Once the script has run you should see a folder like this

Now we can open the Test.xcodeproj file and get ready to build the demo. First we need to change the search paths for headers. By default they look like this

We need to add $(HOME)/GamePlay to each of these paths (or the directory you installed it into)

This will now allow the project to compile, however we still need to set the linker paths and do the same path addition

Add $(HOME)/GamePlay to the ../ paths as shown

Finally we need to add an additional path for the libgameplay.a location this can be done by selecting the build options and removing the original reference and locating the one we built earlier in the DerivedData directory as shown

The program should now run and give you the following screen.

I will do some more blog posts soon on using the game engine with maya.
Saturday, 11 May 2013
GLSL tessellation Shaders under Mac OSX
So this interesting post appeared the other day saying that tessellation shaders were working on Mac OSX. According to the documents and other things like GLView this is not the case.
I decided to spend the day investigating the claims to a) see if they were true, and b) see how I could replicate this in my own library.
The following video shows how I used the Mac OpenGL profiler to dig into the source code and find out how to do this.
The main code elements you need are the following defines
The other problem is that code like
I decided to spend the day investigating the claims to a) see if they were true, and b) see how I could replicate this in my own library.
The following video shows how I used the Mac OpenGL profiler to dig into the source code and find out how to do this.
The main code elements you need are the following defines
#ifdef DARWIN
    #ifndef GL_TESS_CONTROL_SHADER
        #define GL_TESS_CONTROL_SHADER 0x00008e88
    #endif
    #ifndef GL_TESS_EVALUATION_SHADER
        #define GL_TESS_EVALUATION_SHADER 0x00008e87
    #endif
    #ifndef GL_PATCHES
        #define GL_PATCHES 0x0000000e
    #endif
#endif
Once this has been defined somewhere you can use the default OpenGL commands to create a shader, I chose to use the demo code / shader here the main thing to remember is that you must use GL_PATCHES to draw to the tessellation units.The other problem is that code like
glPatchParameteri(GL_PATCH_VERTICES, 16);is not available as the glPatchParam functions are not exposed, the good news is that you can set all of this in the shader so it is not too much of an issue. The updates have now been rolled into the core ngl library, and I will add some demos soon.
Friday, 3 May 2013
Install NGL / Qt on a new Mac
This video blog shows how to install all of the NGL environment on a brand new mac running Mountain Lion. The links to download qt are here and the main configuration for ngl etc is here.
This is how I set the alias for qt creator
Next you need to follow the instructions here to install and setup NGL, you will need to install bzr which is a simple package from here.
Finally this example shows how to build the Qt 5 version of NGL and a basic demo
This is how I set the alias for qt creator
export PATH=$PATH:/Users/jmacey/Qt5.0.2/Qt\ Creator.app/Contents/MacOS
alias qtcreator='Qt\ Creator'
Next you need to follow the instructions here to install and setup NGL, you will need to install bzr which is a simple package from here.
Finally this example shows how to build the Qt 5 version of NGL and a basic demo
Monday, 11 March 2013
Adding Movement in ngl
Thursday, 14 February 2013
When it all goes wrong!
It's that time of year again, (no not Valentines day). Students have finally realised that they have assignments to do and are finally testing and writing code!
So far today I've had 12 email (and this week about 30) with problems and errors, so I've decided to collate as much wisdom and help as I can here which hopefully will help not only you but also me!
This post is intentionally sarcastic and not aimed at anyone in particular!

Linker errors are harder to find but usually are due to the fact that you don't have the correct libraries installed, the also seem much more scary as they seem to go on forever in some cases
For example the following


If you do this in the root of the project where the makefile is it will run make and output all of the errors to the file err.txt. Mail it to me as this will then help me to find the errors.
Then mail me the code, it also helps if I have the following information
clang++ ( Apple clang version 4.0 (tags/Apple/clang-421.0.60) (based on LLVM 3.1svn) Target: x86_64-apple-darwin12.2.0 Thread model: posix)
and the lab build
clang++ -v clang version 3.2 (trunk 163783) Target: x86_64-unknown-linux-gnu Thread model: posix g++ -v Using built-in specs. Target: x86_64-redhat-linux Configured with: ../configure --prefix=/usr --mandir=/usr/share/man --infodir=/usr/share/info --with-bugurl=http://bugzilla.redhat.com/bugzilla --enable-bootstrap --enable-shared --enable-threads=posix --enable-checking=release --with-system-zlib --enable-__cxa_atexit --disable-libunwind-exceptions --enable-gnu-unique-object --enable-languages=c,c++,objc,obj-c++,java,fortran,ada --enable-java-awt=gtk --disable-dssi --with-java-home=/usr/lib/jvm/java-1.5.0-gcj-1.5.0.0/jre --enable-libgcj-multifile --enable-java-maintainer-mode --with-ecj-jar=/usr/share/java/eclipse-ecj.jar --disable-libjava-multilib --with-ppl --with-cloog --with-tune=generic --with-arch_32=i686 --build=x86_64-redhat-linux Thread model: posix gcc version 4.4.6 20120305 (Red Hat 4.4.6-4) (GCC)
Also make sure you have pulled the latest versions of any of my code using a bzr pull as I do bug fixes as they are reported (there will soon be a more official way of reporting this using the redmine system)
So far today I've had 12 email (and this week about 30) with problems and errors, so I've decided to collate as much wisdom and help as I can here which hopefully will help not only you but also me!
This post is intentionally sarcastic and not aimed at anyone in particular!
RTFEM
A lot of the time the errors are quite easy to spot but you get the blind panic of it not working, first thing you should do is "read the (fine) error message".
In the following example
src/GLWindow.cpp: In member function 'void GLWindow::persp(GLWindow::MODE)':
src/GLWindow.cpp:256: error: expected ',' or ';' before 'm_transformStack'
make: *** [obj/GLWindow.o] Error 1
In this case we can read that there is an error in the file src/GLWindow.cpp at line 256 so I would suggest looking there!

As I'm using (and most of you are) QtCreator we only have to double click on the error message to goto the error. Even better it also underlines it in red! (BTW green underlined usually indicates unused variables so we can remove them as well) and yes in this case I've missed a ;
Now some errors are not as obvious and I will add a list of the common ones as I get sent them at the bottom of this post.
Different Error types
It is important to differentiate between error types. We can roughly split the errors into three categories.
- Compilation errors
- Linker errors
- Runtime errors
Compilation errors are the most common and may be due to many different factors, some can be due to a missing header / include such as
src/main.cpp: In function 'int main(int, char**)':
src/main.cpp:11: error: 'MainWindow' was not declared in this scope
src/main.cpp:11: error: expected `;' before 'w'
src/main.cpp:13: error: 'w' was not declared in this scope
make: *** [obj/main.o] Error 1
In this case we are just missing the #include "MainWindow.h" but the error seems worse, the clue is the "not declared in this scope" which should give you a hint that the compiler doesn't know about something. Another error along the same lines is the following
int main()
{
  std::cout<<"hello world\n";
}
In this case we get the error
1.cpp: In function 'int main()':
1.cpp:3: error: 'cout' is not a member of 'std'
Just because we are missing the #include <iostream>. When you do get these errors this is a good resource for finding out what has gone wrong as is this
Linker errors are harder to find but usually are due to the fact that you don't have the correct libraries installed, the also seem much more scary as they seem to go on forever in some cases
For example the following
clang++ -Wall -g ClearScreen.cpp -o ClearScreen `sdl-config --cflags`
Undefined symbols for architecture x86_64:
  "_SDL_FillRect", referenced from:
      clearScreen(SDL_Surface*, char, char, char) in ClearScreen-vFrFBN.o
  "_SDL_Flip", referenced from:
      clearScreen(SDL_Surface*, char, char, char) in ClearScreen-vFrFBN.o
  "_SDL_Init", referenced from:
      _SDL_main in ClearScreen-vFrFBN.o
  "_SDL_MapRGB", referenced from:
      clearScreen(SDL_Surface*, char, char, char) in ClearScreen-vFrFBN.o
  "_SDL_PollEvent", referenced from:
      _SDL_main in ClearScreen-vFrFBN.o
  "_SDL_Quit", referenced from:
      _SDL_main in ClearScreen-vFrFBN.o
  "_SDL_SetVideoMode", referenced from:
      _SDL_main in ClearScreen-vFrFBN.o
  "_SDL_WM_SetCaption", referenced from:
      _SDL_main in ClearScreen-vFrFBN.o
  "_main", referenced from:
     -u command line option
     (maybe you meant: _SDL_main)
ld: symbol(s) not found for architecture x86_64
clang: error: linker command failed with exit code 1 (use -v to see invocation)
This is due to the fact that the compiler is not using the SDL libs flags "-L/usr/local/lib -lSDLmain -lSDL" Once these are added it usually fixes things. One of the most difficult problems you will encounter is finding which function lives in which lib, again you can google. Or I have a handy shell script
#!/bin/bash
for f in *.a *.so *.dylib
do
  echo "checking for $1 in - $f"
  strings $f | grep $1
done
Which using checkLib.sh glVertex in the directory /usr/lib/ gives
checkLib.sh glVertex | more
checking for glVertex in - libGLEW.a
glVertexAttrib1dNV
glVertexAttrib1dvNV
glVertexAttrib1fNV
glVertexAttrib1fvNV
....
Runtime errors are usually created when we cant find the dynamic libs we need to link to, for example
dyld: Library not loaded: libNGL.1.0.0.dylib
  Referenced from: /Volumes/home/jmacey/teaching/NGL5Demos/SimpleNGL/./SimpleNGL
  Reason: image not found
Trace/BPT trap: 5
Means that the LD_LIBRARY_PATH (actually DYLD on mac) has not been set for the NGL lib (see here)
If in doubt make clean
Sometimes things get out of sync and dependancies are not re-read. The simplest solution is to do a qmake; make clean ; make;l
In QtCreator this is the same as doing a re-build all. You will be surprised how often this solves things (usually to deps not being updated)
Still Stuck do this
If you need to send me some errors, please don't do this

Yes that is an iPhone photo of the error message on my monitor, yes I have had this mailed to me before, and no I can't figure out what is wrong! My eyesight used to be that good but not anymore!
This is not much better
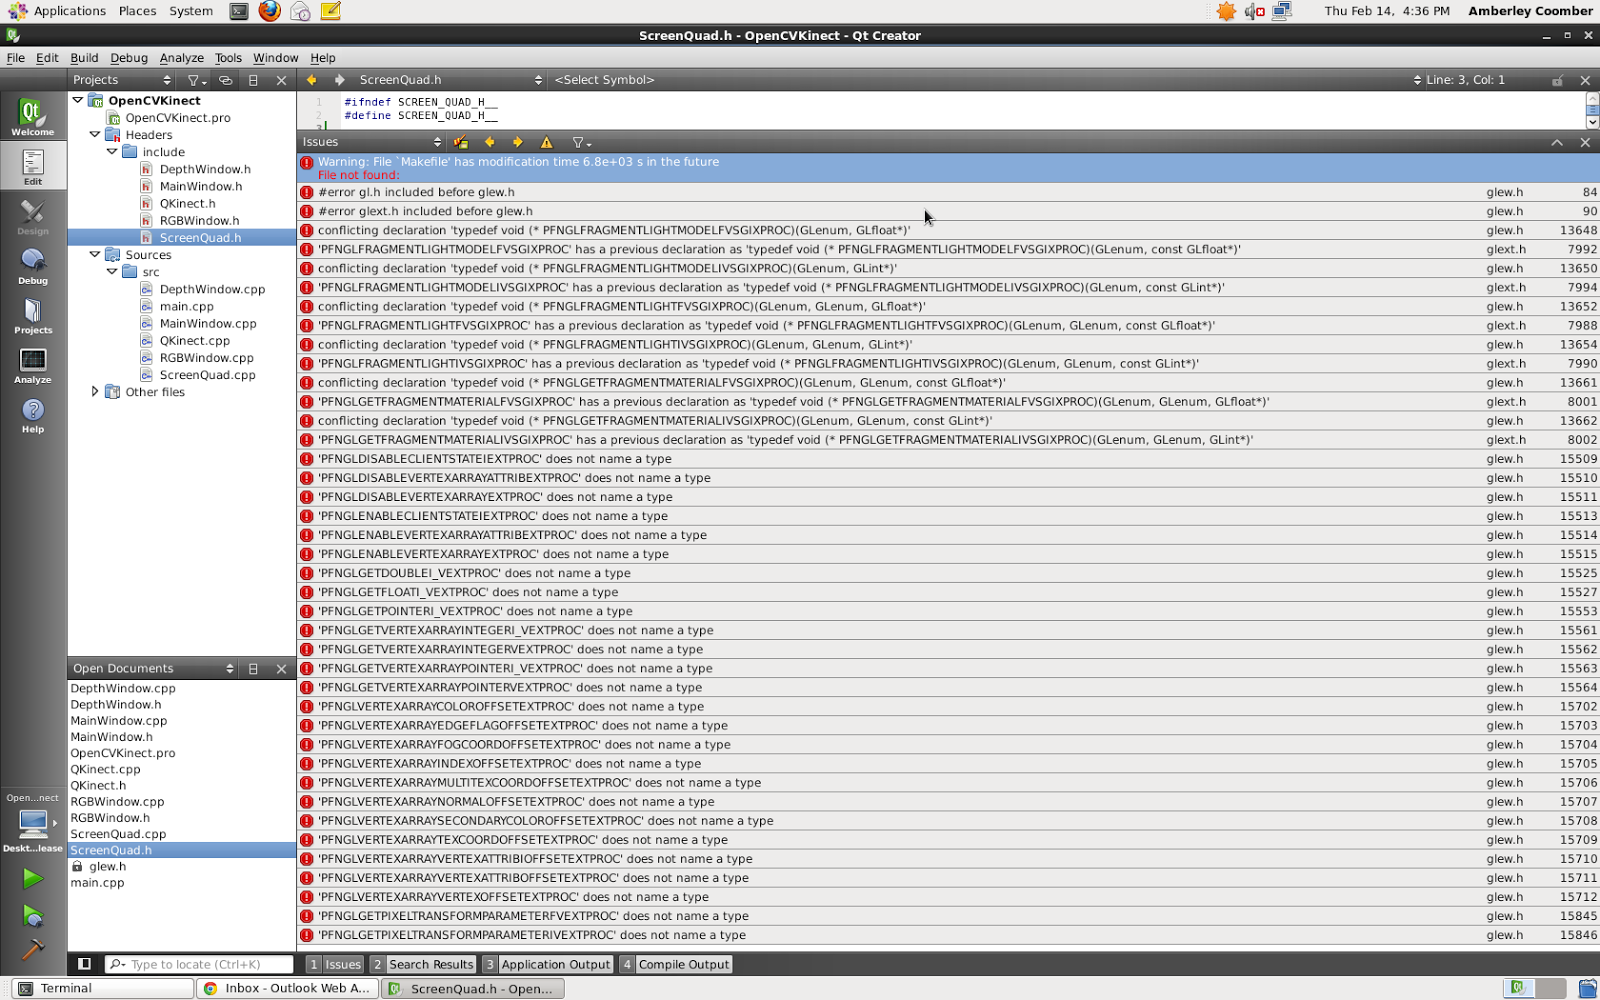
Yes I can see the errors in this one but it still doesn't help much, I really need to see the compiler output / flags as well as the error messages (these are on different tabs on Qt).
The easiest way of sending me errors etc is via plain ASCII text (I'm old fashioned like that ;-) To do this will require a little typing.
cd [your project root]
make &>err.txt
If you do this in the root of the project where the makefile is it will run make and output all of the errors to the file err.txt. Mail it to me as this will then help me to find the errors.
Send me the code
If I ask you to send me the code, I only need the source and other files not the .o and exe. The easiest way of sending this to me is as follows
cd [your project root]
make distclean
cd ..
tar vfcz code.tgz [your project root]
Then mail me the code, it also helps if I have the following information
- Operating System (and version if Mac or Linux)
- Compiler used (use g++ -v or clang -v)
- Graphics Card Make Model and version of OpenGL drivers installed.
- Versions of any extra libs etc you may be using.
clang++ ( Apple clang version 4.0 (tags/Apple/clang-421.0.60) (based on LLVM 3.1svn) Target: x86_64-apple-darwin12.2.0 Thread model: posix)
and the lab build
clang++ -v clang version 3.2 (trunk 163783) Target: x86_64-unknown-linux-gnu Thread model: posix g++ -v Using built-in specs. Target: x86_64-redhat-linux Configured with: ../configure --prefix=/usr --mandir=/usr/share/man --infodir=/usr/share/info --with-bugurl=http://bugzilla.redhat.com/bugzilla --enable-bootstrap --enable-shared --enable-threads=posix --enable-checking=release --with-system-zlib --enable-__cxa_atexit --disable-libunwind-exceptions --enable-gnu-unique-object --enable-languages=c,c++,objc,obj-c++,java,fortran,ada --enable-java-awt=gtk --disable-dssi --with-java-home=/usr/lib/jvm/java-1.5.0-gcj-1.5.0.0/jre --enable-libgcj-multifile --enable-java-maintainer-mode --with-ecj-jar=/usr/share/java/eclipse-ecj.jar --disable-libjava-multilib --with-ppl --with-cloog --with-tune=generic --with-arch_32=i686 --build=x86_64-redhat-linux Thread model: posix gcc version 4.4.6 20120305 (Red Hat 4.4.6-4) (GCC)
Also make sure you have pulled the latest versions of any of my code using a bzr pull as I do bug fixes as they are reported (there will soon be a more official way of reporting this using the redmine system)
Some Common Errors (and Fixes)
I get quite a lot of common errors so I will try and list them hereGLEW Errors
If you get something like this
/usr/include/GL/glew.h:84:2: error: gl.h included before glew.h
#error gl.h included before glew.h
 ^
/usr/include/GL/glew.h:90:2: error: glext.h included before glew.h
#error glext.h included before glew.h
It is due to the GLEW libs not being included properly (you may also get lots of PFNGL..... errors as well) Some of the old versions of my .pro files have a subtle bug in them where the defines are not done correctly check the .pro file and make sure this is correct
linux-g++*{
            DEFINES += LINUX
            LIBS+= -lGLEW
}
linux-clang* {
              DEFINES += LINUX
              LIBS+= -lGLEW
}
xxx does not name a type
Errors such as include/GLWindow.h:50: error: ‘Vector’ in namespace ‘ngl’ does not name a type means that you have either not included the correct header or something is missing. In this case it is due to the fact that ngl::Vector has now been replaced with ngl::Vec3 so you will need to #include <ngl/Vec3.h> and also replace all versions of ngl::Vector with ngl::Vec3
Thursday, 24 January 2013
CA 1 Initial Design General Feedback
This is the general feedback for the CA1 Initial Design in addition to some of the comments here


Class Diagrams
A lot of the class diagrams didn't use standard UML format. This is quite important as I can then see a number of things about the class at a glance. There are more details in my lecture notes but these slides show the main things


I mentioned in a lot of the feedback that you need to show the multiplicity / associations of the classes. This can be done as shown

Associations and Containment
In a lot of the designs there are classes that show some sort of relation, however no mention of a container is shown in the attributes.

In this case we use a filled diamond and it always gives a multiplicity of 1 or 0 .. 1, this implies ownership and when the car is destroyed so it the Engine, this is broadly know as composition.

Aggregation differs from composition as it doesn’t necessarily imply ownership. This is usually implemented by containing a reference to another object where the lifetime is determined elsewhere.
Physics
Those of you that mentioned doing some form of physics need to look at two things. Once getting a time into your program. This can be done easily in Qt using the QTimer classes. There are several NGL demos that use this and you can see how in the code.
The other thing you will need to write is an integrator. If you code is well designed this should be able to be replaced with different types. I suggest starting with a basic Euler integrator then progress to a more stable RK 4 integrator.
If you are not writing your own Physics but need to do some basic physics for a game there are a number of solutions, the labs have both ODE and Bullet installed and there is already an ODE demo for NGL with a bullet one coming soon.
If you are doing a 2D game or a basic 2.5D platform I would suggest Box2D as it is much simpler and more suited to these style of game.
L-Systems
If you are writing an L-System I would suggest reading "The algorithmic beauty of plants". For a general design I would suggest reading in your grammar rules from a text file (you get marks for this anyway). There is a basic parser framework in the lecture code here and you can use boost::tokenize to most of the hard work.
It is also important to only build the grammar up once and create the geometry and store it. As this is a recursive system the generation may be slow and adding in drawing will make this a really slow system once a few iterations are used. The system should only update when a parameter is changed and this should generate geometry to be drawn every frame and not the other way around.
Also start in 2D and generate a simple turtle class, this can later be upgraded to a 3D system once the basic system is working.
Flocking System
One of the hardest problems with a flocking system is managing the communication between the boids. All of the boids need to know where they are in the world as well as have some knowledge of each other. It is possible to use a naive list and check each boid against the others however this will lead to an O(n^2) complexity and slow things down.
For the initials test this will be ok, however it should be factored into the design that at some stage this may become a problem at a later stage.
To get the flock working initially start with the flock centre rule. If you add the position of all the boids and divide by the number of boids this will give you the centroid. You can then calculate the direction vector for the flock centre on a per boid basis.
The other basic rules can then be added. It is also a good idea to add a weight to each of the rules and see the different effects. This can be loaded in a text file (or using a GUI) .
Next Steps
You should have a basic design, re-visit it based on the comments above and see what is missing. Once you have done this you should start to write the classes. I usually create the basic classes so they can be instantiated and connected together. Once this is done start adding the functionality as required.
For a more in detail step by step guide look as the examples from last year here note that some of the data types from these examples have changed but the principles are still the same.
Good luck and if you have any more questions ask me in the lab.
Jon
Thursday, 13 December 2012
Creating a local cmake library install
In one of my previous posts I talked about how to install your own versions of a library when you don't have root access.
In this post I will show you how to install a cmake style project in the same way.
For this example I'm going to use alembic as the target library to build and it will be installed in the directory $(HOME)/
First we will download the alembic source
In this post I will show you how to install a cmake style project in the same way.
For this example I'm going to use alembic as the target library to build and it will be installed in the directory $(HOME)/
First we will download the alembic source
hg clone https://code.google.com/p/alembic/
cd alembic
Now we need to configure cmake to use the correct path for our local install this is done with the -DCMAKE_INSTALL_PREFIX:PATH= command as follows where the = is followed by where you want to install alembic
cmake -DCMAKE_INSTALL_PREFIX:PATH=/home/jmacey/
make -j 4
make install
In the case of the current version of Alembic this will install to the directory alembic-1.1.2
Testing
A simple test program to read alembic files from the command line and write out the contents has been created as follows
#include <Alembic/AbcGeom/All.h>
#include <Alembic/AbcCoreAbstract/All.h>
#include <Alembic/AbcCoreHDF5/All.h>
#include <Alembic/Abc/ErrorHandler.h>
#include <iostream>
#include <cstdlib>


using namespace Alembic::AbcGeom; // Contains Abc, AbcCoreAbstract


int main(int argc, char **argv)
{
  if(argc <2 )
  {
    std::cerr <<"usage Alembic [filename]\n";
    exit(EXIT_FAILURE);
  }

  IArchive  archive( Alembic::AbcCoreHDF5::ReadArchive(),
                          argv[1] );


  std::cout<<"traversing archive for elements\n";
  IObject obj=archive.getTop();
  unsigned int numChildren=obj.getNumChildren();
  std::cout<< "found "<<numChildren<<" children in file\n";

  for(int i=0; i<numChildren; ++i)
  {
    std::cout<<obj.getChildHeader(i).getFullName()<<"\n";
    IObject child(obj,obj.getChildHeader(i).getName());

    std::cout<<"Children "<<child.getNumChildren()<<"\n";
    const MetaData &md = child.getMetaData();
    std::cout<<md.serialize() <<"\n";

    for(int x=0; x<child.getNumChildren(); x++)
    {
      IObject child2(child,child.getChildHeader(x).getName());
      const MetaData &md2 = child2.getMetaData();
      if( IPolyMeshSchema::matches( md2 ) || ISubDSchema::matches( md2 ))
      {
        std::cout<<"Found a mesh "<<child2.getName()<<"\n";

      }
    }
  }

  return EXIT_SUCCESS;
}
To compile this I have created a QMAKE project which sets the paths to point to the correct install of alembic
TARGET=Alembic
DESTDIR=./
CONFIG += console
CONFIG -= app_bundle

SOURCES+=read.cpp
INCLUDEPATH+=/home/jmacey/alembic-1.1.2/include/
INCLUDEPATH+=/usr/local/include/OpenEXR

ALEMBIC_DIR=/home/jmacey/alembic-1.1.2
ALEMBIC_LIB=/home/jmacey/alembic-1.1.2/lib/static

LIBS+= -L$$ALEMBIC_LIB
LIBS+= -lAbcWFObjConvert
LIBS+= -lAlembicAbcCollection
LIBS+= -lAlembicAbcCoreHDF5
LIBS+= -lAlembicAbc
LIBS+= -lAlembicAbcCoreAbstract
LIBS+= -lAlembicAbcGeom
LIBS+= -lAlembicUtil

LIBS+=-lImath
LIBS+=-lHalf
LIBS+=-lIex
LIBS+=-lhdf5
LIBS+=-lhdf5_hl
In the university labs most of these libs will be in the paths but you will need to change the ALEMBIC_DIR to the correct path for your install. Finally the LD_LIBRARY_PATH needed to be amended to point to the correct OpenEXR files by adding the following export LD_LIBRARY_PATH=$LD_LIBRARY_PATH:/usr/local/lib/ to my .bashrc, this may not be needed on your own versions.
Thursday, 29 November 2012
Using NGL with SDL
SDL is a very good library for games development and very useful for cross platform development. In this post I will explain how to install and configure SDL 2.0 (HG) for use with OpenGL and my NGL:: library. The source code can be downloaded using bzr branch http://nccastaff.bournemouth.ac.uk/jmacey/Code/SDLNGL from here
First we need to initialise the SDL video subsystem using the following command
SDL installation
The latest version of SDL handles creating "core profile" OpenGL contexts on mac so this will be required. Earlier version of SDL will not work as they do not support the creation of the correct context for OpenGL under the mac. I decided to do a local install of SDL and if you wish to use this in the Labs at the University you will have to do the same thing as you don't have root permission to install the libs. The process of installation is similar to the one outlined here and I'm going to install the libraries in a directory called $(HOME)/SDL2.0 this is important as the makefile will also use this location to find the sdl2-config script at a later date.
The following commands will download and install the libraries and build it into the correct directory.
mkdir SDL2.0
tar vfxz SDL-2.0.tar.gz
cd SDL-2.0.0-6673/
./configure --prefix=/home/jmacey/SDL2.0 (change to your home dir)
make -j 8
make install
This will install everything into the SDL2 directory and you will have a structure like this
bin include lib shareTo test this is working do the following
cd ~/SDL2.0/bin
./sdl2-config --cflags --libs
-I/Volumes/home/jmacey/SDL2.0/include/SDL2 -D_THREAD_SAFE
-L/Volumes/home/jmacey/SDL2.0/lib -lSDL2
SDL NGL Demo
The demo is split into two main modules. The main.cpp file will create the SDL and OpenGL context, and handle the processing of events. The NGLDraw class will contain all OpenGL setup and drawing routines.
Setup and basic SDL
To use SDL we need to include the <SDL.h> header, this will be placed in the path by the following command in the Qt .pro file.
QMAKE_CXXFLAGS+=$$system($$(HOME)/SDL2.0/bin/sdl2-config  --cflags)
message(output from sdl2-config --cflags added to CXXFLAGS= $$QMAKE_CXXFLAGS)

LIBS+=$$system($$(HOME)/SDL2.0/bin/sdl2-config  --libs)
message(output from sdl2-config --libs added to LIB=$$LIBS)
For more info see this post
First we need to initialise the SDL video subsystem using the following command
// Initialize SDL's Video subsystem
if (SDL_Init(SDL_INIT_VIDEO) < 0 )
{
  // Or die on error
  SDLErrorExit("Unable to initialize SDL");
}
There is also a helper function to exit SDL gracefully
void SDLErrorExit(const std::string &_msg)
{
  std::cerr<<_msg<<"\n";
  std::cerr<<SDL_GetError()<<"\n";
  SDL_Quit();
  exit(EXIT_FAILURE);
}
Next we create the basic window, in this case I get the size of the screen and configure the screen to be centred and half max screen width and height
// now get the size of the display and create a window we need to init the video
SDL_Rect rect;
SDL_GetDisplayBounds(0,&rect);
// now create our window
SDL_Window *window=SDL_CreateWindow("SDLNGL",SDL_WINDOWPOS_CENTERED,SDL_WINDOWPOS_CENTERED,
                         rect.w/2,rect.h/2,
                         SDL_WINDOW_OPENGL | SDL_WINDOW_RESIZABLE);
// check to see if that worked or exit
if (!window)
{
 SDLErrorExit("Unable to create window");
}
Creating an OpenGL context
SDL 2.0 uses a SDL_GLContext to hold the information about the current GL context. There are many flags we need to setup our context and these are handled using the SDL_GL_SetAttribute function. I've also discovered on my linux build that some of these flags don't work and cause crashes (particularly creating a core profile context). To overcome this conditional compilation is used as shown in the following function.
SDL_GLContext createOpenGLContext(SDL_Window *window)
{
  // Request an opengl 3.2 context first we setup our attributes, if you need any
  // more just add them here before the call to create the context
  // SDL doesn't have the ability to choose which profile at this time of writing,
  // but it should default to the core profile
  // for some reason we need this for mac but linux crashes on the latest nvidia drivers
  // under centos
  #ifdef DARWIN
    SDL_GL_SetAttribute(SDL_GL_CONTEXT_MAJOR_VERSION, 3);
    SDL_GL_SetAttribute(SDL_GL_CONTEXT_MINOR_VERSION, 2);
    SDL_GL_SetAttribute(SDL_GL_CONTEXT_PROFILE_MASK, SDL_GL_CONTEXT_PROFILE_CORE);
    SDL_GL_SetAttribute(SDL_GL_ACCELERATED_VISUAL, 1);
  #endif
  // set multi sampling else we get really bad graphics that alias
  SDL_GL_SetAttribute(SDL_GL_MULTISAMPLEBUFFERS, 1);
  SDL_GL_SetAttribute(SDL_GL_MULTISAMPLESAMPLES,4);
  // Turn on double buffering with a 24bit Z buffer.
  // You may need to change this to 16 or 32 for your system
  // on mac up to 32 will work but under linux centos build only 16
  SDL_GL_SetAttribute(SDL_GL_DEPTH_SIZE, 16);
  // enable double buffering (should be on by default)
  SDL_GL_SetAttribute(SDL_GL_DOUBLEBUFFER, 1);
  //
  return SDL_GL_CreateContext(window);

}
Care must be taken with setting the depth size, under mac osx it works with 32 bit, under linux I set to 16 and on some machines 24 will work.
The following code configures the GL context and clears the screen.
SDL_GLContext glContext=createOpenGLContext(window);
if(!glContext)
{
 SDLErrorExit("Problem creating OpenGL context");
}
// make this our current GL context (we can have more than one window but in this case not)
SDL_GL_MakeCurrent(window, glContext);
/* This makes our buffer swap syncronized with the monitor's vertical refresh */
SDL_GL_SetSwapInterval(1);
// now clear the screen and swap whilst NGL inits (which may take time)
glClear(GL_COLOR_BUFFER_BIT);
SDL_GL_SwapWindow(window);
Now this has been done we can use NGL and create our graphics. In this case the NGLDraw class is a re-working of the SimpleNGL demo, it initialises GLEW if required. The following code shows the creation of the NGLDraw class and the key and mouse processing.
NGLDraw ngl;
// resize the ngl to set the screen size and camera stuff
ngl.resize(rect.w,rect.h);
while(!quit)
{

 while ( SDL_PollEvent(&event) )
 {
  switch (event.type)
  {
   // this is the window x being clicked.
   case SDL_QUIT : quit = true; break;
   // process the mouse data by passing it to ngl class
   case SDL_MOUSEMOTION : ngl.mouseMoveEvent(event.motion); break;
   case SDL_MOUSEBUTTONDOWN : ngl.mousePressEvent(event.button); break;
   case SDL_MOUSEBUTTONUP : ngl.mouseReleaseEvent(event.button); break;
   case SDL_MOUSEWHEEL : ngl.wheelEvent(event.wheel);
   // if the window is re-sized pass it to the ngl class to change gl viewport
   // note this is slow as the context is re-create by SDL each time
   case SDL_WINDOWEVENT :
    int w,h;
    // get the new window size
    SDL_GetWindowSize(window,&w,&h);
    ngl.resize(w,h);
   break;

   // now we look for a keydown event
   case SDL_KEYDOWN:
   {
    switch( event.key.keysym.sym )
    {
     // if it's the escape key quit
     case SDLK_ESCAPE :  quit = true; break;
     case SDLK_w : glPolygonMode(GL_FRONT_AND_BACK,GL_LINE); break;
     case SDLK_s : glPolygonMode(GL_FRONT_AND_BACK,GL_FILL); break;
     case SDLK_f :
     SDL_SetWindowFullscreen(window,SDL_TRUE);
     glViewport(0,0,rect.w,rect.h);
     break;

     case SDLK_g : SDL_SetWindowFullscreen(window,SDL_FALSE); break;
     default : break;
    } // end of key process
   } // end of keydown

   default : break;
  } // end of event switch
 } // end of poll events

 // now we draw ngl
 ngl.draw();
 // swap the buffers
 SDL_GL_SwapWindow(window);

}
The most important call here is the SDL_GL_SwapWindow call which tells SDL to swap the buffers and re-draw.
NGLDraw class
Most of the NGLDraw class is basic ngl code, the constructor is used to initialise ngl and create the camera, light and materials. The draw method grabs and instance of the primitives class and draws the teapot, both of which are similar to the Qt NGL demos. The main difference is the processing of the mouse input. I still use the same flags and attributes to store the rotations and position data, however the SDL mouse data is used to grab x,y and button values. This is shown in the following code.void NGLDraw::mouseMoveEvent (const SDL_MouseMotionEvent &_event)
{
if(m_rotate && _event.state &SDL_BUTTON_LMASK)
{
int diffx=_event.x-m_origX;
int diffy=_event.y-m_origY;
m_spinXFace += (float) 0.5f * diffy;
m_spinYFace += (float) 0.5f * diffx;
m_origX = _event.x;
m_origY = _event.y;
this->draw();
}
// right mouse translate code
else if(m_translate && _event.state &SDL_BUTTON_RMASK)
{
int diffX = (int)(_event.x - m_origXPos);
int diffY = (int)(_event.y - m_origYPos);
m_origXPos=_event.x;
m_origYPos=_event.y;
m_modelPos.m_x += INCREMENT * diffX;
m_modelPos.m_y -= INCREMENT * diffY;
this->draw();
}
}
void NGLDraw::mousePressEvent (const SDL_MouseButtonEvent &_event)
{
// this method is called when the mouse button is pressed in this case we
// store the value where the maouse was clicked (x,y) and set the Rotate flag to true
if(_event.button == SDL_BUTTON_LEFT)
{
m_origX = _event.x;
m_origY = _event.y;
m_rotate =true;
}
// right mouse translate mode
else if(_event.button == SDL_BUTTON_RIGHT)
{
m_origXPos = _event.x;
m_origYPos = _event.y;
m_translate=true;
}
}
void NGLDraw::mouseReleaseEvent (const SDL_MouseButtonEvent &_event)
{
// this event is called when the mouse button is released
// we then set Rotate to false
if (_event.button == SDL_BUTTON_LEFT)
{
m_rotate=false;
}
// right mouse translate mode
if (_event.button == SDL_BUTTON_RIGHT)
{
m_translate=false;
}
}
void NGLDraw::wheelEvent(const SDL_MouseWheelEvent &_event)
{
// check the diff of the wheel position (0 means no change)
if(_event.y > 0)
{
m_modelPos.m_z+=ZOOM;
this->draw();
}
else if(_event.y <0 )
{
m_modelPos.m_z-=ZOOM;
this->draw();
}
// check the diff of the wheel position (0 means no change)
if(_event.x > 0)
{
m_modelPos.m_x-=ZOOM;
this->draw();
}
else if(_event.x <0 )
{
m_modelPos.m_x+=ZOOM;
this->draw();
}
}
The rest of the code is fairly self explanatory if you've use NGL before.
Subscribe to:
Posts (Atom)